Photography Series Part III, Night Photography With a Pocket Camera
|
|

By BKKSW
This submission is going to be focused specifically on night photography with a pocket camera (Fuji Finepix F30) and the associated equipment, settings, camera modes, as they apply to landscapes. What this won’t be is an article that shows all
kinds of cool tricks like dragging the taillights of cars driving down the street, exposures longer than a second or two, or any of the things more appropriate for a Digital Single Lens Reflex (DSLR) system rather than a small pocket camera. Small
pocket cameras have come a long ways in regards to their performance, but they are still lightweight small cameras and frankly supporting one properly for extended exposure times would take a tripod that costs more than most owning a pocket camera
would like to spend or for that matter carry around with them. With all that said it should be known that a small pocket camera with exposure modes that allow user input (Aperture Priority, Shutter Priority, Manual) are capable of quite a bit
and we’ll explore some of what they can do.

Let’s talk about some basic camera functions. Shutter speed: Shutter speed is measured in seconds and is the amount of time the shutter remains open after pressing the shutter release and thereby exposes the film / sensor to light.
This is why it’s more “right” to call “shots” “exposures.” When you press the shutter release the shutter opens for the set amount of time exposing the film / sensor to light and then closes. With
a pocket camera like the F30 we should endeavor to keep the shutter speed at 1/60th of a second or faster when hand holding the camera. With a steady practiced hand it’s possible to go slower like 1/20th or 1/10th.. but for nice sharp pictures
let’s try to keep it at 1 / 60th for the wide lens setting and 1/100th for the long lens setting. Aperture: Aperture means an opening. The opening is the center of the lense and this is where the light comes through. To keep this simple
since we’re only using pocket cameras let’s just say that the bigger the opening (F2.8 setting on the F30) the more light comes through. The smaller the opening (F8) the less light comes through. The shutter speed and aperture work
inversely. The bigger the aperture (letting more light in) the faster the shutter speed (giving less time for the light to be in). There is so much more to it than this and understanding the relationship of the shutter speed and aperture in relation
to the film speed or sensor ISO setting and how these setting affect the desired image, so much more that entire books are written on this relationship. A professional photographer who uses the manual mode of his / her camera will be constantly
reading the light with their eyes / camera meter / hand held meter and then adjusting the aperture / shutter speed / aperture along with the focal length, white balance, and some other settings. They do this enough to understand the relationship
in their head, where for most purposes other than very fast moving people / animals they can read the light and make these settings nearly as fast as the automatic mode which uses a CPU inside your camera, and usually a lot more accurately. Eventually
when we get to using DSLR cameras I’ll get a lot more into this, but for now just try to understand what the shutter speed is and what the aperture is. You’ll also need to know ISO for a digital camera which we’ve explained
in prior submissions, but once more ISO refers to the sensitivity (to light) of the sensor. The lower the number (say ISO 100) the less sensitive, the higher the number (say ISO 1600) the more sensitive. This is just like film’s ASA rating,
you’d use ASA 100 in strong daylight, ASA 400 towards dusk or with a flash indoors. ASA 400 is more sensitive to light than ASA 100. This is a very loaded paragraph. Please, read it 4-5 times if necessary to fully understand the basic premises
of shutter speed / aperture / ISO, and if you still don’t understand then please email me with your questions, it’s important you grasp these basic concepts as you’ll find that photography is a lot like math in that each concept
builds on previous concepts.
Next, a few words about supporting the camera. Most of the time we use our cameras in our hands and we become the support. It’s good to get into the habit of tucking in your elbows to your chest / stomach and building a bridge with
your body to hold the camera with. The heavier the camera the more important this is. It’s also good to get into the habit of GENTLY releasing the shutter button vs. mashing it down hard. Both a good hold and gentle release will hold your
camera as steady as possible for a nice clearly focused image. Releasing the shutter uses much the same techniques of releasing a trigger on a firearm. Take a deep breath, half release your breath, brace yourself and the camera, gently squeeze
the release. With practice (lots of it) it’s possible to hold to low shutter speeds hovering around 1 / 30th (one half) of a second. Below that you’ll need a tripod or some other support like a monopod. Tripods and the head of the
tripod can get quite costly, I have several that approach $2000 USD each. This is way too much tripod for our uses. What we want with the F30 or any pocket camera is a $2 (in Singapore they’re $2, in camera stores in western countries more
like $10-$15) table top tripod that is very small (4 inch legs), sturdy, and not more than 3-4 ounces in weight. You can put this in your pocket, fanny pack, or backpack with ease and carry it all the time. Places on top of a steady table, balcony
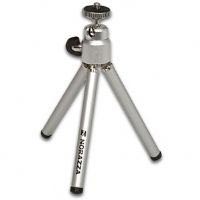
ledge (if you put your camera on a balcony ledge please attach a lanyard for safeties sake), top of a car, or anywhere you can find a steady surface. Below is a picture of a tripod very similar to the one I used for the samples in this submission
and it has 4 inch legs and weighs 3 ounces. It’s always in my backpack and in a pinch will even support a larger DSLR camera. Using a solid support IS THE SECRET to sharp pictures. Using it CORRECTLY is the secret to ultra sharp pictures.
Finally, let’s talk about some exposure modes. Automatic: In automatic mode the camera selects both the aperture and shutter speed for you. On the F30 this results in some very good night shots, albeit not perfect. I’ve added many new night
shots to my F30 sample gallery that you can look at here, all taken in automatic mode: http://www.pbase.combkksw/raw Next lets talk about “Aperture Priority” mode. In this mode
we will manually select the aperture and then the camera will automatically select the appropriate shutter speed. Remember, the smaller the aperture number (i.e. F2.8) the bigger the aperture and the more light it lets in, while the bigger the
aperture number (F8) the smaller the aperture and the less light it lets in. Aperture priority would be appropriate for static (non-moving) subjects such as landscapes and portraits. Shutter priority is the opposite. You set your desired shutter
speed and the camera will automatically select the appropriate aperture. This mode is mostly used for sports, moving cars, anything at all that isn’t sitting still where you want to make sure you freeze motion.. or perhaps stop motion if
that’s your creative goal. Manual mode: This is where you set both the shutter speed and the aperture. The camera won’t help you at all. You measure the light and then set your settings. This really isn’t very hard to do and
later on I’ll be encouraging the more advanced folks who own DSLRs to give up their automatic modes in favor of full manual settings. This is when they’ll see the most improvement in their photography Ok, so this article will focus
mostly on the F30 in aperture priority mode since most of my examples are landscapes and the F30 really isn’t that suitable for effective capture of moving objects save for some exaggerated effects.

We’ll be using Aperture Priority mode, we’ll be selecting the aperture and the camera will choose the shutter speed. This might not be enough to satisfy our creative intent. This is why cameras come with a control called “Exposure
Value Compensation” so you can bias the auto mode of the camera in the direction you want to go. This is read as “EV” and the values are expressed in STOPS of light. Increasing the camera ONE FULL STOP effectively DOUBLES
the light on the sensor. This is a good time to mention that you should look in your camera manual and become familiar with how to set your camera to Aperture Priority and how to add / subtract EV. With the F30 you merely turn the mode dial on
top of the camera to “Av.” For EV you’ll hit the + / – button on the back bottom right and you’ll get the menu to adjust both the aperture and EV values. So, adding ONE STOP of EV doubles the amount of light hitting
the film / sensor.
Another control we’ll want to be familiar with is the WHITE BALANCE setting. As I mentioned in previous submissions light comes in different temperatures which is measured in degrees. Cool leans towards blue, warm leans towards red.
An incandescent light inside your home would be cool and about 2200 degrees Kelvin, daylight neutral and about 5500 degrees Kelvin, and solid shade warm and about 8000 degrees Kelvin. The goal is to make sure the cameras computer is set to the
white balance setting closest to the light we’re using to expose the picture. Have you ever noticed that in some pictures peoples skin tones will look too red or too blue? This is simply a mismatch of white balance. Most of the time we
leave the camera is “Automatic” and this allows the camera to select the white balance automatically by using a white balance sensor. Modern cameras do a pretty good job of this. But once we’re out of the most common types
of light the white balance sensor doesn’t work well and we’ll need to set the white balance values manually. How does this affect our pocket cameras with a night landscape shot? Take a look at the pictures below as I cycled the camera
through five different WB settings. Only one of them was close to being right (shade), but if you look at the other settings you might start to get some ideas on how to use them creatively for the most effect?

By now we’ve learned how to put the camera in “Av” mode, how to attach it to a tripod, how to set that tripod on a steady table (a table no one else is touching or using), and how to adjust the white balance for the colours we’re
after. Now lets talk about adjusting our settings for the best exposure. We’ll discuss aperture first. For the purposes of pocket cameras and landscape photography you’ll want to set your aperture as closed as possible and still
have enough shutter speed to capture a sharp picture. With pocket cameras you’ll notice little difference between F2.8 and F8, the aperture range of the F30. This will be VERY different with an DSLR. All of my examples were taken using
Aperture F2.8. It lets the most light in at F2.8 and we need all the light we can get on the pocket cameras for night photography. I also set the ISO value to ISO 100 and as it got darker ISO 200. This means we had very little grain (noise) in
the image, different from using the automatic mode at night and having the camera select ISO 1600 and getting grainy images. So, F2.8, ISO 100 / 200, white balance to shade, and the camera’s computer was setting the shutter speed for me.
All that’s left for me to adjust is the EV value.
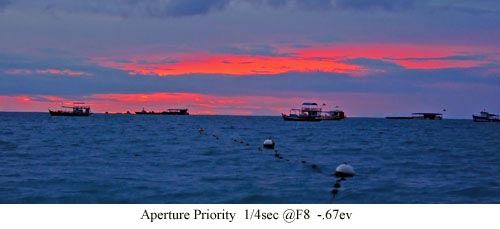
If there is still some light left your first exposure when reviewed will probably be too bright. In this case you’ll add some “negative” EV value (shorter time shutter is open from the standard Av auto setting for the
given light). Look at the series of pictures below, I started at ‘dusk’ with the sun just barely below the horizon and with the EV control in the zero / auto position I took a series of shots while gradually adding negative EV. You
can decide for yourself the most pleasing exposure, for me it was -.67 (negative 2/3s of a stop) EV.


Here’s a secret most professionals don’t even understand. During the first 30-40 minutes that it becomes completely dark, and all your eyes can see is darkness, the camera can still see the colours left by the setting sun. You might have
to leave the shutter open long enough to capture these colours, and the colours won’t always be the same as pollution, smoke, clouds, and other environmental factors affect the colours, but there will be some type of colour there when your
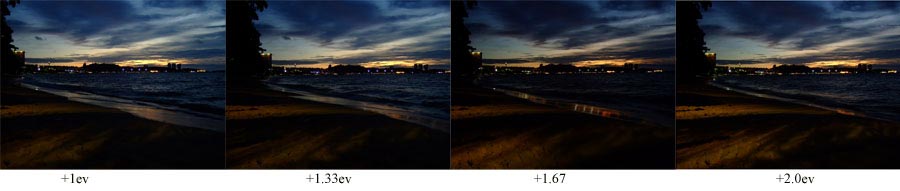
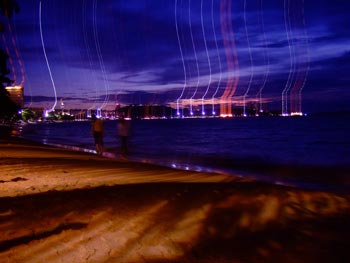
eyes can’t see anything but darkness. When it’s dark you can also start to bring other light into the frame. In the below samples I increased EV (left the shutter open longer) enough so that the street lights were casting an interesting
light on the sand. This is card balancing the lights and this skill can be very complex and can take lots of experience to fully understand. However, with some patience you can just try different settings and then examine your results later and
take note of what you were actually doing. Notice I started this series at +1ev and slowly doubled the light to +2ev while balancing the sky with the street lights for maximum effect. It was dark when I took these pictures, totally black. However,
I’d let 2-3 minutes pass by between each exposure so there would be the same amount of light in the sky (as the sun went further down) but more light appearing in the sand from the street lights.
For now this is enough information to give you some ideas on how to start using your pocket camera for night photography. Actually, it’s quite a lot of information to digest. Depending on feedback we’ll go back over some of this later while also learning more advanced techniques at the same time. Some things I didn’t mention yet. Notice that even with low light in the frames and long exposure times the pictures are still sharp (look at the detail in the sand and of the distant buildings). This is because I used the self timer to trip the shutter and didn’t vibrate the setup by trying to press the shutter release with my finger. This is a very easy control to use on the F30, please refer to your manual. I was sitting in a beach chair with the camera attached to the table top tripod sitting on top of the table and drinking a coke for about 45 minutes to get all these images. A little bit of patience goes a long way.
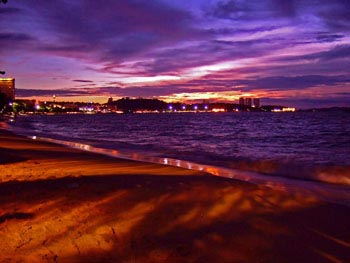
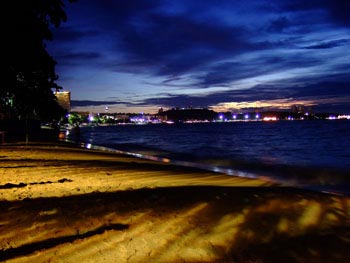
Here are two shots taken in total darkness about 35 minutes after sunset. The only real difference is the white balance setting. I like both versions.
|
|
And this is a shot taken ten minutes into the darkness capturing a rare red part of the light spectrum. ALL of these pics are straight out of the camera and only resized for posting.
You can also play with the camera with longer exposures by “dragging” the bright parts of the frame for effect, in this case the distant lights on the horizon. This might not be the coolest thing to do, but it can be fun and maybe make an
interesting shot.
I hope you’ve enjoyed this submission. My next submission is either going to be on basic composition (what to aim your camera at and why) or a short review on the inexpensive or free image viewers that will allow you to do basic image editing and
resizing so you can email a small picture instead of huge pictures that clog up peoples inboxes. Feedback is appreciated.
Until next time…
Stickman's thoughts:
Excellent!
