Suphanburi Part I/Review, Helicon Filter
![]()
|
• Soechi International Hotel • Grand Mutiara Hotel Sumatra • Inna Muara Hotel • Rocky Plaza Hotel |
We are still accepting (and pleading for) images of children from SEA. No matter how terrible you think they are, please send them in anyway. These images will be used to complete a set of 3 high quality
mosaics which will be sold to benefit the Karen and Burmese Orphans living in the orphanages and refugee camps. The more images the better, I can use all you have. Please take the time to go through your images for anything you think might help.
If you missed the "No Place to Call Home" special, you can click on the link and read more about this. Thank you! QandA@Bkkimages.com
Feature Photograph


Bangkok Skyline
You've heard me talk about the "magical minutes" before. This is the time after sunset when the sky appears dark to the naked eye, where properly exposed you'll find all sorts of color
floating around. Sometimes, as in this case, you'll find the magic colors within 5 minutes of total darkness, sometimes you'll have to keep trying for 30-45 minutes. And once you find the colors you'll need to fine tune the exposure
to take advantage of them.
See the bright reds, the swirls, even the violets and darker purples? Great stuff. And none of it is Photoshop. This is 98% straight from the camera. The other 2% is adding the border and cropping. The magic minutes are very common in SEA skies. You'll
need to develop some patience, scout out the best sites, and generally get the feel for it. But when you do the colors are wild and fun and that, that is significant. Anyone interested in a step by step "how-to" for the magic minutes?


Refinery in Rayong
This is an industrial complex shot. Specifically an oil refinery. The image is a bit underexposed, the sky is very dark, and rain drops are starting to fall. My assignment was to capture an interesting and colorful scene that was both bold and maximized
light. How am I going to do that with this image, have you ever seen anything more drab and boring?
Never say never! Taking the image is only part of your skill set. Another part of your skill set is Photoshop, and the other part is your creativeness. Looking at the above picture I knew it had potential so I sat there staring at it for a few minutes
until my vision was complete. Now I knew how I wanted it to look. And the sun be damned, if the light wouldn't cooperate with me then I'd cooperate with the light!

Edited Refinery Shot

The resulting picture perfectly captured my vision. I created several adjustment layers and started drawing in the light. I wanted a directional light from over my right shoulder hitting the shiny steel towers, and from the same direction hitting the
cranes and bringing out their yellow colors. Another layer helped me bring out the dark greens as if light was actually striking them. One more layer for the light rays on the work truck and sign, and one more for the worker. Notice how the worker
now has blue pants, color in his jacket, the cones are the right color, and his transient is green as it's supposed to be?
101 little things needed to be adjusted to realize my vision. I think it looks pretty good and the quality will stand up to any size of enlargement. This is much better than giving up that day, and possibly more days, waiting for the sun to be perfect
for your vision. Sometimes the right tools work just as well to bring your vision to life.
A Day in Suphanburi
Tom Twee del is a good friend with significant experience in China and has self-published several interesting volumes of his travels in China complete with many great images and informative narrative. Last year he visited Thailand for the first time and I had a great time showing him around the area. Somehow he found time to put together a like 364 page book of his travels around Thailand!
When Tom agreed to become part of our small select product review team I was both excited and grateful. I hope you enjoy this and future reviews by Tom. For those whose plans include extended travel in Thailand and China I’d recommend contacting Tom and inquiring into obtaining copies of his books. Tom Tweedel is an Austin, TX based photographer and can be reached at: tomsds@austin.rr.com
Of all the places in Thailand that I went to take pictures Suphanburi was by far my favorite. The place Suphanburi is a small city (probably around 30K) with lots of charm. It was a very average Thai city and give me a real taste of what Thailand outside
of Bangkok is like.
The Town Square

This seemed to be one of the major intersections in town. At least where the highway ran through. Actually in some respects it was more like the edge of town. This was were the higher density development started. By Asian standards it’s
not too dense and this was not a big place. By US standards it would be a small city and the development is much more concentrated.
The Canal

There was a large canal that ran through town. I was kind of surprise to see a family swimming in it. Dad was in there with the kids while mom was under a tree reading a book. They looked like they were having a good time.
The Auto Section
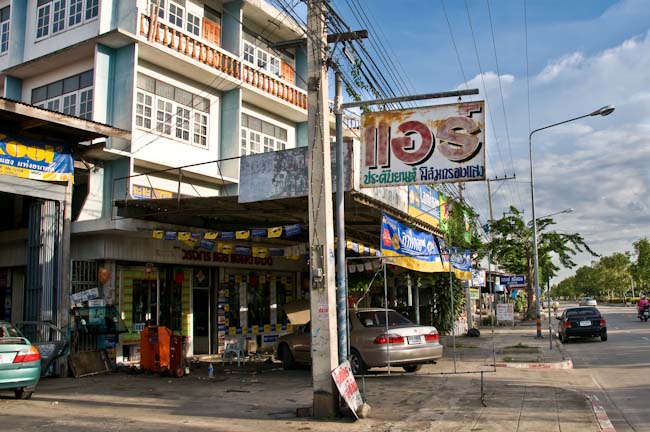
At the time I was wandering around most of the business had closed for the day. So I was walking along a wide and mostly empty street. Businesses seemed to be grouped together and this section contained the car repair and maintenance businesses. I saw
body shops, tire stores, oil and car wash shops and more. By western standards the stuff was packed in pretty tight but there was still room to breathe. Walking along in the humidity and fading sun really reminded me of walking along cities on
the Texas coast. It had a similar feel which was strangely comfortable and not exotic.
Canal Street

I have no idea what the real name of the street was but I called it Canal street. The reason for that is that canal the people were swimming in ran right down the middle. It was actually a divided street, two one way roads with a very wide median between.
The median was nice. It had the canal in the middle and well manicured bushes on either side. The bushes were home to a large (3 ft +) lizard of some variety. I chased him for a while but couldn’t get a picture of.
Convenience Store

This store was very typical of small family run businesses in Thailand. They sell some of the basics of daily life like bottled water and snacks. There are often several of these per block. Some are pretty nice, some are pretty run down. The more upscale
ones become 7-11’s.
Field of Roosters

It seems that some Thai towns have mascots. Suphanburi’s was the rooster. Why I don’t know but it was a popular mascot. All along the roads around town they had shops selling rooster statues. Then I arrived at another open public area and
it was FILLED with roosters. All sizes, row after row of roosters. There were a few little elephants but roosters ruled that roost.
A Block in Suphunburi

This was a typical block in Suphunburi along one of the main roads. For the most part it was unremarkable though the place had its charm. It was a typical road with crazy motosais, shops and restaurants.
Interesting Building

Suphanburi was home to a couple of interesting structures, more than a few temples and an interesting building or two. This one caught my eye as I was walking along. I think it is a museum of some kind.
Grounds of the Temple

There were a couple of temples in town. They were distinctive in structure and in the possession of the crematorium smokestack. I wandered through one that was a bit less walled off than others. It had a large parking/meeting area in the center and the
structures around it.
There were some monks in their orange robes taking care of business. I saw one monk come back with a couple of plastic bags full of groceries. As he walked into the temple grounds he was happily greeted by some of the stray dogs. You could tell who was
feeding them.
The River Walk

I wandered down smaller and smaller alleys until I reached what appeared to be the end of the road. What I found at the end was a delightful surprise. There was a river that ran through town and along the length of the river on one side was a boardwalk.
I was surprised to see such an extensive piece of public works in a small town. This place wasn’t big or especially popular but it had a longer river walk than cities 10x its size.
The River Walk Up Close

It was about 20-30 feet wide and made of cement and about 4 feet above the river. It was divided into two sections separated by elevation. The lower section on the river bank side was for scooters and bikes. The higher section which was on the river side
was for pedestrian use. There were people out on the walk for an evening stroll. Most of them middle aged to elderly. There were a few young men out, most of them were fishing. It was a great place to come for an evening walk or morning jog.
Living Next to the River
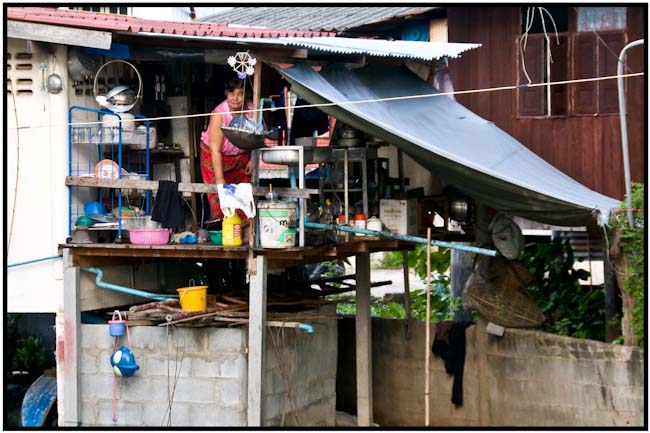
This house was built up to the edge and still had parts of it on stilts over the river. Some of life was still conducted as it had been out on the porch and in the river.
Living on the River

As I was walking along the river I attracted the attention of some kids living in a boat on the other side of the river. They waved at me long enough to get a shot of them. They seemed to be having a good time on the house boat.
Traditional Thai House

It was hard to find some “traditional” housing but there was a great example on the other side of the river in the center of town.
Row Boats on the River

There were still a number of traditional row boats on the river.
Downtown Market

Roaming down the riverwalk I found a lively market downtown. This is where a lot of people went to do their daily shopping. I spent some time wandering around.
Flower Vendor

Flowers seemed to be a popular item. The chains of flowers hanging on the rack to the right are actually intended for vehicular use. They make the vehicles smell better and are supposed to bring about blessing and good luck. With traffic the way it is
you need all the luck you can get.
Hammy Fruit Vendor

This guy put on the pose when I took a picture of him and his selection of exotic fruits.
Smiling People

A lot of people smiled when I pointed the camera their way, including this group of meat vendors. They were very friendly, or maybe I just looked silly.
Ariel Antennae

After picking my way through the market I found a bridge that arched up over the river to the other side of town. I went halfway up and found I could get a better vantage point on the town I noticed that there were a whole lot of aerial antennae. Guess
there are a lot of TV’s.
Looking Back on the Market

From the bridge you could see the market as a whole. It was mostly perched along the boardwalk.
Next Time
Suphanburi by Night…
Review, Helicon Filter
Introduction
The good folks at Helicon Soft Ltd were generous enough a few months back to send us some of their feature software products for review. Last month Craig Lamson reviewed (a product of great interest to professionals and advanced amateurs Helicon Focus and its yet to be released companion product Helicon Remote. Those of us here at Bangkok Images were so
impressed with this one of a kind product we decided to take a closer look at one of the other products they sent us. Helicon Filter . I'm glad we did.
The name "Filter" is a bit deceiving. With image software this normally refers to a single purpose filter such as a black and white filter, a contrast filter, or some type of special effect filter.
Helicon Filter is much more. Helicon Filter is a complete imaging solution from your base file to it's final intended use. It features a full array of advanced level features in a user interface (UI) my grandmother could easily use and my
grandmother has never used a computer in her life! This product is designed to allow you to easily manipulate professional features with a bare minimum level of computer or photography skills. Have I caught your attention?
Digital photography is huge. Who hasn't noticed that virtually everyone, from school age children to active seniors, has one of the many digital cameras which has defined an era? Ten years ago a digital point and shoot compact was an expensive specialty
item. Today there are hundreds on the market at any one time and you can find them in any store at very reasonable prices. As digital compacts became affordable and their image quality increased, one important aspect of digital photography remained
elusive. A comprehensive software application that even a novice computer operator can use with relative ease. Now this void has been filled. Helicon Filter steps up and if they didn't hit a home run, they've certainly hit a solid triple.
Helicon Filter walks you step by step through the process of connecting your camera to the computer, downloading your images, and processing those images for their intended use. You can email, send via your mobile phone, print, save, or save the image
to any storage device. The processing step is where Helicon Filter stands at the front of the pack. They make common and advanced features very easy to use. You can adjust for underexposure, remove redeye, fix a blemish, add a fancy 3D frame,
resize, sharpen, or just about anything most professionals do. And it helps you do these things by walking your through the process step by step in a series of guided frames (filters) with a brilliant 'help' function active and accessible.
Enough talking, lets process an image together and I'll take you through each processing filter in detail and you can see for yourself.
Enter the Darkroom
SOURCE

In the example above you can see the Helicon Filter UI (user interface). It has the standard menu items along the very top, easy to use icons on the next line, and below that you can see the filter topics. At the bottom there is a active help system which
will automatically explain each function as you're using that function.
You start in the 'Source' filter. This is where you'll import your images or select an image already stored on your computer. Over on the right you can click on a folder tree icon to open/close
the folder tree. You can see the folder tree of my workstation open, the folder I selected, and to the immediate left thumbnail images from inside that folder. Click on the image you want to process.
BRIGHTNESS

In the 'Brightness' filter you can adjust the brightness level, contrast, highlights and shadows, and different levels. All the available choices are in the menu to the right. See the last box
you can check labeled "Exposure Highlights?" If you check this box any area(s) which turns red are overexposed, and any areas which turn blue are possibly underexposed. With this image you can
see the young woman's hair has some areas of underexposure highlighted in blue. Uncheck the box and the blue/red warnings go away.
Below the image is the help area. As you click on a function, say contrast or in this case Exposure Warnings, the associated help topic will appear in an easy to read and understand format. Examples are provided as appropriate. See the triple place line
immediately underneath the image? You can grab this line with your cursor and move the cursor up/down to increase/decrease the image area while decreasing/increasing the help area. This function is smooth and quick.
COLORS

The next frame (filter) is where you adjust or change your colors. This is where you can easily adjust your white balance to make the skin tones accurate, equalize colors that might be out of whack, or in this case select one of the style filters that
simulate a corresponding type of black and white film. See the menu open in the bottom right? Here you can see where I selected the Tri-Max Kodak film filter. Tri-max is a very nice black and white film from Kodak. It lends itself nicely to the
look I'm envisioning for this wedding portrait.
NOISE

In the next frame (filter) we have a selection of tools to help us easily rid the image of the common noise which is best likened to film grain. When our digital cameras choose a higher ISO to match the lighting conditions light to heavy 'noise'
is often the result. Our goal in noise removal is to remove as much noise as possible while leaving as much detail as possible. Most other products make finding this balancing point very hard to find. Helicon Filter makes it easy.
By clicking the cursor on a part of the image you want to compare noise/detail, a 200% loupe appears to help you see the finer points. Make your adjustments in the menu on the right while observing the loupe. The process couldn't be easier. If you're
not sure which adjustment slider to start with or what it does, just place your cursor over the slider and the active help function will explain it to you in the help pane below the image.
Have you noticed the tool wizard popping up in the right top part of the image review area? For more help or explanation click on the wizard.
SHARPENING

All consumer digital cameras incorporate a anti-aliasing filter in front of the digital sensor. This filter slightly softens the image, sometimes if the filter is exceptionally strong the images will be significantly soft. To negate the softness induced
by the anti-aliasing filter we use sharpening tools. Helicon Filter includes a strong suite of sharpening tools.
Your goal is to sharpen the image as much as possible while inducing as few artifacts (small image defects) and halos as possible. Once again the 200% is very handy for taking a close look at certain parts of the image while adjusting the sharpening sliders
on the right. And again, active help is automatic and available in the reading pane below the image.
ABERRATION

All lenses induce some level of aberrations and sometimes these can be quite noticeable. Eliminating these aberrations can be difficult and tricky and many imaging software products don't include these capabilities. Helicon Filter makes the removal
of aberrations quick and easy.
Use the 200% loupe to take a close look at shiny jewelry or light colored objects with a strong backlight. Aberrations will become visible in these areas as a sort of 'purple fringe', and the color can vary depending on other factors. The sliders
on the menu to the right makes removal quick and easy while the active help in the reading pane explains any questions you may have.
DISTORTIONS

Every image will have some amount of distortion. Like aberrations distortion is primarily a function of lens quality and to a lesser extent sensor design. Inexpensive lenses commonly found on digital compacts will often contain an objectionable amount
of barrel or pincushion distortion. In addition perspective distortion and vignetting can also be problematic.
Once again Helicon Filter makes correction of these issues quick and easy. Make your adjustments using the sliders on the menu to the right, and if you have any questions observe the reading pane where the active help will be following along with the
information you need.
RESIZE

How many times has someone sent you a full size image, or better yet 8-9 full size images, without realizing how large they were? So often we can watch our email downloading for what seems like ages as these large files fill our mailboxes. Resizing images
can be easy, or it can be difficult. Helicon Filter makes it easy. And lets not forget that we resize for a number of reasons. Sometimes we want a small image suitable for posting on the web, to fit on a certain print size, and even to send via
our mobile phone
This is also where you'll crop your image to taste. Helicon Filter allows you to crop while maintaining the aspect ratio, or not. It also allows you to set your desired print size and then maintains the appropriate aspect ratio to produce border
free prints. Make your adjustments using the sliders on the menu to the right and if you have any questions you'll find the answers in the reading pane below the image.
FRAMES

Everybody likes an attractive frame! And software that allows for attractive and easy framing runs the gamut from inexpensive to very pricey. And you usually get what you pay for. Until now. Helicon Filter allows you to add attractive frames and place
text captions with ease. You really get a lot of choice with this package and the ability to import border textures and adjust each component of the frame to your taste. I found myself having fun playing with the different possibilities. Do you
like the frame I designed for this image? Using the active help section in the reading pane I walked myself through it in about 2 minutes.
RETOUCHING

There are 1001 reasons we'd want to retouch an image. Flash induced red-eye, facial blemishes, sensor dust, or maybe we just didn't like the sky. Maybe we want to clone out an offending power wire. The fact is retouching is often needed and
many find the necessary skills elusive.
Helicon Filter allows us to easily accomplish the most common retouching chores, and even some of the advanced. Removing that pimple, cloning out the food stain, or even blotting out personal information like a license plate number becomes easier than
ever before. And all while being guided by the active help system in the reading pane.
SAVE

Ultimately we'll want to do something with our images. We'll want to save them for another time, send them to friends via email, zap one to your spouse on your mobile phone, or possibly make a print. Whatever you'll be wanting to do, Helicon
Filter makes it possible.
Printing

The print function is simple. And yes, it's guided by the active help feature in the reading pane (thought you'd never ask..;o). Selecting the paper size, how you want it to fill the paper, image position, it's all simple and fast.
Send to Phone

Sending to your mobile phone couldn't be easier. You can even attach text and/or make the image accessible to a public network like Flickr or most other image sites.
CONCLUSION

The popular adage "Use the right tool for the right job" stands out here. I have no illusions professional photographers and amateurs who have already invested a considerable amount of time will
be tempted by Helicon Filter. And of course Photoshop has many more functions necessary for the professional and many amateurs.
However, there are scores of individuals every day who have just purchased their first digital camera, or perhaps their 5-6th digital camera, and have just never been interested in spending the time or money required for more complicated/involved software.
If I had a nickel for every time I've had someone tell me how inadequate the software is that came with their camera, or who paid big money for a popular professional product and found it was too much for them.. then I'd be rich.
Helicon Filter isn't perfect, and any single function isn't performed any better than most other programs and worse than some. But these differences are small. What Helicon Filter does do, is it takes you through the processing steps in a logical
and easy manner, and it does this in a way anyone can understand. And it does it while always explaining each slider/function in the reading pane. You don't have to remember if you're doing things it the proper order because Helicon
Filter is walking you through the steps one by one and you can see where you are, and where you should be, in the graphic representation above the image.
And it does all of this for $60. $75 for the Helicon Filter Pro version which includes support for multiple processors and includes a plug-in for Adobe Photoshop, Corel Paint Shop Pro, and other programs.
Who is this product perfect for? As a professional I require more capability. However, while I was working on this sample image in Helicon Filter and making my screen captures I noticed my wife was watching. She loves her point and shoot digital compact
and I get stuck doing most of her processing. She can get the images from her camera to her computer, but beyond that her capabilities are limited and she's not interested investing a great amount of time or money into learning the sort of
software I use. She couldn't take her eyes off the screen. When I finished the image she said "so easy to use! Can you put it on my computer?" In the time it took me to write this short review she's already emailed and SMSd me a dozen images she's processed and I fear I'll soon have to block her email address.. ;o)
LATE UPDATE: I discovered there is a color management issue with Helicon Filter 4.93. This would never be noticeable (or significant) for users who don't have color profiled monitors. It will be noticeable for users who do have color profiled monitors. I've discussed this with Helicon Soft ltd and they assure me the issue has been addressed in their soon to be released Version 5.0 which I will review and update immediately upon its release.
Photography News of Interest
Sony announces the DSLR-A850, a full-frame DSLR for under $2000 USD! This just keeps getting better for consumers, and Sony is leading the feature vs. price wars. The DSLR-A850 feature
wise, is very close to their flagship A900. The main differences are a slower frame rate (3fps vs. 5fps) and a smaller viewfinder magnification (98% vs. 100%). If you own Sony lenses, or older Minolta lenses, this might make for a very tempting
upgrade! You can read about it here.
Sony also announces some other new DSLRs, the DSLR-A550 and DSLR-A500. These are consumer level entry range models, but they offer
a great feature vs. value set. Check them out here. AND they're announced a new 28-75 F2.8 SAM lens which will
be significantly less expensive than their flagship Carl Zeiss lenses. You can check out the lens announcement here.
Leica, in a weeks time, will reveal their next generation of Leica Cameras. Stay tuned for the announcement next week. Watch the Utube sample here.
Olympus announces their new E-600. This is a lower cost version of the E-620. The E-600 will have 12mp's, cost $600, and comes with a 28-84mm F3.5/5.6 kit lens. You can read more about the E-600 here.
The Detroit Museum will be displaying some of the most rare photographs. The exhibit should be spectacular. These early genre images will be a lot of fun to look at. You can learn more about this show here.
Canon announces the 7D! The new 7D competes directly with Nikon's excellent D300S, and then takes it several steps further.
18mp's, ISO 50-12,800, 8fps, HD 1080p video, 4 processors, 1.0x viewfinder magnification with 100% coverage, new CMOS design, impressive weather sealing, new Autofocus system with 19 cross type sensors, new exposure system, 920,000 pixel
3" LCD, and wireless flash control built in! This is a professional APS-C sensor size DSLR! You can read the specifications here, or the hands on review here.
Canon's first lens with it's new Hybrid Image Stabilization is the EF 100mm F2.8L Macro and this promises to be a legendary macro lens. You can read more about it here.
Canon also announces two new EF-S lenses, the 15-85mm F3.5-5.6 IS USM, and the new 18-135mm F3.5-5.6 IS USM. Both include 4 stop
image stabilizers. These look to be high quality affordable lenses. Read about them here.
Readers Submissions
Steve – Here is a series of images from my recent trip to Poland
MTS International

This elderly gentleman in a horse drawn carriage in front of the Royal Castle in Old Town Warsaw, Poland caught my attention for nothing more than his tiding up his carriage for his next customer.

The Royal Castle in Old Town, Warsaw, Poland sits at the Castle Square of Old Town Warsaw, Poland which was almost completely destroyed during WWII. The Royal Castle was once the official residence of the Polish Monarchs. The personal offices of the king and the administrative offices of the Royal Court of Poland were located there from the 16th century until the Partitions of Poland. In its long history the Royal Castle was repeatedly devastated and plundered by Swedish, Brandenburgian, German, and Russian armies. The Constitution of May 3, 1791, Europe's first modern codified national constitution, as well as the second-oldest national constitution in the world, was drafted here by the Four-Year Sejm. In the 19th century, after the collapse of the November Uprising, it was used as an administrative center by the Tsar. Between 1926 and World War II the palace was the seat of the Polish president, Ignacy Mościcki. After the devastation of World War II it was rebuilt and reconstructed. Today it is a historical and national monument, and is listed as a national museum.
The tiles and brick on this Royal Castle are of the same color and when the sun is shinning on them, they are a bright red clay color. Very impressive.

Mushroom Pizza bread, a draft Zywiec beer, and a lemonade at an outdoor café on this warm August afternoon in Old Town Warsaw, Poland.

The Krzywy Domek or better known as “The Crooked House” located at the walking street of Bohaterów Monte Cassino in Sopot, Poland on the Baltic Sea is the most photographed building in Poland so how could I not take a picture of this “Crooked House” also.

Nice modern home in Gdynia, Poland about 100 meters off the Baltic Sea.

One of the walking streets in the historic Old Town area of the port town of Gdansk. The mix of the colors of the walls of the buildings with the brick fascia was a nice mix.

Fruit stand with dried sunflowers, corn, cucumbers and other fruits/vegetables being sold in “Old Town” Gdansk.

More of the brick fascia, street side eateries, and pedestrians on a closed to traffic walking street in “Old Town” Gdansk. I believe the Gothic-style building in the for distance center of the picture is the Town Hall and the 82 meter tower
on Dlugi Targ.

This is one of the multiple steeples of the largest brick built church in the world the Mariacki (St. Mary’s) Church in Gdansk, Poland. It was build in the 14th -15th centuries and is also the largest place of worship ion Poland.

(see 9426 above)

Homes along the Motlawa River in Gdansk, Poland.

Homes and a ship along the Motlawa river in Gdansk, Poland. The billowy clouds are what caught my attention though.

I believe this might be an attached building to the Mariacki (St. Mary’s) Church in Gdansk, Poland. The colors and the Hanseatic architecture were impressive.

I can not recall if this is part of St. Mary’s Church or not. It is in Gdansk though.


Street side food vendors in Gdansk. The foods all looked so good….. and they were.

St Mary’s Church again along with the the colors and curves of the surrounding buildings and the angles of roof tops all captured my attention.

Gdansk, Poland. Not sure what the building is. I just liked the way it looked with the gold, the windows, and the various statues and animals depicted above the doorway and in the walls of the building.


These pictures were of building rooftops and the central plaza at sunset in the Old Town Square of Opole, Poland.

Palace of Culture and Science is the defining landmark of Warsaw, Poland. It was commissioned by Stalin as a gift of the Soviet people, was completed in 1955, towers at just over 231 meters, was built with an estimated 40 million bricks, and is the tallest
and largest structure in Poland.
MTS International –
Thank you! Fantastic look at Poland! Very nice work.
Steve
Hello Steve,
Look at these photos, the first was taken last year and the second this year. Without knowing i photographed the same little boy last year and this year also.


Charles
Charles –
This is a great coincidence! This is one of the simple rewards of photography and an unexpected pleasure.
Steve
I suspect the readers submissions will be a highly anticipated section of this column and I encourage anyone with photographs and travel accounts theyd like to share to please send them to me at: QandA@Bkkimages.com
Readers Questions
Hi Steve,
Here is a question for your column. Real situation!
My best mate's wife has asked me to take her "pregnant photos". Huh, I thought to myself! I have never photographed a pregnant girl before and was wondering what I should be aware of. I know this is a somewhat ambiguous question but this
really is new to me – and it is important to her so I want to get it right!
Cheers,
Stick
Stick –
This is one of the single most difficult challenges for a photographer. This is an area where your technical skills need to be superb, and your people skills better. This is not an assignment to take without due consideration and I mean this as a caution.
Technically you need to determine what type of images the lady wants. Hopefully (and usually) she'll show you something she's seen in a magazine or book so you'll have some ideal. Otherwise, you'll need to show her samples and see
what she wants, and she probably won't know until she sees it. Needless to say pregnant women should be given exactly what the desire.
Almost all work of pregnant women involves some degree of nudity. They want to record their changes during this time. Some will be happy with a shirt pulled up over their belly, some will want the Demi Moore Vanity Fair treatment (very popular, I've
done a few dozen of these). Because there is nudity involved, and at a time in a woman's life where she'll often feel her least attractive and most vulnerable, you'll need all your people skills. Be direct but respectful, and don’t
leave anything that could surprise her during the shoot and spoil her mood.
Often the woman wants the husband to pose with her. Some experience with 'couple' photography is desirable. Now you're dealing with a man who is 100x more sensitive about the way he looks in such a situation as is a woman, especially if
nudity is involved. A common pose might have the man without a shirt, and the woman leaning with her back against his chest with both holding an exposed belly.. or some variation of.
Choose a quiet location. You'll have to work hard to set the proper mood, and remember that 'mood' defines this sort of portrait. The physical changes will be obvious and easy to emphasize, but the 'mood' you'll need to develop
and in a way conjure. This will take all of your people skills.
Meet with the couple before hand to discuss the shoot. It's helpful if you can decide on the poses ahead of time. If you were a professional you'd have portfolios, pose books, and a subscription to several photography/art magazines which will
be very helpful. Talk about their desires for showing her changes, if he'll pose with her, the setting, if other children might be part of the portrait as well. This sort of portrait is either a highly individual portrait, or a family affair.
Find out what the woman wants. Occasionally the man will do all the talking, if this is the case engage the woman directly.
Once you know these things you can move on to selecting the setting, what lighting style the setting dictates, and what lens and light combination will achieve the mood you're after.
At this point in the information gathering I could give specific advice on which lighting, lens, settings, and the such.. but as you can see there is much to consider.
Good on you for accepting such a challenging assignment! I look forward to seeing the results.
Steve
Please submit your questions to QandA@Bkkimages.com All questions will be answered and most will show up in the weekly column.
A Snapshot of Bangkok Images Week in Review
This has been an absolutely ambiguous month for me! My home and offices have been undergoing a major renovation and the time and stress involved with living in a construction zone, not to mention dealing with Thai workers for such a lengthy period, can
cause .. what's a nice way to put this.. undue stress?
On the positive side everything has turned out great! I finally have proper electricity for my gear. The lighting, blinds, and even the addition of an 18% grey table top for my monitors has really helped stabilize how I'm seeing the color on my monitor.
We've also built and are currently testing a fantastic new workstation. I'll go over this more in depth in the future once it runs for a month or so with 100% reliability. Professional photographers need that 100% and I was careful to design
and source the parts for this workstation with that in mind.
I've also started sourcing the parts to build my own fileserver. More on this later. I can't wait to have 16-24tb (that's terabytes folks) on hand for my storage and server needs.
I'm gearing up for what I hope will be a much improved high-season. There are many indications from my friends in the hotel and hospitality industry pointing towards much improvement. If hotel bookings in 5-star hotels are any indication of what
the high-season will bring, we'll be doing just fine in a few months.
Infocus Blog
The Right Tool for the Right Job
In Stick's last weekly (http://www.stickmanweekly.com/StickmanBangkokWeeklyColumn2009/NickNostitz.htm) he interviewed Thailand's most adventurous
photojournalist Nick Nostitz which I read with great interest. I always find it fascinating to read how others think and feel about their work in a related field.
A few paragraphs jumped out as germane to this particular column and I thought I'd share them with the readers.
""As far as the photography goes, I understand you only recently moved to digital. What prompted you to do that and how do you find it?
I didn't really move to digital. I use digital but I still love film. When my Contax G2 broke in late August 2008 I had to buy a digital and for that subject matter digital is ideal.""
This answer is very well put. I'd go so far as to say they reflect my own feelings. Digital is ideal for a photojournalist, but if it were me I'd certainly send in my Contax G2 for a refurbishing. Heck, I've got all my old Olympus OM gear
refurbished and sitting in my "cabinet of fame" where I can touch and play with them once in a while. Sometimes I even take pictures with them.. ;o)
"" Why?
It is fast. When I shoot this sort of news on film, I have to get films developed, I have to scan the films and then I have to Photoshop each image for at least half an hour. Digital I just put it in the computer, spend at most 10 minutes in Photoshop
and save a lot of time and money.""
Very true! Not only that, but many PJ's have rigged up devices so their images with voice comments are sent in real time as you cover an event. Depending on what you're covering and who you work for, such requirements aren't unusual.
"" What sort of digital camera did you get?
I have used up two Canon EOS 450 bodies. I bought them because they are the cheapest 12 megapixel camera available. I cannot afford the proper professional models. I bought a Sigma 18 – 55 lens 2.8 throughout because the quality is much better than the
kit lens. Then in the Songkran riots, early morning at Din Daeng just after the military attack, my camera broke and I was lucky that I found the only open store that day, which was only open for an hour or so and I got myself a replacement, another
EOS 450, and continued straight away. And 4 days ago that body broke as well and I bought a EOS 500D which I hope lasts a bit longer. Unfortunately, I need the image quality of 12 or 15 megapixels but I can't afford a quality built professional
camera.""
I've said over and over again in this column that a relatively inexpensive camera may be all you need and this illustrates that point very well. The Canon EOS "Rebel" bodies are small for DSLRs, relatively fast handling, and very capable.
Their new T1i is quite the camera and even includes a excellent video mode. I'm curious how an experienced PJ like Nick Nostitz will put that video to use? Will he find it useful? Will it change his style? Will it lead to him carrying a more
capable video camera as a matter of routine? Perhaps we'll find out in his next interview. It's also interesting how when working with an inexpensive body in a professional capacity that "rapid replacement" proves to be a real
advantage.
" You've showed me some shots you have done over the years and they were great.
That I continue shooting in film because film has some very strong, I can blow up the prints much larger and speed is not the deciding factor which it is in covering the protests. I also think the creative possibilities with film are better than with
digital."
I suppose we could hash over both the enlargement and "creative possibilities" statements, when I first moved to digital after decades with film I felt much the same. I'm very interested if
he'll still hold the same views by the time his next interview comes about?
Great interview Stick! A very interesting look into the working life of a successful photojournalist. I enjoyed this very much.
Until next time..
