Death Railway Museum/Bracing The Camera
![]()
|
• Flamenco Beach Resort • Ramada Ras Sudr Resort • Sheraton Soma Bay Resort • Morgenland Hotel St Catherine |
Feature Photograph
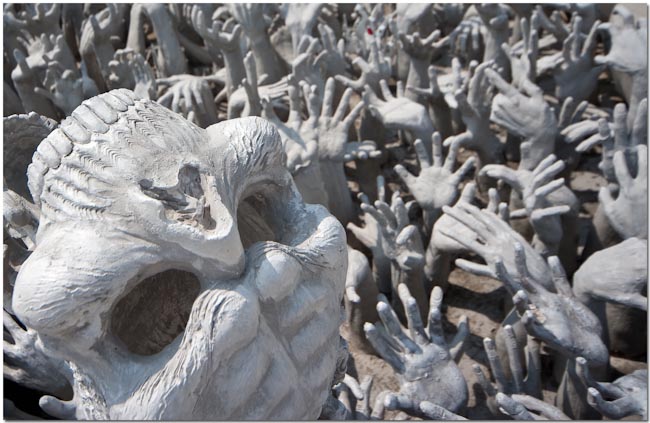
This week's photograph was captured at Wat Rong Khun in Chiang Rai. I’ll cover this contemporary and unconventional Buddhist temple in-depth in a future outing section, but this week I wanted to share with you this particular image. This was taken at the head of the small semi-circle before the bridge which stands for the human world. Right before crossing over the bridge with fangs which is the mouth of Rahu, which is a representation of hell or suffering. I think, this display is a visual representation of human suffering.

This image is significant for what it represents. Throughout South East Asia’s history there has been much suffering. Everyone remembers the Vietnam War and the Killing Fields and the genocide committed by the Khmer Rouge during the “purging” which began in 1975. And lets not forget the invasion(s) of Siam by Burma in 1765-1767 or Siam’s invasion of Laos (1778 and 1792), Cambodia (1769 and 1782), or Vietnam (1784-1785). There has been enough bloodshed in SEA to upset the Lord Buddha many times over.
The screaming skull and hands reaching up to drag him to hell represents a powerful image. I like the way the skull is in critically sharp focus in the foreground and the hands slightly defocused in the background. Anyone notice the red painted fingernail?
This is an interesting temple and although I did a terrible job of capturing its beauty I still plan on sharing it soon.

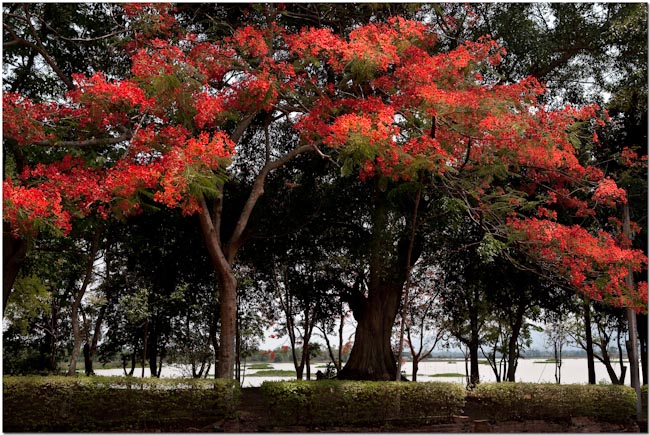
All around the temple is beautiful Chiang Rai countryside. While I was very disappointed with my shooting of the temple, which is the reason I made this long journey, I was more than pleased with the landscape images I captured along the way. Sometimes it works out like that. When we arrived at the temple the sun was high overhead, the heat extreme, and the photographic opportunities of the temple weakened. But along the long drive the sun played through the trees and fields providing many great opportunities for those willing to see, stop, and compose an image.
This image works a lot better when its bigger, but it’s still striking at any size. The naturally deep saturation of the flowers on the tree, the varying side lighting coming through the trees, and the lake in the background. The dynamic range of this image is more extreme than it looks. I bracketed for six different exposures hoping to capture it this way and only one came close.
Death Railway Museum and Research Centre
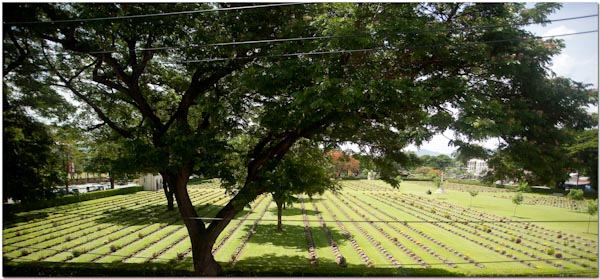
In the three preceding weeks we’ve visited the bridge over the River Kwae, the Chungkai War Cemetery, and the Kanchanaburi War Cemetery. This is the final installment on my trip to Kanchanaburi and the part that impacted me more than any other. The Death Railway Museum brings the entire experience together both visually and intellectually. Its here where you can learn the “where, what and why” of the Siam – Burma Railway and at the same time view displays and artifacts that help you visualize what it must have been like for the POWs over 50 years ago..

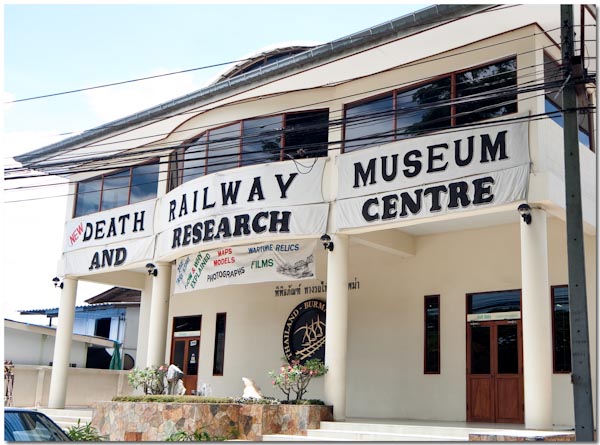
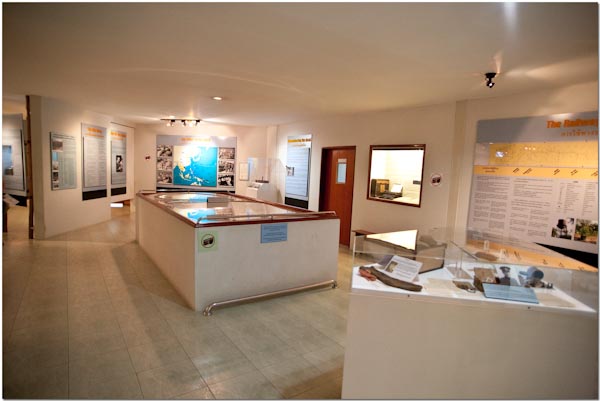
The Death Railway Museum is directly to the side of the front of the Kanchanaburi War Cemetery. You can easily walk from one to the other in just a minute or two. The building is big and modern and well marked.
Normally photographs inside the museum are forbidden. Mr. Rod Beattie the owner, curator, and research director of the museum generously offered to allow me to photograph the interior and exhibits. You can’t write enough to describe Mr. Rob Beattie. He has dedicated his life to pursing the history and preservation of everything concerning the Death Railway. He’s the caretaker of the cemeteries run by the Commonwealth, helps identify remains, and runs this museum and research center. He’s constantly in the field uncovering new artifacts and has located and marked all the work camps along the course of the railway. The care and attention to detail he’s put into this museum is amazing, especially when you consider it is for the most part, the work of a single man.
I wasn’t carrying the equipment I’d normally use to “properly” photograph the interior of a museum so we won’t pretend these images are even decent. I had a 20mm f1.8 lens I carry for use in dim temples and I turned the ISO to 1600-3200 and hand-held, did the best I could. I didn’t want to miss this opportunity and hopefully I’ll be invited back to properly photograph this interesting place.
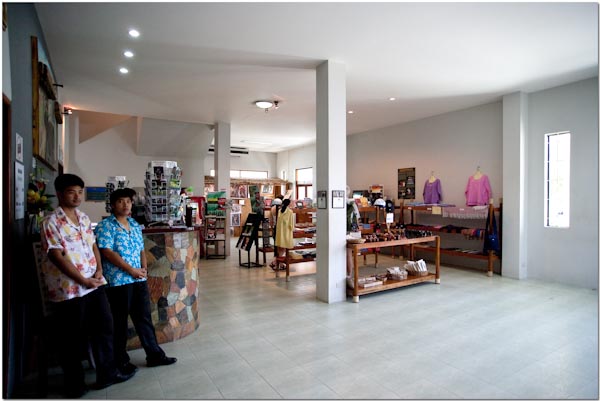
As you walk in the staff is very polite and helpful. They had been told I was coming and were prepared. The gift shop at the entrance holds many interesting items.
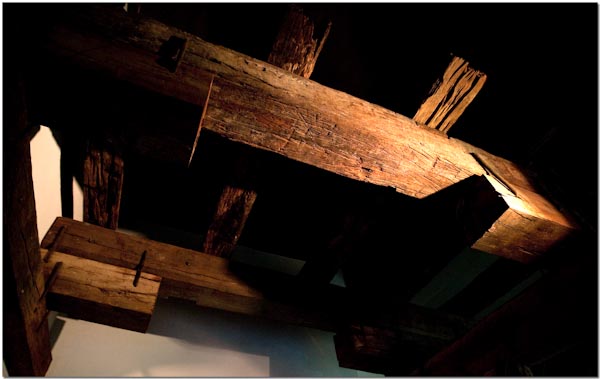
As you walk from the entrance area into the museum you pass under a trestle. Looking up you can see what the track looked like from underneath giving you a feel for what the men working on the railway must have seen from their working positions.
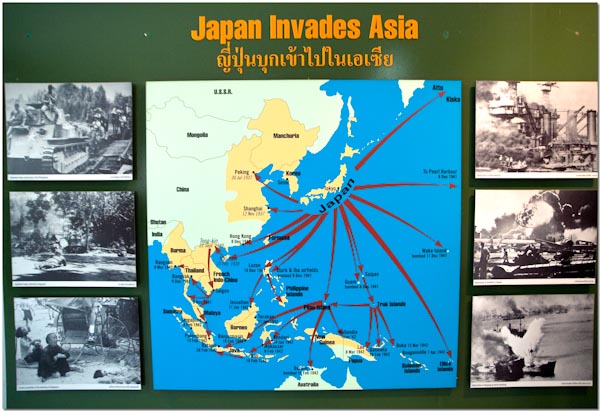
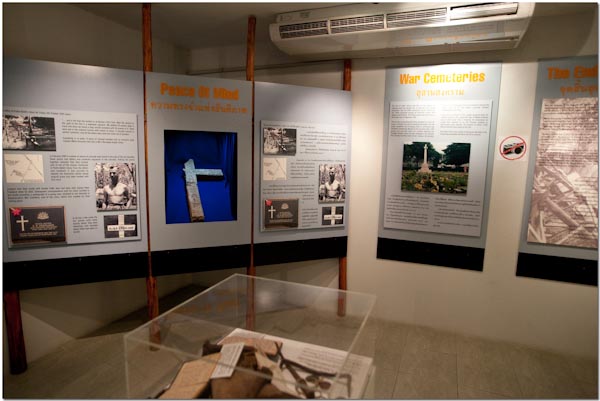
All throughout the museum are backlit and colorful graphic representations telling the story of the Death Railway. I’m only going to post one or two of these images so you can see what great quality they are, because there are other ‘tourist’ sites out there who would love to copy and use Mr. Beattie’s research.
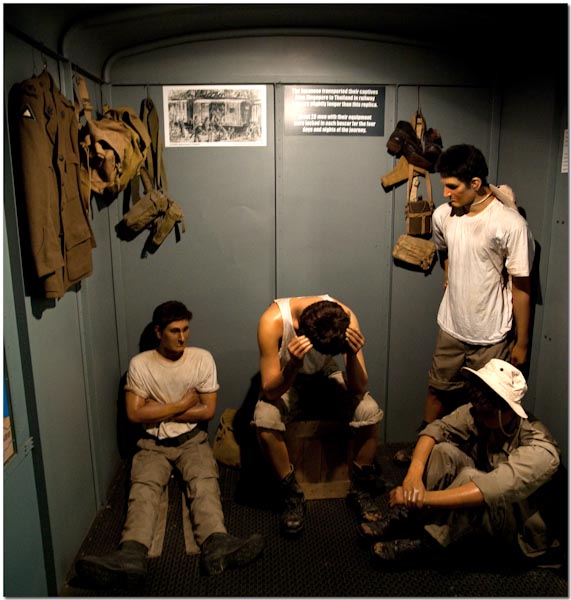
This display shows what it was like inside the box cars transporting POWs from other POW camps in SEA to the Death Railway work camps.
Something that strikes you early if you’re paying attention is that this isn’t a Japanese bashing endeavor. The entire museum is dedicated to sharing the actual reality as it was lived, both bad and good, and I think it does an excellent job. The Japanese are shown to be fair when warranted, and ruthless when earned. War is never pretty and it must be extremely difficult for Mr. Beattie to be so fair-minded considering nearly 2800 of his countrymen died along the railway.
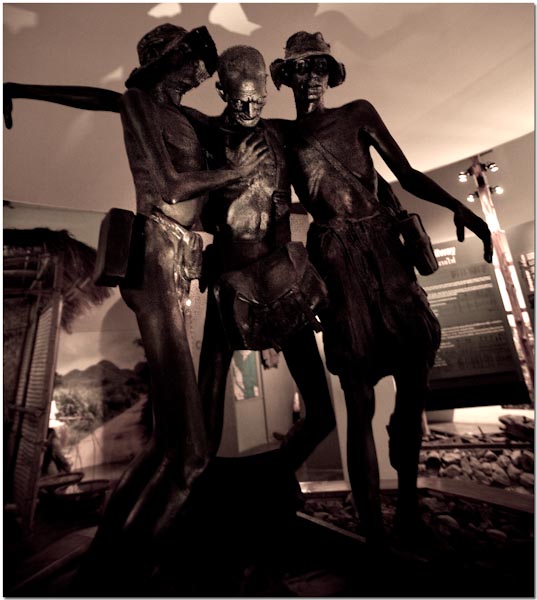
This piece of art depicts the malnourished and starving POWs helping a fellow prisoner.
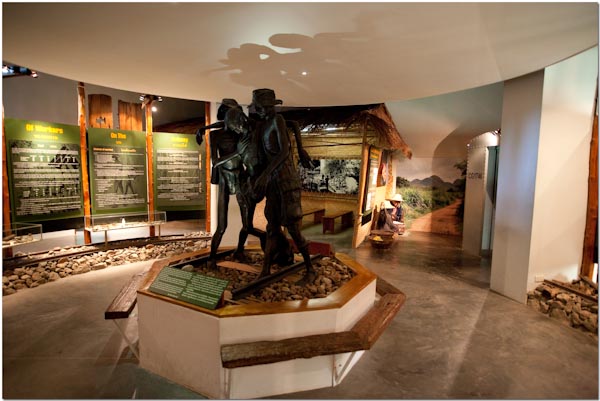
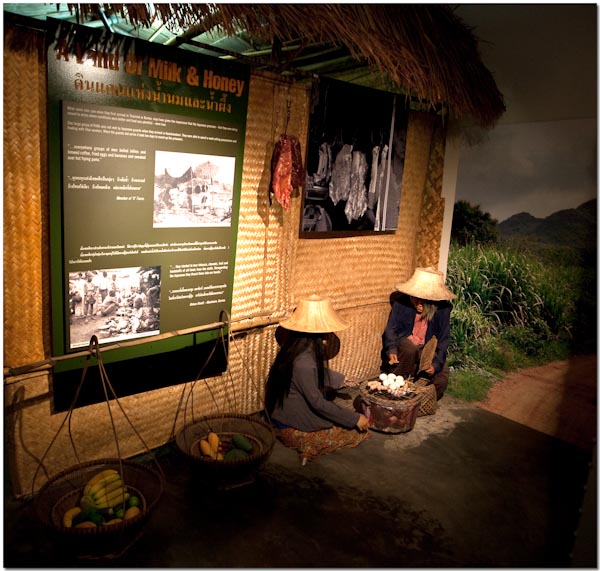
This image gives you a feel for the spaciousness of a display room. Many graphic information displays along the walls, artwork in the center, appropriate lighting, and cool air conditioning allow you to take your time and learn as you move through the exhibits.
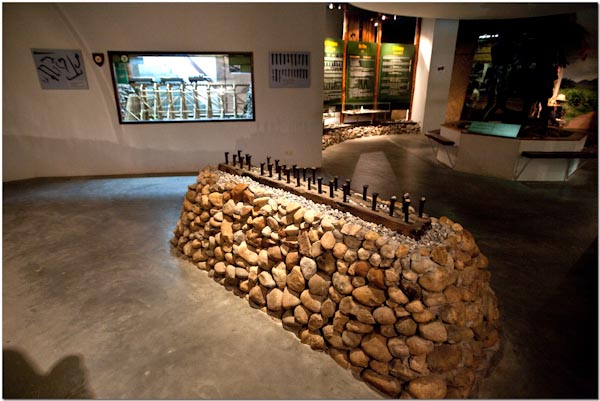
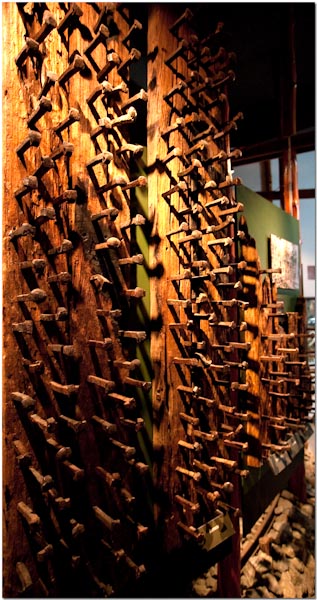
Another view showing a railway tie with the spikes used to secure the tracks.
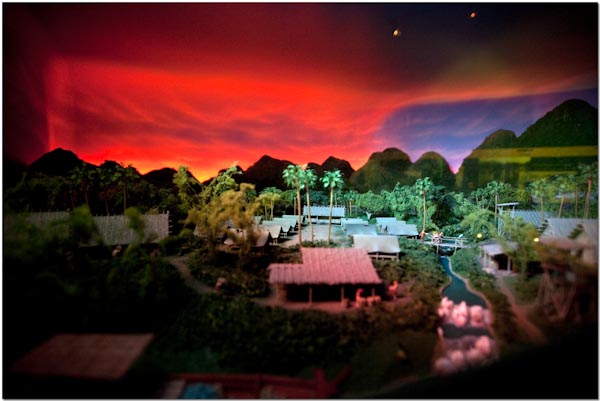
Set into a wall are very detailed scale models of the work camps. There was very little light and I apologize for the poor capture.
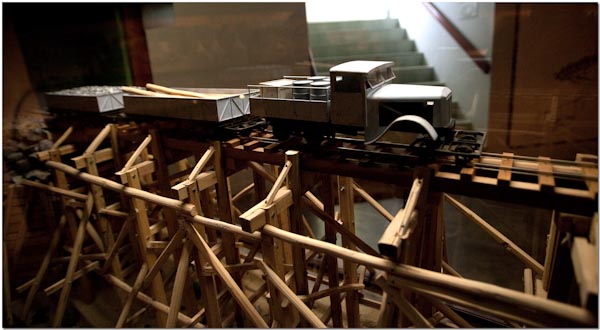
A scale model of the bridge with the working truck and trailer used to haul materials.
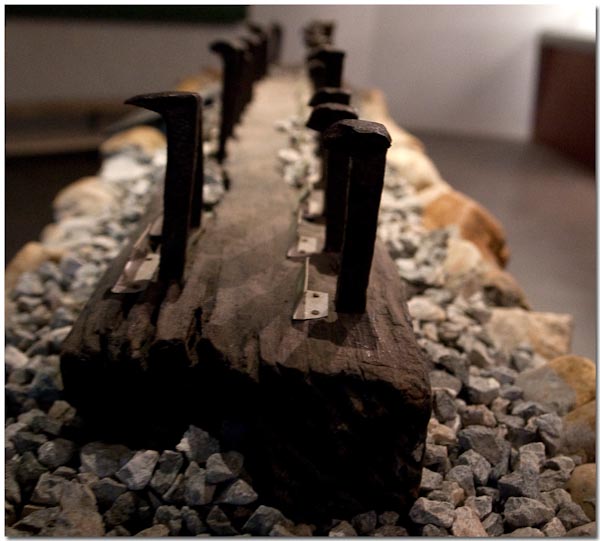
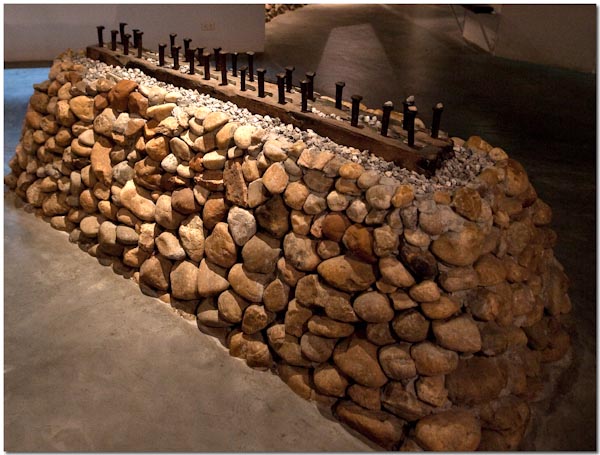
A closer look at the spikes.
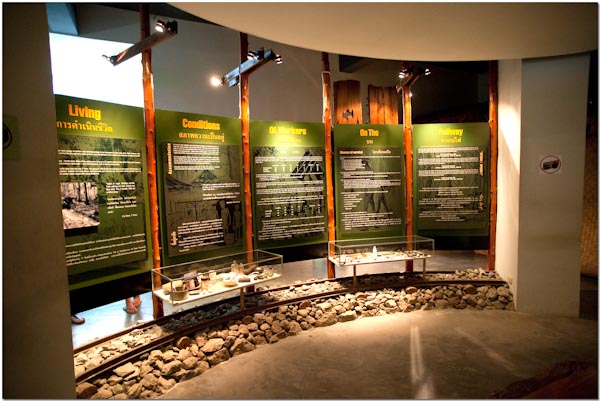
One of the many information display walls. You can read these displays for hours. It’s that interesting!
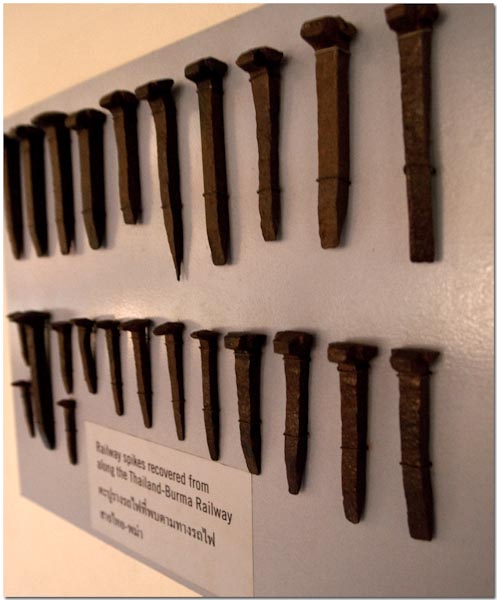
Railroad spikes recovered from along the course of the railway.
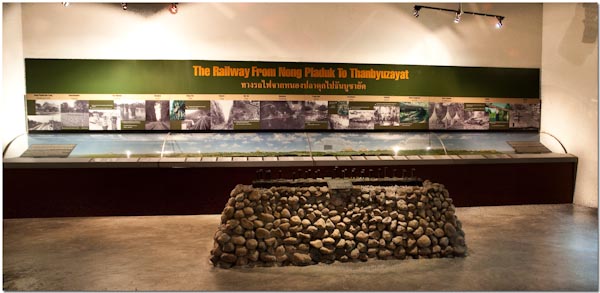
You can’t tell from this view, but this is a model of the railway and timeline from beginning to end.
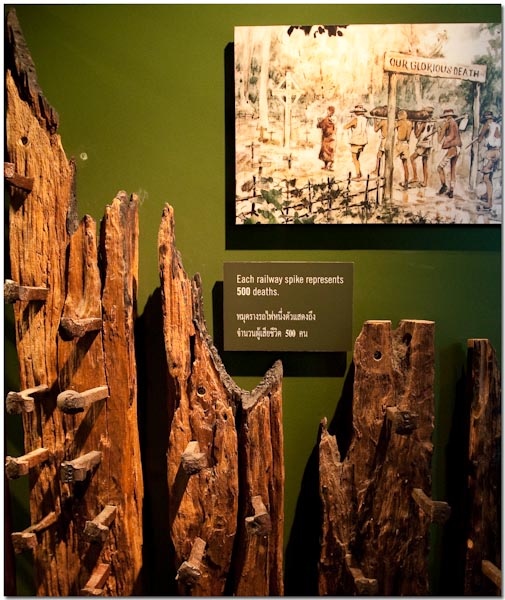
Each railway spike represents 500 deaths.
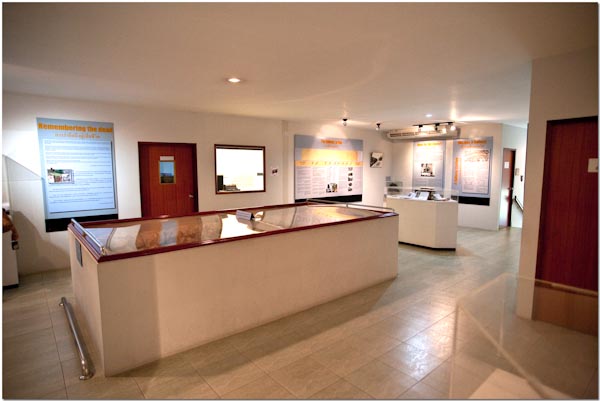
This large display room is on the second floor.
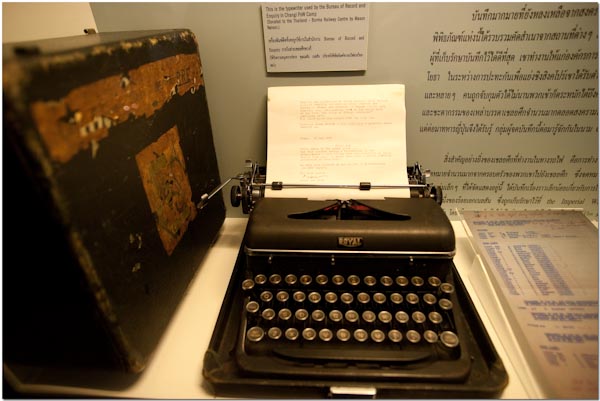
The actual typewriter used to record along the railway.

Pieces of a marker laid together in their original form. This is part of the cross from Padre Babb’s diary. The letters and numbers identify the Australian soldier whose grave had been marked with this cross.
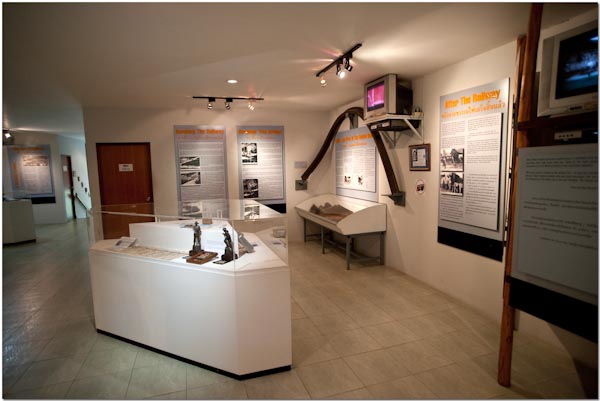
Another view of the second floor display area.
Another view.
More information walls. The large iron arch is an artifact from the Azon bomb dropped by the Americans. The Azon was the first guided bomb. It was first used on the long railway bridge at Pynmana Burma on 27th December, 1944.
The information wall which displays the cross shown above.
As you complete your tour through the museum it ends at the second floor in a very nice and modern snack area with huge windows overlooking the Kanchanaburi War Cemetery.
I had to be careful not to show too much, or give too much information. I wouldn’t want your curiosity for seeing the museum to be satisfied by what you see in this column. I’ve barely touched on the information and visuals you’ll experience when you visit the Death Railway Museum. I cannot convey to you how much of an experience this is. When visiting Kanchanaburi you must give the Death Railway Museum the highest priority on your “must visit” list.
Bracing The Camera
This week's learning topic is as important as it is simple. Holding the camera. How can something so simple be so misunderstood?
Bracing (holding) the camera correctly is the single most important thing you can do to get a nice sharp image. No matter how great your camera, how advanced your image stabilization, or how fast your shutter speed, if you’re not holding the camera still you’ll never get a sharp photo.
First, lets talk about the two types of cameras that require different techniques. A DSLR has an optical viewfinder that lets you hold the camera in close to your body, tuck your elbows into your chest area, and achieve a decent bracing technique. Point and Shoot Compacts have a rear mounted LCD which requires you to hold the camera almost at arm's length which takes your arms away from your body taking away your ability to brace properly. Is it any wonder that so many point and shoot compact pictures look so blurry?
The truth is, most point and shoot compact cameras are capable of critically sharp images. It’s just that most people never hold the camera properly so the images from compacts look blurry or out of focus. This needn’t be.
Let’s talk a bit about bracing a DSLR. Bring the camera to your eye, but try (and practice) not actually touching the camera to your head. If you touch the camera to your head/eye then your head will shake the camera. There’s no way around this. Large soft rubber accessory eye cups (Nikon makes some great ones while Canon does not) not only help block out the light so you can see better, but they’re an effective ‘buffer’ between your shaking head and your camera. So bring the camera to your eye but don’t touch it to your head/eye.
Next, tuck your elbows in. No flying chickens allowed! Tuck them in solidly to your chest area effectively making a supporting triangle between your body and the camera. Practice this. It doesn’t feel natural at first, but soon it will feel perfect.
Now, take in a breath and let it halfway out. Frame your subject, focus, and ‘squeeezzzeee’ that shutter release slowly. Let it surprise you when it goes off. Do this slowly a few hundred times, and then you can easily break this process into steps and speed things up until you’re shooting as fast as the guy standing next to you “poking” his/her shutter release and making blurry pictures.
You firearms shooters will instantly recognize this technique as very nearly the same as you’d use for a rifle or pistol. It is. The same techniques that allow to you hold a firearm on target and hit with a high degree of accuracy at a long distance, absolutely applies to holding a DSLR and achieving critical focus.
Firearms shooters shoot from basic positions. Standing. Prone. Sitting. Prone is the most stable, sitting (elbows braced by our knees) the next, and standing the least stable. Like skeet and trap shooters standing allows you to track (pan) the target (subject) while holding steady. With this technique you swivel your hips to pan a subject. You don’t move your arms. You keep your arms tucked and braced. Practice these techniques and soon you’ll be able to shoot at shutter speeds you’ve never dreamed about before while achieving critically sharp images.
But what about point and shoot compacts? I’m afraid there’s not a lot you can do here. Bend your elbows in and try to hold it as close to your face as you can. The closer you can get your arms in towards your chest the more stable the brace.
Techniques that work for both types of cameras would include leaning against a tree, pole, fence or other supporting structure. Your legs are much less table than a permanent structure in the field. Take advantage of everything you can. Workshop students are sometimes surprised when I lean up against a wall, a car, or anything more stable than my two legs. But once they try it they’re sold!
Do you carry a backpack? Book bag? A jacket or something you can roll up in a soft ball? Place it on a table and put your camera in the center. A car hood works well. The top of a fence. Nestle your camera down into the softer base and you’ll be surprised how easy it is to get sharp pictures.
And let's not forget other techniques like Mirror Lock-up, using an external shutter release, the internal timer, anything that gets your hands away from the camera at the moment of exposure.
Bracing your camera properly is a lot about common sense. But this means you’ll need to think about it and have it on your mind each and every time you release the shutter. If you make a conscious effort to think about bracing for 500-1000 images, soon you’ll develop habits you’ll follow without even thinking about it. Give these methods a try and you’ll be surprised just how good that “defective” lens you’ve been cursing really is. ;o)
Photography News of Interest
You MUST click on this link and view the picture of the “hand of hope” from of a 16 week fetus reaching from the womb of its mother during a lifesaving surgery. The image is
ten years old and made the photographer Mike Clancy instantly famous. The right place at the right time. Now, ten years later you can see the 9 year old boy whose hand sparked debate across the world. Read more here.
Perhaps the best place to buy your photographic and stereo gear anywhere! B&H is “the place” professional photographers in America go to buy their gear when they need first class advice and service. B&H also services photographers from countries all over the world. This is an interesting article on why Circuit City failed and B&H thrives. Read the article here.
Most professionals are familiar with Arca-Swiss for their excellent ballheads. One sets atop two of my tripods! Now they’ve announced the Rm3d High Precision Hand-Held Rangefinder! This baby takes a medium format digital back (or film back), had auto-locking horizontal and vertical shift systems and even has a front tilt. The price will probably be very expensive. You can read about it here.
Volunteers need for photography project. If you live in Linlithgow you might be interested! Niki Collins is doing a study on individuals and groups. You can read more about it here.
Readers' Submissions
Steve;
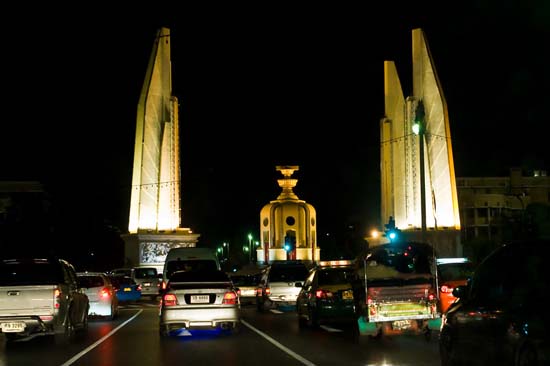
A few photos from my last trip to Bangkok.
Near the Grand Palace
This Statue/Display was located downtown near the grand palace. In and of itself it wasn’t that impressive but for me it had a memories and thoughts associated with it. I was talking with the person that was showing me around this area and they said they hoped we didn’t get stuck in the traffic surrounding some protests that were happening in the area.
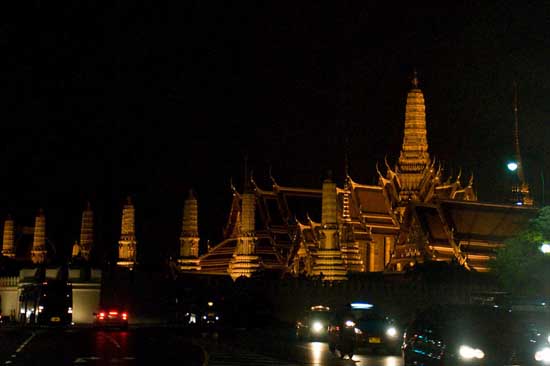
The Grand Palace at Night
The Grand Palace is “the” palace in Thailand. Historically it’s where the King lived. It wasn’t just interesting during the day, it was also pretty cool at night. From the road it looked better at night than during the day. The way the lights illuminated the pillars gave it a very exotic and mysterious look that tourists have come to expect.
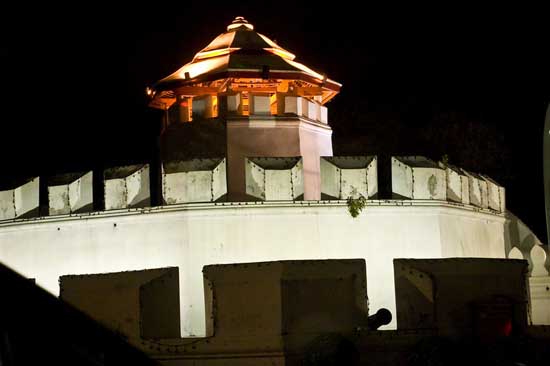
Turrets near the Grand Palace
Downtown is where many of the tourist sites are. This was a fort near the Grand Palace that looked rather impressive at night.
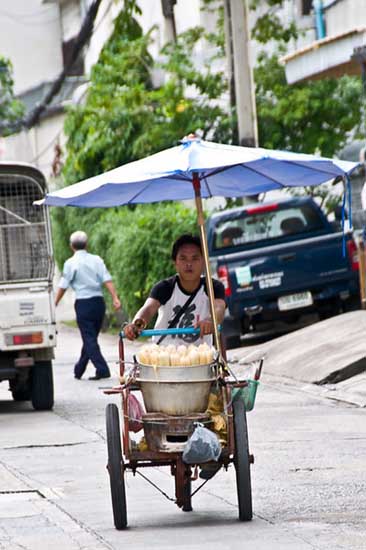
Roving Desert Cart
This cart went up and down the street hawking something resembling snow cones. I really wanted to get one but we had other priorities at the time.
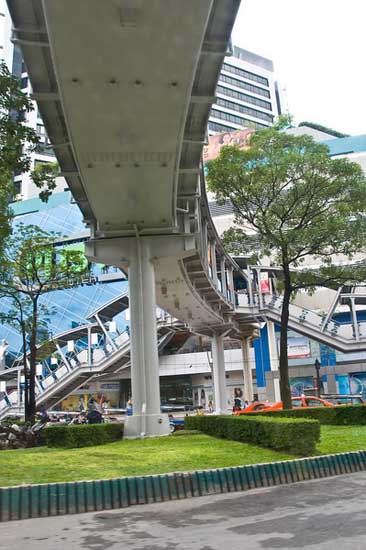
Overpass
I managed to single out this pedestrian walkway in the maze that was the mall area. It was an impressive example of good infrastructure. You could go anywhere you needed to go in the area without running the risk of getting squished. Traffic in this area was pretty bad.
I hope you enjoy these.
Tom
Tom –
Thank you! Great night shots! Please keep them coming.
Steve
I suspect the readers submissions will be a highly anticipated section of this column and I encourage anyone with photographs and travel accounts they'd like to share to please send them to me at: QandA@Bkkimages.com
Readers' Questions
Hi Steve,
I’m just starting to process my RAWs from the PI. As far as white balance goes…so far I’ve left it at “as shot”. That should mostly be okay, right? As far as all the other post-processing is concerned I go about it just as I would do with the JPEGs? I’ve imported them all to Lightroom with “Auto Tone” enabled. They look okay already. I’m thinking about only tweaking the best shots some more now. I’ve got more than 700 from the PI alone and just the thought of processing them all already gives me a headache…
Akulka
Hi Akulka –
Yes, for the greater part the auto white balance sensor, especially in natural daylight, does a very good job of capturing the more “accurate” white balance. White balance sensors have really improved in just the last few years, it’s amazing how the auto WB sensor on my newest $300 point and shoot compact is more accurate in less than ideal lighting conditions than my five year old $8000 professional DSLR.
However, “accurate” may not be the best choice. Don’t hesitate to experiment with the white balance to “warm” or “cool” the colors to your taste. This takes some practice to get really good with.
The “auto-toning” sometimes works great, sometimes not so great. If the images appear correct to you then by all means use them that way. There’s no need to adjust anything that’s already “right.” More people spoil their images during post-processing than during the capture.. just because they think they must do something. So, I think tweaking only the best shots is a great idea. In fact, this is what I do. I can’t be bothered with processing all the images I capture. I use Lightroom to view my work, tag the images (or save them to Quick Collection) I’ll have further interest in, and then I’ll go back at my leisure and work on them individually. Post-processing should be fun and entertaining. If you try to do too much, or do them all, it loses its fun very quickly.
BTW – Your last gallery and this last question gave me a great idea for a learning topic! Thanks!
Steve
Hi Steve,
Got a quick question. I want to put some of the photos of our holiday online for friends and family to see. As I don’t have my own domain, I was wondering if you can recommend a good photo hosting website. If possible, a website that makes it difficult to download the photos, as I don’t want other people to use them. I think some of the images could be used for commercial purposes (only a few, I’m not pretending I’m that great :p). Any ideas?
Is it possible to embed a copyright on the images when you export them from Lightroom?
Please let me know your thoughts on this.
Thanks.
Best regards,
Koen
Koen –
This would make a great learning topic.
You’d be surprised how many people think because the image is on the web they’re free to use it without regard to copyright. I’ve had images stolen on a regular basis and the last time I checked (several years ago) my images were being used without permission in over 600 instances! Many on professionally built websites for commercial use where web designers just copied them instead of going to a stock agency and paying a fee. For a person whose livelihood depends on copyright this can be more than annoying.
True story: Yahoo has an African Grey parrot user group. I decided to check it out once because I have African Grey parrots. On their opening page is the flying/attacking African Grey shot of Caesar in black and white. I joined the user group and asked the guy running it where he got the picture. He replied he took it! It has my watermark and is clearly my image. He took it from my Pbase account. I called him on it and he stuck with his position. Giving it some thought, this was only a group of 35 – 40 individuals and they’d never pay for an image anyway. It was when this happened that I just accepted a certain amount of my work could be written off to theft.
Keep in mind that anyone can “print to screen” (ctrl, print screen) which copies the entire screen to your clipboard. Then, when you open a new document in Photoshop it will automatically be sized for your clipboard. You then select “paste” and the entire screen is now in Photoshop. Crop around the image you want and you have it. If you can see it on your screen there is nothing you can do to stop someone from taking it. Nothing. You can only make it more difficult so others can’t do the “right click” and “save image” easily.
Flickr doesn’t allow right click. Smugmug protects them as well. I personally think their fees are too high so I’ve used Pbase for years now. Since I purchased my own domain I’ve thought of shutting down my Pbase account but I’ve developed other uses for it that I can’t do on my own domain. When I do the learning topic on photo hosting sites I’ll cover these.
I hope you’ve found this somewhat useful. I’m sorry more can’t be done to protect your images. I recommend keeping them as small as possible to discourage use off the web, watermark them, and compress the heck out of them to keep the quality down. I know this is contrary to showing off your images for best effect.. but this is why I limit my images in the weekly column the way I do.
Take care
Steve
Please submit your questions to QandA@Bkkimages.com. All questions will be answered and most will show up in the weekly column.
A Snapshot of Bangkok Images Week in Review
A relatively slow week. One photography workshop, two bids for product photography, and lots and lots of processing, writing, and administrative work. I continue to work on the design for my new website.
Infocus Blog
Polaroid or Photoshop?
This is all too often the question and it really shouldn’t be.
Old school photographers are extremely committed to getting the image right “in the camera.” Younger photographers, often 4-5 decades newer to the profession are more interested in what they can do to the image after the fact in Photoshop.
Many arguments take place over this issue. Old school photographers claim that “photoshopped” images aren't real images. New school photographers tell them to accept the new technology, it can’t be stopped. Who is right?
There is a time and place for both.
News journalism absolutely must not be “doctored” out of the camera. The journalist's reputation and the reputation of the agency he/she works for is at stake. Remember everyone poking fun at North Korea for “enhancing their missile program” with Photoshop? They added in twice as many (or more) missiles to show their military prowess. What about the extra smoke near a plane crash in New York? The list of discredited journalists is longer than it should be.
What about portrait photography? Time Magazine recently changed the color of Obama’s swim trucks and the color of his skin! How many celebrities have their images enhanced before publication? It’s a lot more common than you’d think at first, but when someone gets “exposed” being enhanced it’s often publically humiliating. I personally have gone into great detail on portrait subjects to smooth skin, apply makeup, change skin tones, or any other enhancement services they requested and paid for.
Landscapes? Every landscape photographer has felt the pain of showing up at the right place at the right time, only to be greeted by terrible skies or some other flaw they can easily fix in Photoshop. Should they keep appearing day in and day out to get the nice looking clouds they’re after, or should they just add them in Photoshop? Landscape photography can be controversial. Landscape photographers run the gamut from purists to Photoshop artists. It’s hard to call this one.
Only this is for certain. The better you can capture the image “in-camera”, the better your chances for standalone success, or success in Photoshop. You should ALWAYS endeavor to make the most perfect image possible “in-camera.” It really pains me to hear from the lips of fellow photographers “that’s okay, I can skip that step and fix it in Photoshop.” Or something to that effect.
The more effort you spend being in the right place at the right time, the more effort setting up, the more skill developed, the better the resulting image will be. The better the resulting image, the better the results will be any way you choose to use that capture.
Let’s build good habits folks. Laziness has never been a key component of photography.
Until next week..
