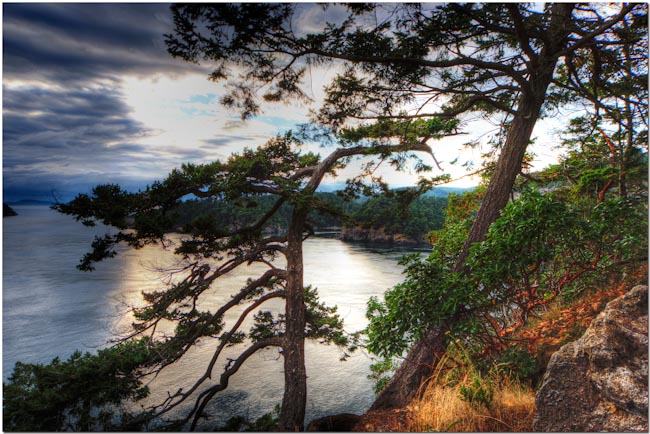
Kanchanaburi War Cemetery/HDR II
![]()
|
• Nefertari Hotel Abu Simbel • Seti Hotel Abu Simbel • International Hotsprings Hotel Baharia • Hilton Borg El Arab Hotel |
Feature Photograph
Street and people photography in Thailand is an area I’ll continue to cover over and over again. This genre captures the interest of visitors to the Kingdom more than any other. More, there are more opportunities for street and people photography in Thailand than you can imagine at first thought. I’ve said before that we need to do more to capture the ‘real’
Thais which are more representative of mainstream Thailand and I’m still committed to this. However, this last week found me wandering around several Hmong Hill Tribe villages in Northern Thailand and I’d like to share a few of my captures.

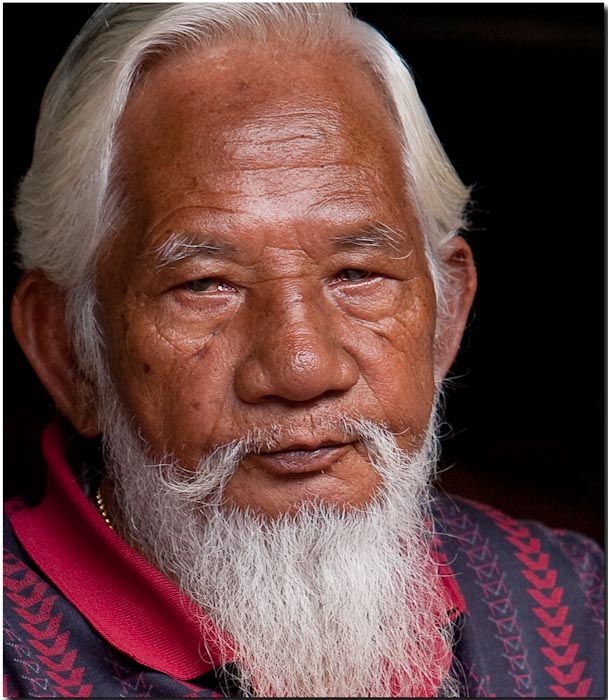
This image is significant because the subject is strong enough through appearance to stand on his own.
Previously I’ve commented most photographers are keen to show a close up of a craggily old face, a woman smoking a pipe or cigar, or with a mouth full of rotten teeth.. and think that because of these things the image is strong enough without a background story. I’ve advocated for photographers to “zoom out” and show more of the environment of the subject so a story is told along with the capture. The man and his story. IMO it is rare that you effect a capture of a subject that by looks alone, the story is told and the interest is held. I think this image does so.
This is a portrait of a Hmong Hill Tribe Village elder who runs his own store in the merchandise area. Despite a weather worn face with leathery rough skin defined by character, this man is impeccably groomed and well dressed. He does not hold the look of the “stereotypical”
tribesman. Every hair on his head and whisker on his chin is there with purpose and style. I dare say this man is probably fending off the local ladies on a full time basis.

Technically this image is very good but not perfect. The shiny spot on his forehead and tip of his nose are distracters. On the plus side the colors are extremely accurate, the depth of field appropriate, and his stoic expression riveting. The key that holds these elements together is the sharp focus. If the image were not critically sharp the grooming would not be so apparent nor would the weathered features. When your image is technically correct and critically sharp, it allows you to see the image in such a way as you otherwise could not. His well exposed and critically sharp face, the colors of his skin and clothing, are well set against the dark background.
For those of you who are curious about the gear, this image was not captured with the excellent and sharp 135/2 or even the 85/1.2. This image was captured handheld with Canon’s excellent 70-200mm F2.8 IS.
The same battle tested lens I take with me nearly everywhere. All light is natural. The 70-200mm F2.8 IS/VR lenses are the quintessential photojournalist lens.
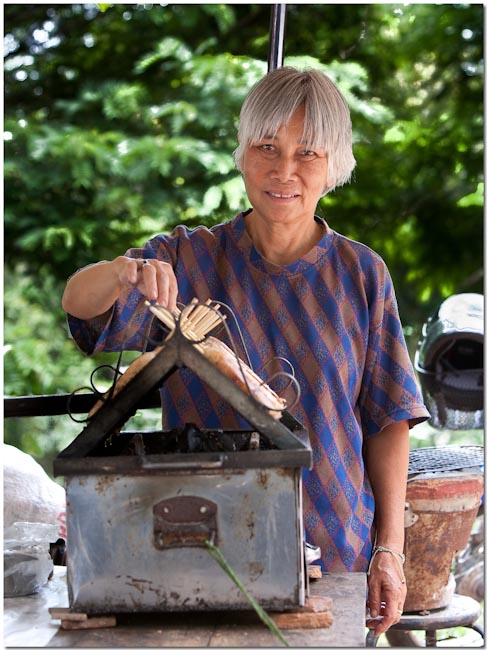
In contrast this image is not nearly as strong. To its credit it does tell much more of the story, and it’s even critically sharp. But the subject is much more common, not nearly as “uncommonly” well groomed, not weathered to the same degree, and the background doesn’t ‘push’ the subject to the front in separation. She is simply a friendly older lady selling meat on a stick.
If you have any doubts, ask yourself which of the two images you’d be most likely to see on the cover of National Geographic or Popular Photography.. (I know, wishful thinking..;o)

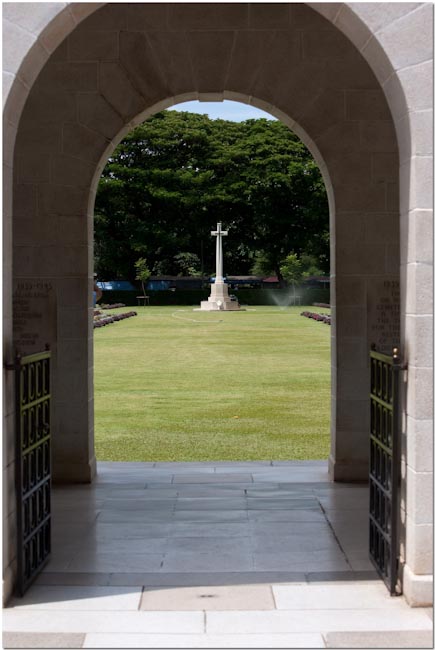
Kanchanaburi War Cemetery

Last week we visited the Chungkai War Cemetery in Kanchanaburi and I promised you this week we’d take a look at the Kanchanaburi War Cemetery. To recap:
During the construction of the Burma-Siam railway it is estimated that nearly 100,000 civilians and 13,000 prisoners of war died and were buried along its course outside the work camps. Later the remains of Allied prisoners were moved to three cemeteries, Kanchanaburi and Chungkai in Thailand, and Thanbyuszayat in Burma now known as Myanmar.
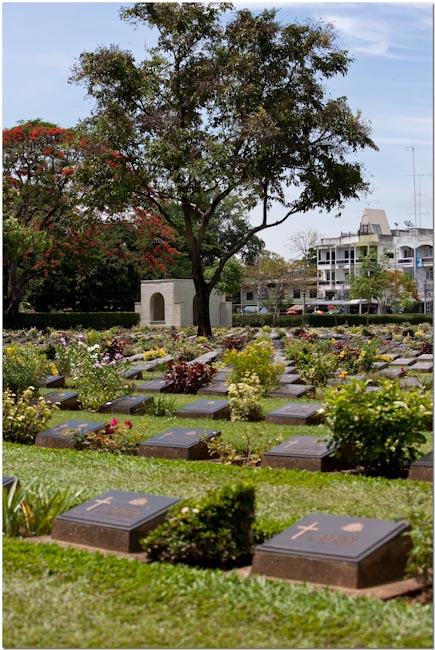
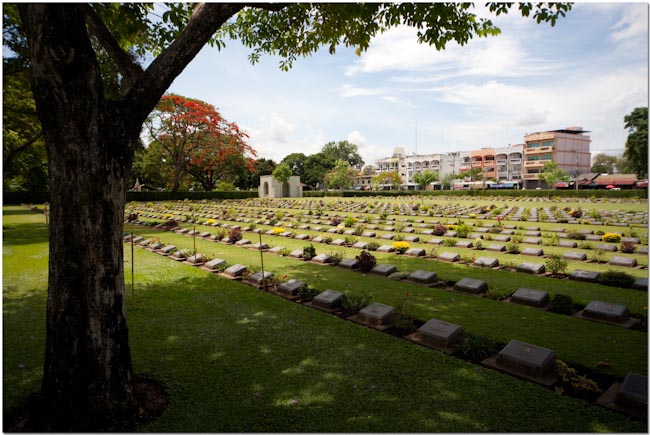
Kanchanaburi War Cemetery is closely located to the former prisoner of war camp “Kanburi” which was a base camp for POW’s. It was created not during the building of the Death Railway as was the Chungkai War Cemetery, but after the fact by the Army Graves Services of the Commonwealth. Remains recovered along the course of the Death Railway from Bangkok to Nieke were transferred to this cemetery.

There are 5084 Commonwealth casualties of WWII buried here. There are also 1896 Dutch war graves. 300 men, most of whom died from a cholera outbreak were cremated and their ashes are now interned in two graves. 11 men of the India army are buried in Muslim cemeteries in Thailand and commemorated with a small memorial inside the entrance archway.
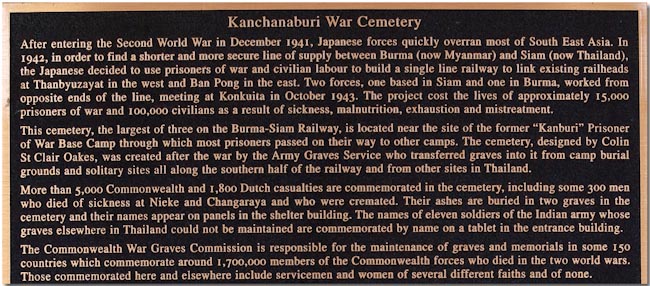
Inside the memorial are several plaques in both Thai and English which provide information about the railway.
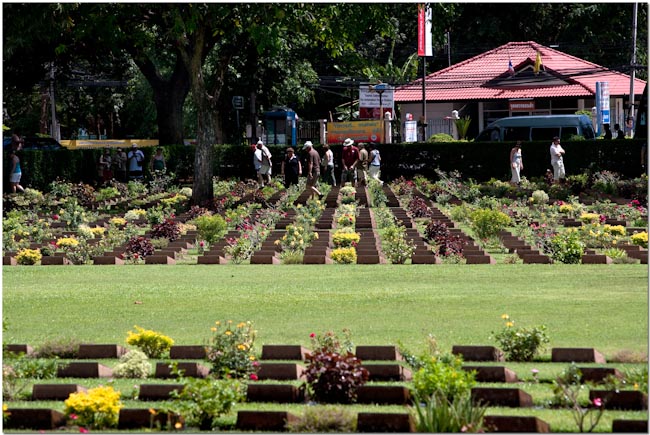
From the back of the cemetery you can see this view. Tour buses pull up out front and hundreds of tourists file in, most have no idea what they’re even looking at, and then file out. I was amazed while at the cemeteries, at the numbers of tourists who appreciated the well maintained landscaping more than the story behind the men buried beneath the surface.
Also from the back of the cemetery looking towards the front. As I mentioned in last week's column, the maintenance and upkeep is absolutely first rate. The best I’ve seen in Thailand anywhere.
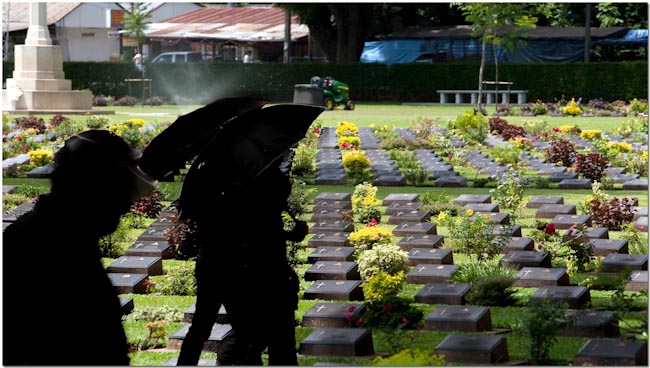
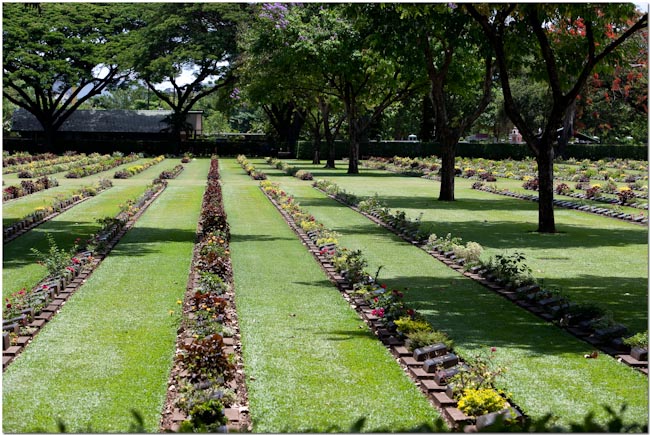
Precisely ordered markers stretch out in long rows. Some visitors are there with a purpose and silently search for that special marker of meaning.
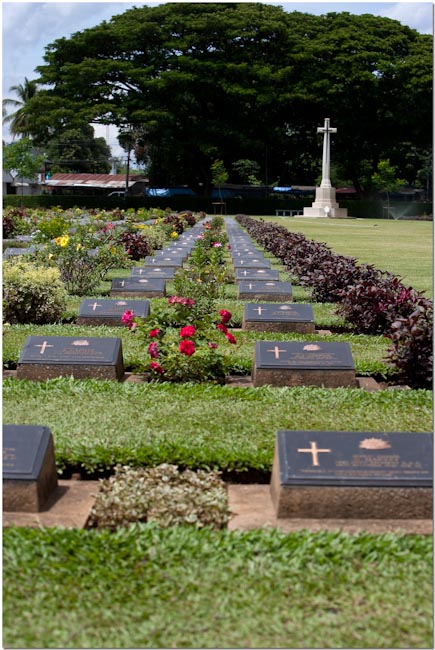
The rows are seemingly endless. Each marker maintained in top condition separated by flowers and ornamental shrubs.
No matter which angle you check, the markers are laid in perfectly in precise lines.
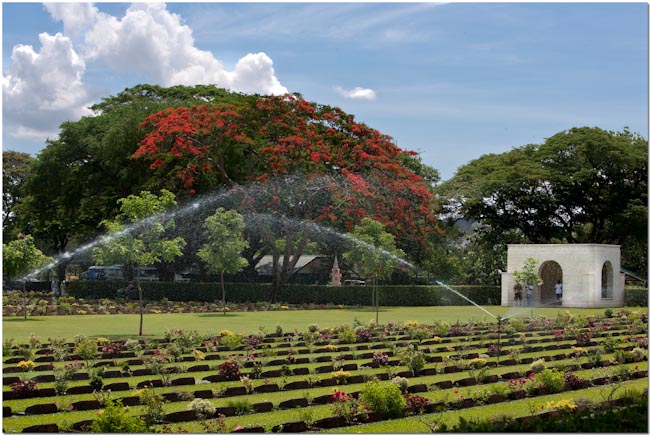
Standing in front of the Death Railway Museum you have this view of the markers and the trees which shade them.
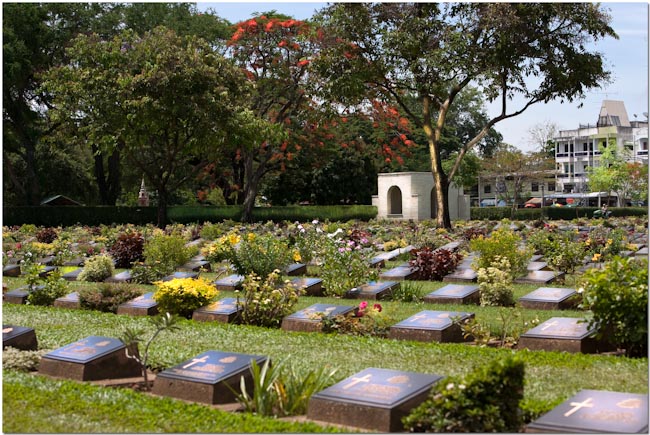
Color and light are available in abundance.
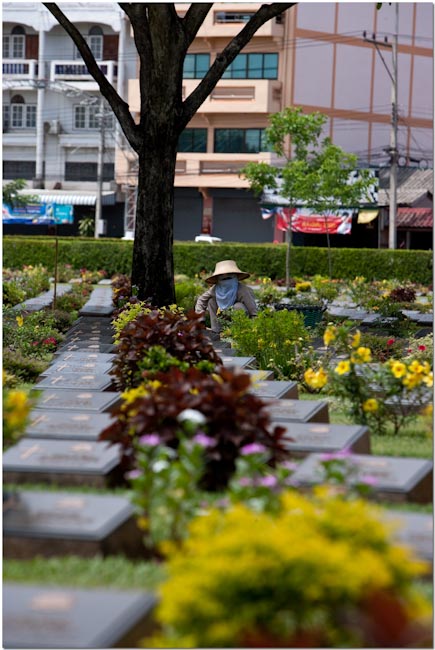
During the entire length of my visit I didn’t observe any groundskeepers or laborers except for this lone woman who almost blended into the scenery unnoticed.
The shade trees are huge and perfectly placed to provide shade and protection to the fallen.
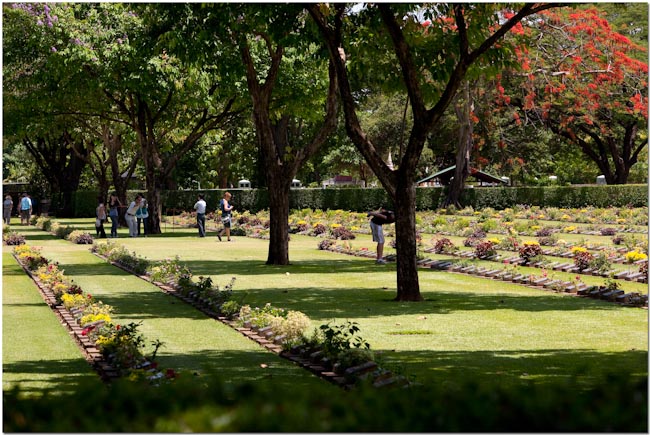
Beauty is everywhere. I find this appropriate when you consider the men buried here were deprived of the basics in life, but perhaps were able to find their own beauty in their service, simple acts of kindness, and the brotherhood they continue to share to this day.
High Dynamic Range (HDR) II
There is a lot of hype recently on photo websites about HDR (high dynamic range) processing. Photographers show beautiful images, tell people they were HDR processed, and everyone naturally wants to make their own beautiful images. Naturally!
I’ve also have had many questions recently on HDR and during my last 10-12 workshops HDR has been a requested learning topic.
Months ago I covered the basics of HDR and I’m going to do so again this week. I’ll do it a bit differently, but just as simple and basic.
First, you want to really look at the scene and see if you want to use HDR. Many are under the impression that HDR makes ordinary images better. This would not be correct. Only scenes that would benefit from HDR should be shot and processed as HDR. Otherwise you end up with an image that was obviously processed and who wants that?
Scenes that benefit from HDR are scenes where the dynamic range of the scene exceeds the dynamic range of the camera being used to capture the scene. If the entire dynamic range of the scene can be captured with one image, then by all means use one image. If it’s the “look” you’re after, then you’ll need to learn advanced processing skills.
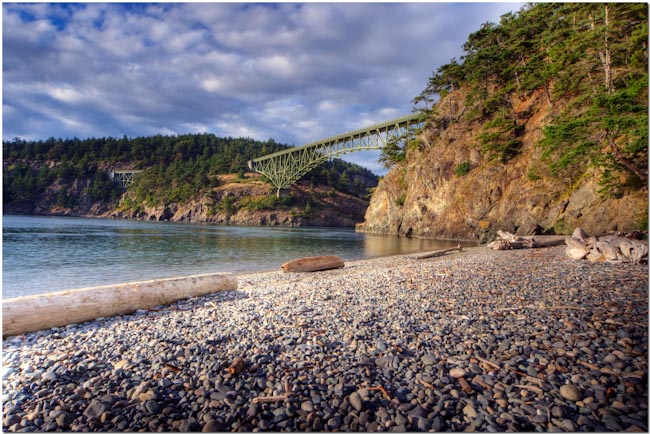
If the dynamic range of the scene exceeds that of the camera then it’s time to capture and process HDR images. Let’s look at the following scene.

The middle image is correctly exposed by the histogram. The -1 image is one stop underexposed and the +1 image is one stop overexposed. Looking at the idle image I can immediately see that the rice fields are correctly exposed, but the clouds have lost a lot of detail and definition as has the sky. Notice the increase detail/definition in the clouds/sky of the -1 image? Notice the tree line to the right middle? It’s dark in the 0 and -1 images, but well exposed in the +1 image. Each image of the same scene, exposed to a different value, has elements I’d like to see in the final image.

The final image is much nicer. The clouds have great detail and definition, the sky is processed perfectly, the tree line is well exposed, and the rice fields themselves are well lit and the color vibrant. I must say though, HDR processing by itself did not achieve these results. HDR processing with advanced image processing both were required.
To capture HDR images you ideally want to set up on a tripod so you capture exactly the same scene. If you have a modern and fast DSLR you can often get away with “auto-bracketing”, but it’s still good to learn this process using a tripod.
Expose your histogram for a balanced exposure. When your histogram is as balanced as possible, note the value. Now, DO NOT CHANGE THE APERTURE. ONLY CHANGE THE SHUTTER SPEED when capturing HDR images. Noting the histogram change the shutter speed to capture images above and below your reference image. In the example above I captured three images, one stop apart.
Sometimes you’ll want to capture five images, sometimes seven or nine. Usually 3-5 are adequate, but it really depends on the scene and how large the steps are between. The closer the steps between, the more smooth the tonal range. It’s all a trade off in time and effort, but each scene should be evaluated individually to determine how many images and how large the steps. Only experience can tell you these values.
You can then use HDRsoft’s excellent PhotoMatrix or Adobe Photoshop's HDR feature to process the HDR images. I use Photomatrix. There are several advantages to Photomatrix, one of which is the ability for the program to line up images which were not captured perfectly. By this, I mean if the frame shifted side/side or up/down a bit while handholding, Photomatrix can probably help line them up correctly during the processing. We’re talking very small amounts here, not gross errors. Photomatrix also includes a very good tonemapping program and Lightroom plug-in to help your workflow.
I’m not going to get into the actual HDR processing. I’ll save that for a later date. Photomatrix has an excellent tutorial and so does Adobe, and I’d recommend both.
For now, let’s take a look at some common HDR errors. I’ll be using images I’ve used in the column previously, but now in a different context.
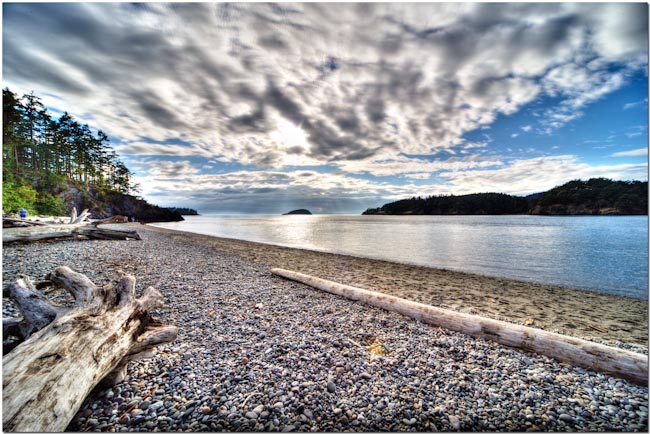
This image was captured at 12mm (full frame) and the camera was resting on the log to your left. It was sitting right on top of the log. Notice the clouds look weird? Clouds move very fast. Often over 100mph. These clouds were moving towards me, and moved enough during the five captures to sort of blend together creating this weird effect. The image is nice enough, but the clouds are just wrong.
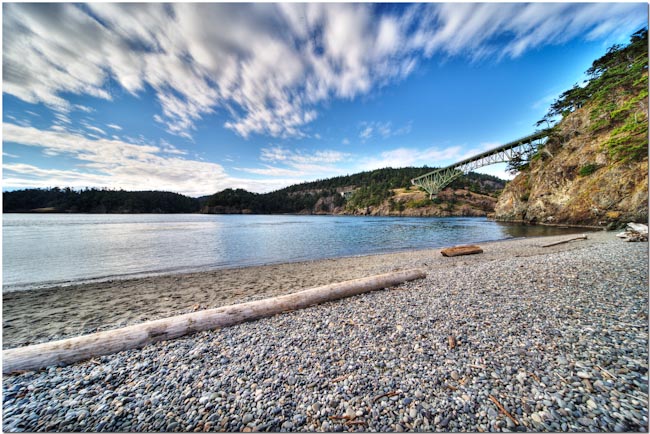
I’ve now turned 180 degrees. Now the clouds are moving away from me at the same speed. The effect however is different. Great scene, weird clouds. This happens with anything that moves. Water, branches in the trees, people, cars, anything that moves. If the scene has any movement at all, then HDR probably isn’t the best technique you could use.
I’ve always liked this image. Seven images combined. I needed at least seven because the dynamic range from the very bright sky to the very shaded foreground was huge. I probably should have used nine. The clouds cooperated in this image.
This image is a proper HDR image. Everything came together like it should. The clouds are right, the water perfect, and the tonal ranges make the image very attractive. Remember I’ve said many times that we might take 1000 images and only get 4-5 really good ones from that 1000? The same thing applies to HDR. Just because you take the time to capture and process HDR, don’t think the process is magic and every image will look great. Only some will, and the more experience you have evaluating scenes, the more keepers you’ll achieve.
Remember these rules:
- The scene should be evaluated for HDR. Only scenes with a dynamic range that exceed that of the camera should be considered.
- Shoot from a tripod, or at the minimum auto-bracketing.
- Shoot in either manual (preferred) or Aperture Priority mode. The only value that should change should be the shutter speed.
- HDR process in Photomatrix or Photoshop.
- Tone-map and use advanced processing techniques on the resulting image.
- Not ALL HDR processed images will be keepers.
I hope this helps. There are other techniques besides HDR and I’ll cover them in the near future. Which technique you choose depends on your evaluation of the scene, available time, and desired effort you wish to deploy.
Photography News of Interest
I’ve recommended the Fuji Finepix F200EXR and now you can read a complete review of this little compact. They gave it their highest recommendation, but during their comparisons tested it against a more expensive and the most competitive compact.. which they should have. They claimed the pixel binning technologies didn’t help against this specific camera, but never bothered to explain why it helped against all the others Hmm.. sometimes you need to think beyond the review. You can read it here.
Capture One Pro has updated to version 4.8 and now supports the latest cameras. This is perhaps the finest raw converter out there. If you don’t already have it, you might find it work evaluating. Especially if you’re into the details. You can read more about it here.
Do you own one of Canon’s excellent G10 Powershots? Great camera! However, there is a service recall and you’ll want to check out your serial number here.
The Pocket Camera as a Visual Notebook? I’ve been doing this for over a decade! Now, someone finally explains why and they do so very well. They also compare three fine compact cameras, the Fuji F200EXR, the Panasonic LX3, and the Canon G10, the top three “compacts” on the market today. Great read! You can read it here.
A very simple article on how to take better photographs. Maybe suitable for someone you know just starting out? You can read it here.
Readers' Submissions
Steve, have you ever been to Ubon Ratchathani? If you haven't you should plus it is a great place to visit and looks of nice places for taking photos. Pha Taem is the first place in Thailand where the sun rises and also the first place where it sets and is very popular.
We went there just after Songkran on the 14, 15 and 16th.
Charles
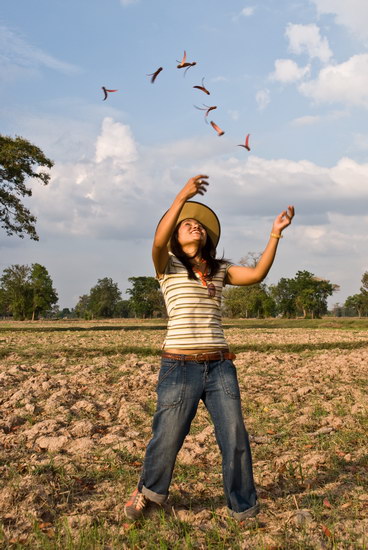
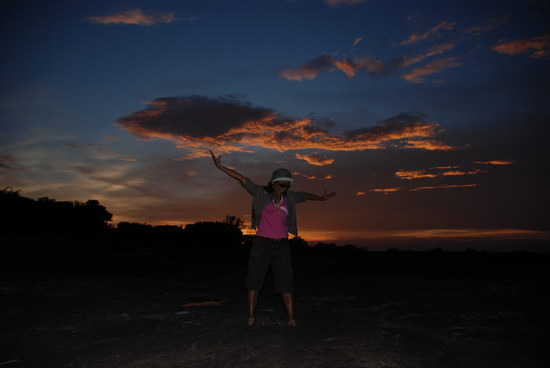
Charles –
I really like that first image! The sunset one is nice too, but a bit dark for my tastes. Thank you for the submissions!
Steve
I suspect the readers' submissions will be a highly anticipated section of this column and I encourage anyone with photographs and travel accounts they'd like to share to please send them to me at: QandA@Bkkimages.com
Readers' Questions
Steve – I have been trying to get action shots of Noi throwing things in the air, I've tried Lotus flower petals and now while we were in Lumduan, close to Surin I got her to throw these seeds from the local trees. My question is how can you try and get everything in sharp focus when you've only got seconds to shot the pics?
Charles
Charles –
This is an easy but not so obvious one.
What you want to do is pre-focus, lock your focus, and then all you have to do is snap the picture when she throws things up.
You can do this by putting your camera into manual focus, focus on her closest eye, focus until you get the “in focus” indicator light in your viewfinder… and make sure there is enough DOF through the use of your aperture/focal distance/focal length combination to take into account the different plain of focus from her eyes through the leaves. For instance, if you were using a 24-70 lens at 70mm and were about 15 feet from her.,. then F8 would do the trick. Maybe even F5.6 depending on how the leaves flew.
With all the settings pre-set.. it’s just a matter of pushing the shutter release. This is much faster than pushing the shutter release and waiting for the cameras CPU to autofocus, autometer, and then take the picture.
I hope this helps
Steve
Hi Steve,
My name is Ged from the UK and I would like to ask about full-frame sensors. I am new to photography but am looking toward the future in so much that I own now a Sony A350, but when the time comes I would like to go FF i.e. the A900 or similar when the time comes. Could you explain the benefits of it, not so much the tech stuff but benefits to me the end user, also I read in several places on the web, that if I go FF then any lenses I own that is designed for cropped sensor SLR will be useless on FF, what is the effect of using these lenses on FF camera, Is it advisable to buy lenses now designed for FF, if so are there any effects of using these lenses now on my A350? I also read about number of pixels: sensor size ratio, and problems with noise etc, with this in mind is there an OPTIMUM number of pixels for a given sensor i.e. can you have too many.
Sorry for all the questions mate, hope you can help. please fell free to edit the above as you see fit.
Many thanks in advance, and please keep up the good work, the articles are very informative and so interesting, again thanks
Ged (UK)
Ged –
Thank you for being so patient. I arrived home this afternoon and am busy answering my emails and yours is one of the first on the list. Allow me to answer your question on the layman’s terms you requested. What exactly in real terms are the advantages for you in selecting a full frame sized sensor? I’ll list my answers in order of the priority that’s important to me:
- Image quality. A bigger sensor is like a bigger sheet of film. You can put more on it. This doesn’t necessarily mean you can put more of a vista or landscape into the frame, but it does mean that for a given area of that vista or landscape that you can capture more/better information during the recording process.
- As an example use this simple analogy: If you were given a full sheet of notebook paper and were asked to describe the scene in words, you would have so much space to do so. Now, if you were only given half a sheet of notebook paper and were asked to do the same thing, you can immediately see you could never record the scene with the same amount of accuracy or depth. The size of the notebook paper limits you either way, but the smaller paper limits you more.
- Focal Length of Lenses: Almost without exception the best lenses are made for full frame cameras in the focal lengths most useful. Yes, these lenses can also be used on crop frame (APC-S) sensor cameras, but then you must multiply the focal length by either 1.5x (Nikon/Sony/Pentax) or 1.6x (Canon) to get the true focal length. I.e., a 50mm lens becomes a 75mm lens on a Nikon DSLR APC-S camera. Sometimes for subjects such as birding, certain wildlife, or sports, this can be an advantage. Generally however it is not. A 24-70mm lens is designed to be used on a full frame camera at distances calculated to be the most useful. If you multiply those distances by 1.5x they are not as useful in most cases. There are technical aspects in this area as well, such as maximum resolution of given lens, then the maximum resolution of the same lens when you’re only using the center part of the lens (APC-S sensor use), but these are better discussed as an advanced topic.
- Generally you cannot use lenses designed ‘only’ for APC-S (crop sensor) cameras on full frame cameras. The cameras that do allow this show a dark circle around the image where the sensor is larger than the lens making them not very useful at all.
- Optimum number of pixels per sensor space: Yes, given the exact use of the camera, the most common ISO to be used, available light, and so on.. and the most current technology available.. you could probably say a certain number of pixels per given area is better than another number.
- Lets take Nikon as an example. They make a full frame 12mp D3 and a full frame 24mp D3x. Both are great cameras. The D3 excels in low light, sports and other functions where you need to save a lot of data to the flash card as quickly as possible, and so on. The 24mp D3x excels at capturing the most resolution and detail given adequate light, but it takes longer to process/store 24mp of data than 12mp of data, so it takes longer to capture/save a given number of frames. After a certain point, the less light available, the more advantage goes to the 12mp D3. These are very simple points we’re looking at, but if you match them to your needs the choice becomes more clear. Many photographers have both a D3 and D3x. They take one out of the bag over the other depending on their current needs.
- There is no ‘perfect’ DSLR. The DSLR which fits you the best, will be the DSLR which fits your style of photography the best. Generally a full frame sensor is a big advantage. Generally the focal lengths of lenses used as designed would be a big advantage. You need to examine your style of photography and equipment needs carefully before making your purchase.
I hope this helps.
Steve
Steve,
Firstly many thanks for your reply and yes it does help, I will no doubt have many more questions for you and I hope you don't mind me asking them, I must say that the way you put things across is possibly the best I have come across, so please keep it up. I know you must be very busy and will not in future waste your valuable time with thank you e-mails, please take it from me I am very grateful ,again a big thank you and keep up the good work.
Ged
p.s. I am hoping to come to Thailand in September during rainy season, I was on Koh Samet a couple of years ago an saw the most amazing lightening storms, I know these are possibly advanced techniques but maybe I get lucky LOL. Maybe I can buy you a beer in sept, take care and good luck.
Ged –
I’m glad I could help. The beer sounds great!
Steve
Hi Steve,
Hope you’ve finally recovered fully from that nasty bug you had. Sounded pretty serious!
I’m glad you like my questions. I do appreciate you taking the time to answer them all. I know I can sometimes ask a lot of questions and it’s good to know I’m not getting on your nerves yet :p.
Just 1 question for now. I did take a few shots in Tanzania which I would like to try and process in HDR. I used EV bracketing with 1 full stop over- and underexposed. When I reviewed them on my laptop however, I did see that the photo’s don’t exactly line up. I moved the camera slightly when taking the individual shots (even while using servo I think). Is this going to be a problem, or is Photoshop able to line up the different images as layers correctly? I don’t have the time to work on this yet, but maybe I’ll have a few more questions when I try that. For starters I’ll have to install Photoshop, but I’m a little worried that my laptop can’t handle the extra strain of another imaging software. Even Lightroom is already taking a heavy toll on the processing resources.
Thanks again.
Best regards,
Koen
Hi Koen –
I’m back from the north today and answering emails. Sorry it took so long to get back to you.
I’m going to run a learning section on HDR again.. I’m getting a lot of questions on this technique lately. I suspect it’s being overused.. and used when it shouldn’t be. But to answer your questions about alignment, yes the better they line up the better. However, the better HDR software such as PhotoMatrix builds in some alignment features which helps line up the images when they’re slightly off. Photomatrix also gives you choices on how it lines the images up, one choice perhaps better for certain images than another. So, you can be off a certain amount in some cases with no ill effect.
Photoshop shouldn’t tax your system resources too heavily. If you have the hard drive space then don’t worry too much about resources. Lightroom uses much more of your resources, especially in a laptop, because the database features are hard disk intensive.
Eventually you’ll want to set up an inexpensive desktop for your image processing. Much cheaper than a quality laptop, and the performance gains have to be seen to be believed. For imaging, you want all the power you can get. I’m running a 3 year old Core 2 Duo 2.66gig with 4gigs of RAM, two Nvidia 7950GT video cards, and over 12tb of storage.. and while it does okay.. the new i7 CPUs with say 8gigs of RAM would be sooo much nicer. A new i7 motherboard, CPU, and RAM is about $600 USD if you shop carefully.. and will fit in my current case, use my current video cards, storage, etc. So, once you get a decent setup.. upgrading every 3-4 years becomes cheap.
Not to mention a desktop LCD is hugely better for imaging than a laptop LCD..
I know you’re into computers pretty heavily, but if you need help spec’ing out a system let me know. I’m fairly up to speed on what matters for imaging.. could help keep you from overspending.
Take care
Steve
Hi Steve if I want to take some HRD photos do I just need to change the shutter speed and leave the exposure where it is. And off course the focus.
e.g.; start at f5.6 and change the speed from 50>100>200>400.
Charles
Hi Charles –
I’m getting enough HDR questions that I think I might do next weeks learning topic on HDR.
On a very basic level here is the answer to your question.
- First evaluate the scene. Figure out and know why you want to use HDR, what you hope to gain from it. If you can do it without HDR then do so.
- Set up your camera either in manual or aperture priority mode. Meter for the best overall histogram you can achieve and not the settings.
- Vary the shutter speed up/down from this reference point to capture the number of shots you want to process in HDR. This might be a total of three, the medium and one up/down from the medium. It might be five, seven, or more. You might choose ½ a stop as your steps, 2/3’s, 1 stop, or a bit more. It depends on the scene and what you’re trying to accomplish.
- HDR WILL NOT make a better image just because it’s HDR. You must have a reason and plan for its use..
I hope this helps.
Steve
Please submit your questions to QandA@Bkkimages.com All questions will be answered and most will show up in the weekly column.
A Snapshot of Bangkok Images Week in Review
This has been a busy week. I spent the entire week in Northern Thailand, Chiang Mai, Chiang Rai, and many parts between. I was able to shoot a performance at a theatre and capture some good stock images. I hope to process the images and share some galleries with you soon.
Infocus Blog
When Is It Too Small?
I’m talking about flash memory cards.
The trend is for physically smaller flash memory cards with greater amounts of storage. Between my DSLRs, compact cameras, PDAs, GPSs, and mobile phones (I’m sure I forgot something) I have flash memory cards in many shapes and sizes, and each new device hosts an even physically smaller flash memory card.

I should have got the hint when my ‘micro’ SD card shot out of the spring loaded slot of my mobile phone a while back and it took me two hours to find it in the rug! It’s really that small. Fortunately I don’t need to handle it that often, it stays in the phone and we only talk to each other via USB cable.

However, there are two devices I own that require a very frequent handing of the cards. My DSLRs and my compact cameras.
I’ve always been very comfortable with Compact Flash (CF) cards. They’re large enough not to lose, sturdy, and you can even wash and dry them without harm if you forget them in your pockets. I can’t say the same about Secure Digital (SD) cards.
They’re too small, too light weight, appear to let water inside, and did I say they’re too small?
My professional DSLR takes one each. A CF and SD card. Brilliant! (not) When I was up north last week I had one 16gig CF card and one 16gig SD card installed in my DSLR. When traveling I tend to use the SD card as much as possible because my laptop has a built in SD slot. If I use the CF card then I need to find the CF card reader at the bottom of my camera bag and plug it into a USB port.
I was up in my hotel room and noticed my 16gig SD card was still in the computers slot. I took it out, placed it in the front pocket of my shorts, and went directly to the car. Once at the car I reached into my shorts pocket for the SD card so I could put it directly in the DSLR. I figured I was ahead of the game by doing this immediately. I was wrong. The SD card was gone.
How? There were no holes in my pocket and I heard nothing fall to the floor. Not that you’d hear a tiny small SD card anyway. For sure you’d hear a big clunky CF card though! I backtracked and searched and turned my hotel room inside out and still no SD card. Later I turned the car inside out. Then my dirty laundry, suitcase, and camera bag. The SD card had somehow escaped into the wild or wherever SD cards go when they’re set free.
This could have been a catastrophe. I had 12 gigs of images from the last three days of shooting on that card. 6 gigs of those images I couldn’t replace. Fortunately (this time) I followed my own advice and had already backed up my images on both my laptop hard drive, and my external USB powered hard drive. This way I only lost the cost of a 16gig SD card. It could have been much worse.
What if I was shooting a wedding and lost the card between the camera and computer? I take precautions so this doesn’t happen, like using very large capacity cards that won’t require changing, leaving them in the big camera until I’m right in front of the computer, and so forth. But what if I didn’t?
I’ve never lost a CF card in 15 years of use. So far I’ve lost three SD cards. I tend to think I’m a very careful person when it comes to such things.
The only thing I can think of as to ‘how’ I lost the SD card, was reaching into my pocket for my keys, phone, or something on the way downstairs. Pulling out another item might have allowed the SD card to be pulled out and fallen to the floor unnoticed.
These are the sorts of things professionals should consider when selecting and using equipment.
Until next week..
