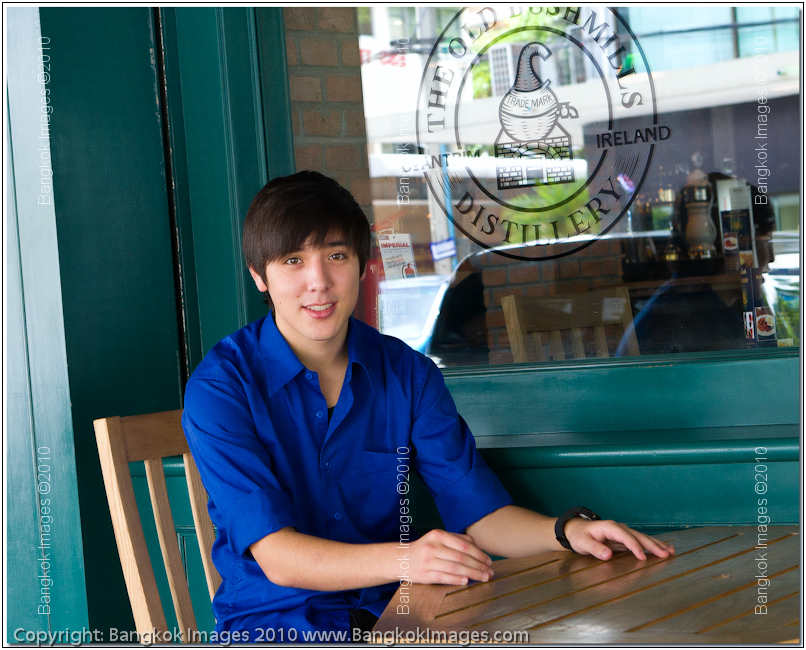
Alaska Cruise/Xrite Color Checker Passport, Hands On/100th Edition!
![]()
|
• Chiang Mai Grand View Hotel • Chiang Mai Hill 2000 Hotel • Chiang Mai Orchid Hotel • Green Lake Resort |
I have some unfortunate news to report on this project and total 100% transparency is how I feel this should be handled. My planned beneficiaries of this project, innocent very much in need children at a certain orphanage, have fallen victim to their local manager who we have found cannot currently be trusted and I doubt this is likely to change. Decisions need to be made if we're going to carry this project forward and if so who the new beneficiaries will be. I do expect this project to generate significant revenue so I take it very seriously. As you read this I'll be back in the Mae Sot area investigating further. I'll keep you informed. For now I'll still collect images with the intention of making the best most meaningful mosaics possible and as always, I'm asking for and will greatly appreciate your help with the images.
We are still accepting (and pleading for) images of children from SEA. No matter how terrible you think
they are, please send them in anyway. These images will be used to complete a set of 3 high quality mosaics which will be sold to benefit the Karen and Burmese Orphans living in the orphanages and refugee camps. The more images the better, I can
use all you have. Please take the time to go through your images for anything you think might help. If you missed the "No Place to Call Home" special, you can
click on the link and read more about this. Thank you! info@BangkokImages.com

Quick Click Links
Feature Photograph
An Alaskan Cruise Xrite Color Checker Passport, Hands On Review

Photography News of Interest
Readers Submissions
Readers Questions A Snapshot of Bangkok Images Week in Review
Infocus Blog, When Did You Become a Geek?T

Feature Photograph *menu
 Rob is a good friend and a very serious amateur photographer with the resources to travel and vacation in some really exotic places. He hails from New Zealand and has lived or traveled through much of Asia and wherever his extraordinary IT skills are required. Nary a day off from work is wasted as Rob and his wife Sao pack up camera equipment and hit the road looking for new and rewarding locations to photograph. He publishes www.1ds.com where you can always find lots of great photography and interesting blog entries. If there is a great place to photograph in Thailand you can bet Rob and Sao have already been there and documented it.
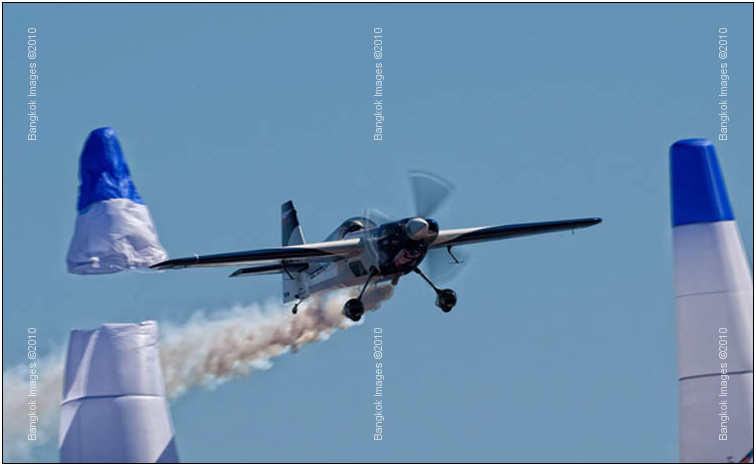
It’s a good 39 Celsius and we’re hiding in the shadows.
For this shot I was just trying to get the plane in between the two pylons. The cool thing here, and what makes everyone go “wow” when they see it is the obvious timing involved in getting the clean cut, the trail of paper on the wing and
the stopped propeller. Of course the smoke doesn’t hurt either. Of the 500 other nice shots I got, this one is the standout in everyone’s mind. I certainly didn’t see anything like this in the press, who seemed to stay down
around the main viewing area, which was, stupidly, looking into the sun a lot of the time.
With the Canon 1D3 and a 500/4 lens, I was shooting at the maximum 8fps, using the middle focus point so the AF system doesn’t get confused with collateral clutter (i.e. the Pylons in this case). For those wanting to understand how some of these
miracle pictures are taken, it’s usually a combination of luck (Being there when it happens), persistence (getting to where you need to be to get some luck, and keep on shooting until luck happens) and some planning.
Luck happens more often when you have planned the shots. We’d seen a few pylons clipped, but they were always out of range. By placing ourselves in a shootable distance of these pylons, it was just a matter of time.
So we now know that luck is:-
- Right Place;
- Right time;
- Persistence;
- Planning and
- Eight frames per second.
With photography, we make our luck.
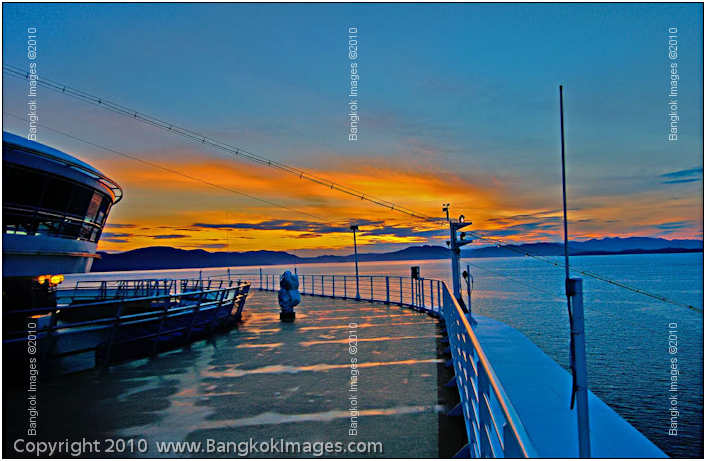
An Alaskan Cruise *menu
I’ve been spending a lot of time with my son and not so much time with my camera, but I aim to remedy this next week when I take son and camera on a road trip. Until then, I hope you don’t mind if I share some images from a cruise I took
my wife and son on about 8-9 years ago.
All the images were taken with a Nikon D2h which was a professional class Nikon DSLR at the time equipped with Nikon’s best sensor, a 4mp APC-S 1.5x sensor. I’ve oft mentioned that it’s not so much about the number of pixels, as the
quality of the pixels. Good glass and 4mp’s produced images that printed at 24×30 inches and back then were considered more than acceptable. I suspect few professionals could tell the difference between some of my 4mp 24×30 and my 21mp
24×30’s, unless they were side by side comparisons.
Some background. My wife and son had helped me with a lot of hard emotional and hard physical work when my parents passed away. 2-3 years of work. At its completion I rewarded their loyalty and hard work by booking passage on a then brand new cruise ship
on only its 3rd voyage.. I’ll tell you what I thought of the cruise at the end of the pictures.. J
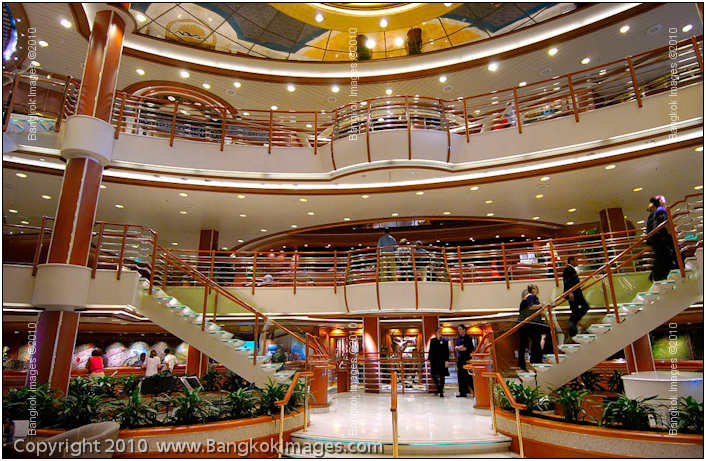
Nikon D2h, Nikkor 12-24mm F4 AFS at 14mm. Handheld at ISO 1600
This is the main ‘mall’ area of the ship with all the nice stores. These ships can be as nice as the finest hotels.
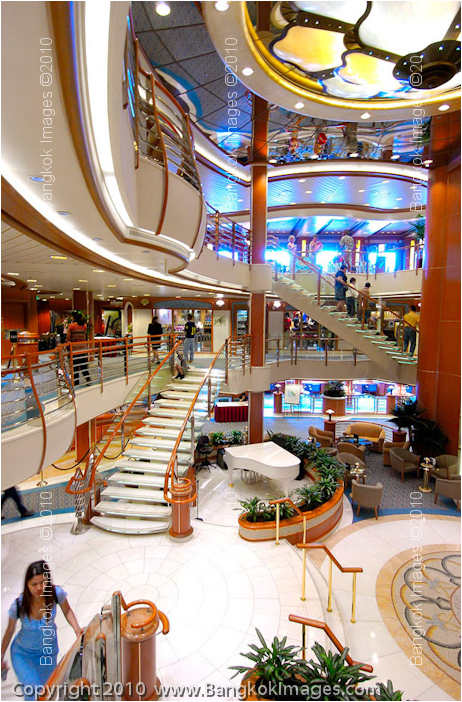
Nikon D2h, Nikkor 12-24m F4 AFS at 12mm. Handheld at ISO 1600
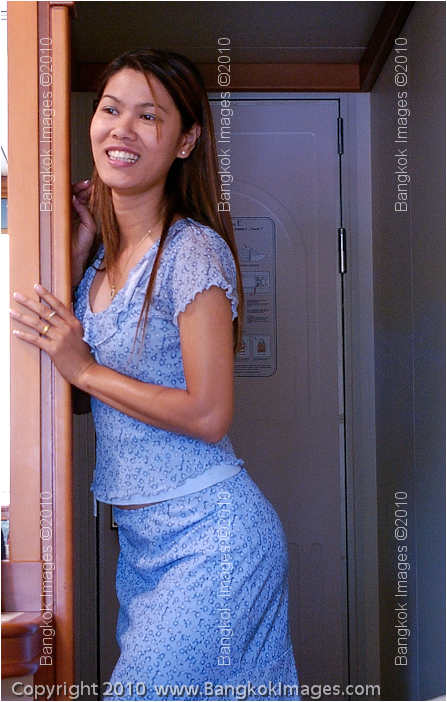
The wife coming up the stairs below.
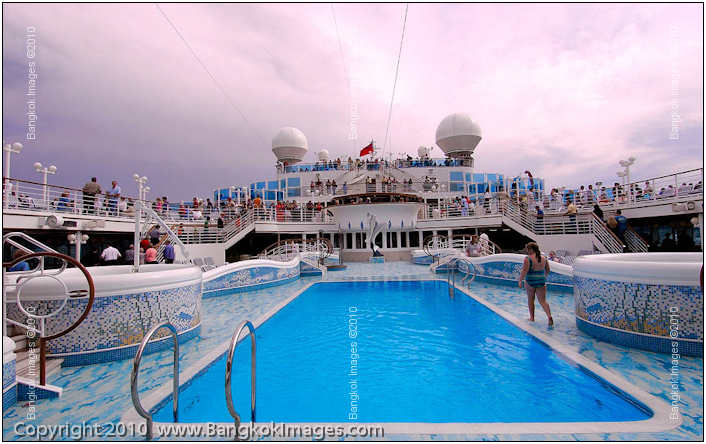
Nikon D2h, Nikkor 17-35mm F2.8 AFS at 24mm. Handheld at ISO 200
A view of one of the five pools and who knows how many Jacuzzis. The northwest sky was always interesting.
Nikon D2h, Nikkor 12-24mm F4 AFS at 12mm. Handheld at ISO 400
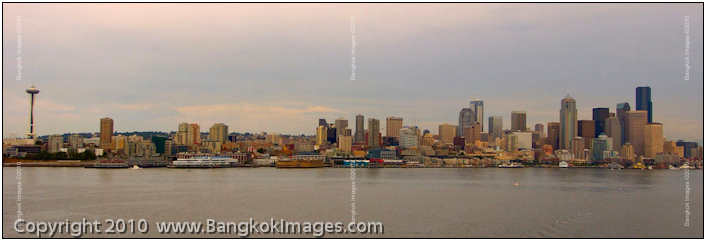
The Seattle skyline from the ship as we left port.
Nikon D2h, Nikkor 70-200mm F2.8 AFS VR at 120mm. Handheld at ISO 400
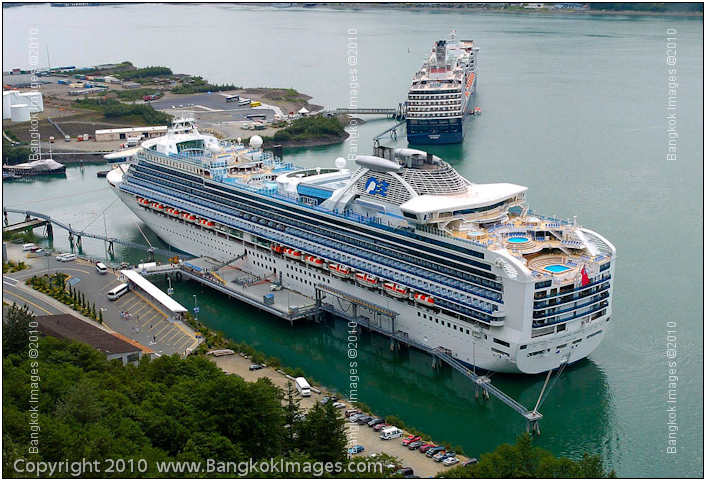
A view of our ship from a port in Alaska. I can’t remember what port, but she sure is a beautiful ship.
Nikon D2h, Nikkor 70-200mm F2.8 AFS VR at 70mm. Handheld at ISO 400
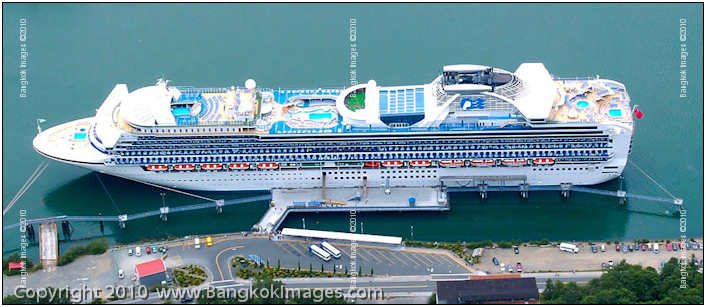
Another view of the ship where if you count carefully you can see all five swimming pools, the 9 hole golf course, and much more. Quite different from the big grey ships I’ve spent considerable time on.
Nikon D2h, Nikkor 300mm F2.8 AFS. Tripod mounted at ISO 200
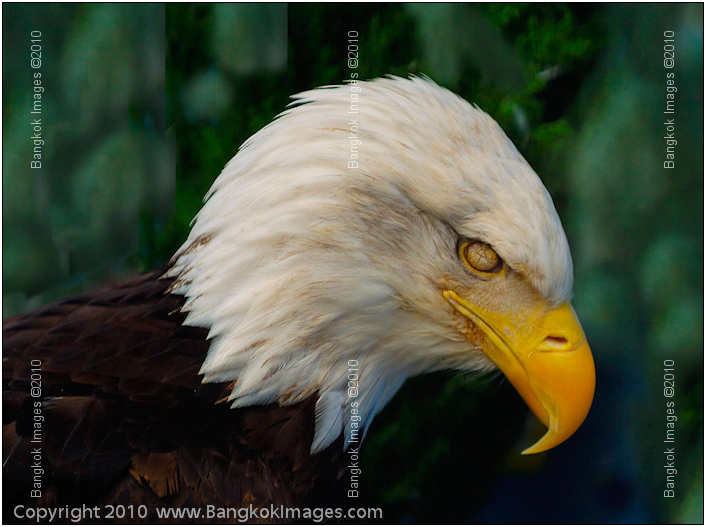
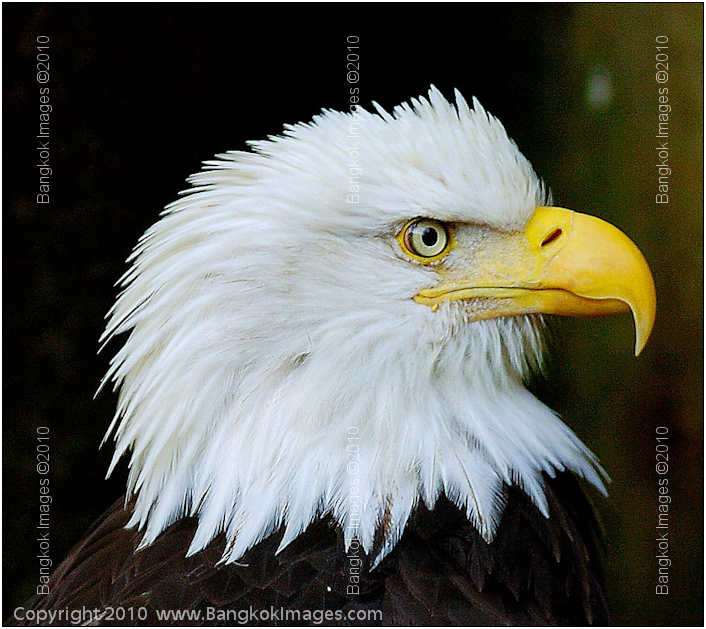
This caged eagle had its eye put out supposedly while mating. Eagles exhibit mating behavior in the air and can get quite carried away resulting in crashes and injuries. Without both eyes his depth perception is off and at the speeds these beauties fly
he flew into the ground and barely survived. A caged life was all that would keep him alive. To me he looks extremely sad.
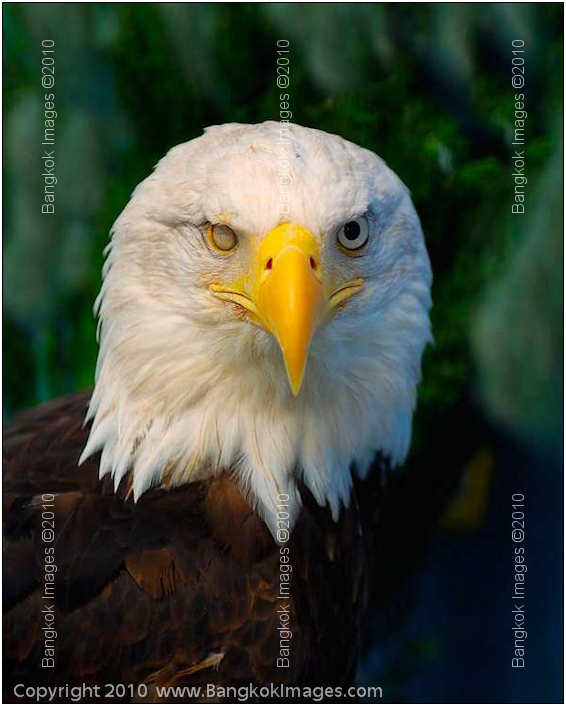
Nikon D2h, Nikkor 300mm F2.8 AFS. Tripod mounted at ISO 200
It took over 30 minutes for him to turn towards me. Hundreds of tourists noisily went past his cage and I’d swear he made the decision not to look at them. Once they were gone he slowly turned towards me and held my gaze for several seconds.
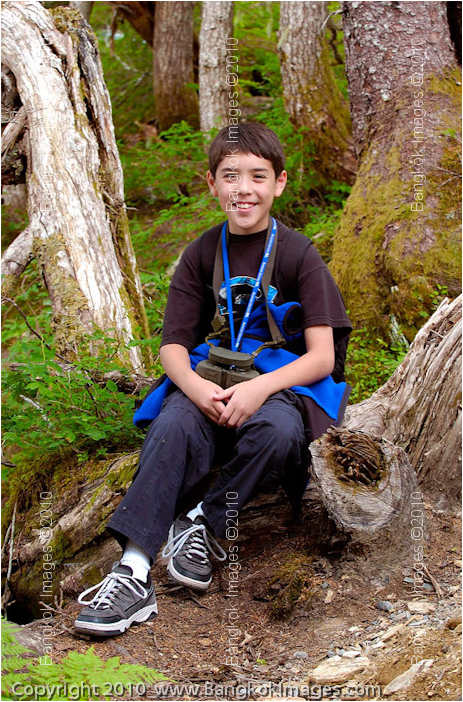
Nikon D2h, Nikkor 28-70mm F2.8 AFS at 60mm. Handheld at ISO 400
My son while out on a hike.
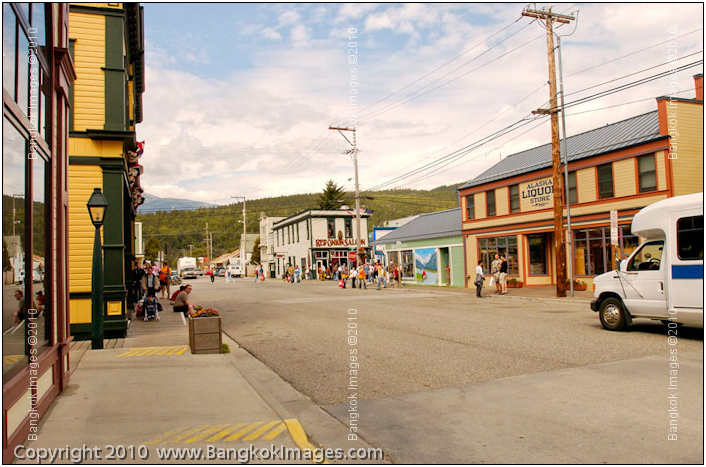
Nikon D2h, Nikkor 17-35mm F2.8 AFS at 18mm. Handheld at ISO 200
A tourist town plain and simple. Most of the small towns servicing the cruise ship crowds had a similar look and shops lined with everything from real wolf pelts (wolves raised in captivity!) to custom made
hunting knives.
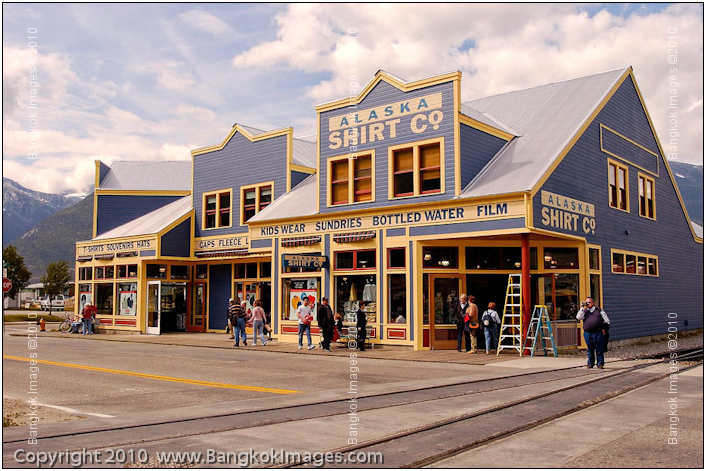
Nikon D2h, Nikkor 17-35mm F2.8 AFS at 20mm. Handheld at ISO 200
The same sort of town at another port. It was at this town where I could resist a custom made skinning knife made by the best custom knife maker in Alaska. Beautiful work.
Nikon D2h, Nikkor 300mm F2.8 AFS. Tripod mounted at ISO 1200
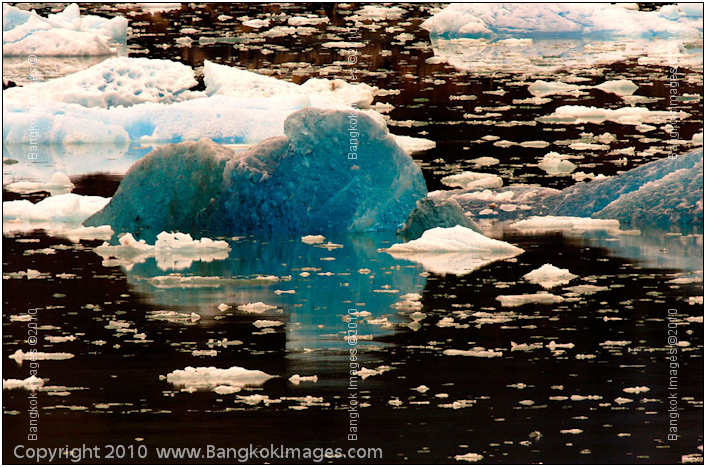
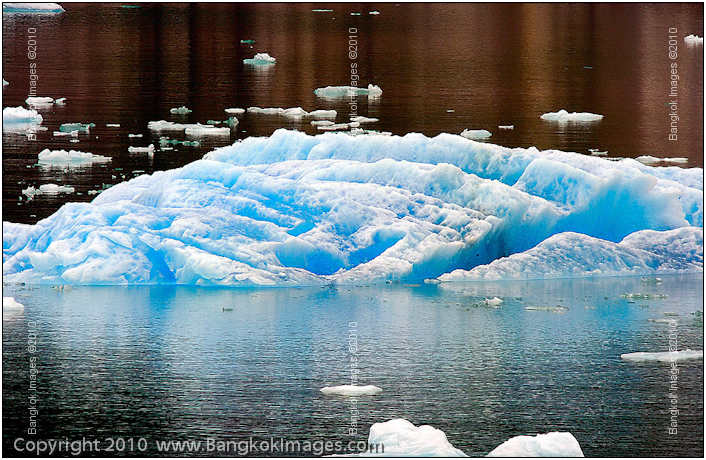
A piece of floating ice. Floating ice can and was often many different shades of blue.
Nikon D2h, Nikkor 300mm F2.8 AFS. Tripod mounted at ISO 1600
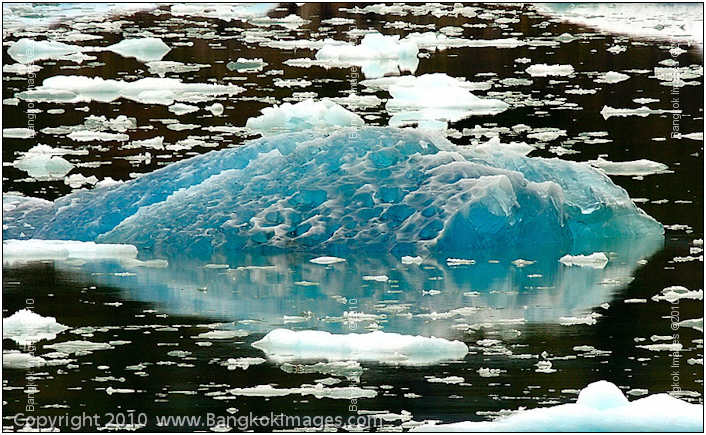
Another piece of floating ice.
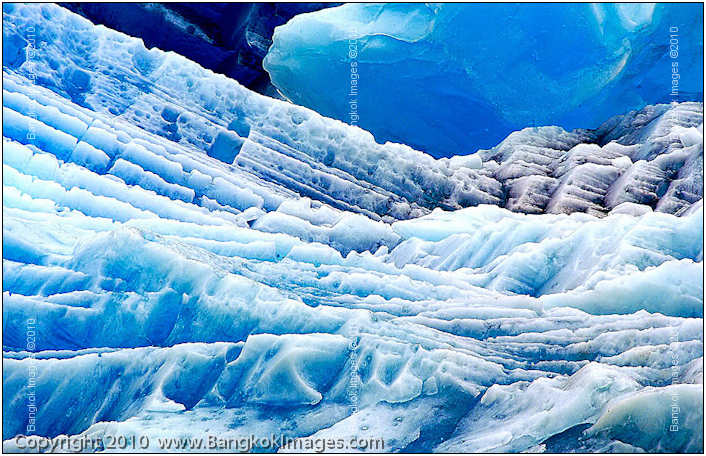
Nikon D2h, Nikkor 70-200mm F2.8 AFS VR. Handheld at ISO 800
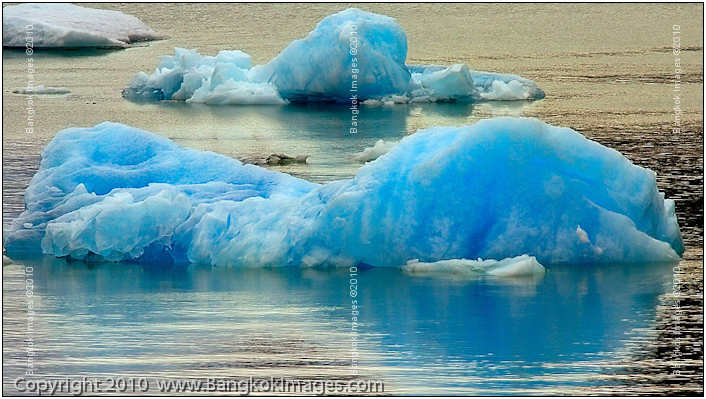
The floating ice can be really beautiful. I’d stand on the deck for hours watching the different light of the fast moving sun change the color and shadows of these ice pieces.
Nikon D2h, Nikkor 28-70mm F2.8 AFS at 43mm. Handheld at ISO 200
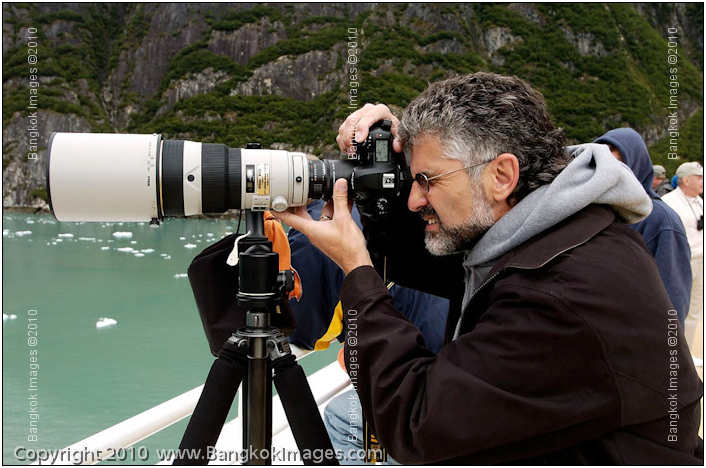
I made a friend on this cruise and his name is Phil. This is him sampling my D2h, Nikkor 300mm F2.8 AFS (even back then I liked white lenses.. :o), and my Gitzo tripod with Arca-Swiss head. Yes, I brought two D2h bodies with me on the trip.
Nikon D2h, 70-200mm F2.8 AFS at 200mm. Handheld at ISO 1600
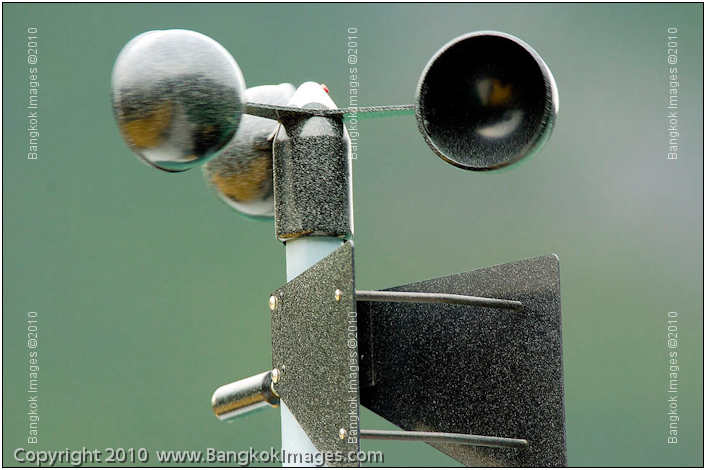
A weather vane, mostly decorative I’m sure.
Nikon D2h, Nikkor 300mm F2.8 AFS with the Nikkor 2x teleconverter. Tripod mounted at ISO 800
With the APC 1.5x sensor, this was an effective 900mm shot from a moving ship of a large glacier. These shots took every bit of proper tripod and telephoto lens technique I could muster and quite a few of them turned out very sharp.
Nikon D2h, Nikkor 300mm F2.8 AFS with the Nikkor 1.4x teleconverter. Handheld at ISO 1600
Quite the lucky shot from a fast moving skiff at an effective 630mm!
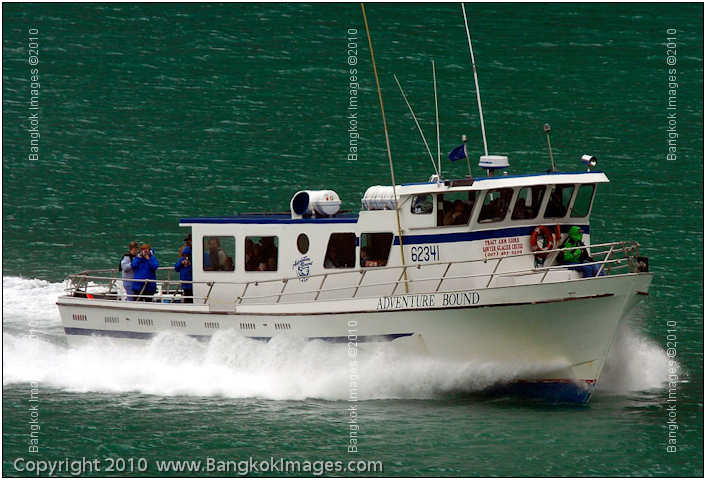
Nikon D2h, Nikkor 70-200mm F2.8 AFS at 200mm. Handheld at ISO 400
Whale watching tourist boat. I saw more of these than I did whales.
Nikon D2h, Nikkor 17-35mm F2.8 AFS at 24mm. Handheld at ISO 1600
A beautiful Alaskan sunset.
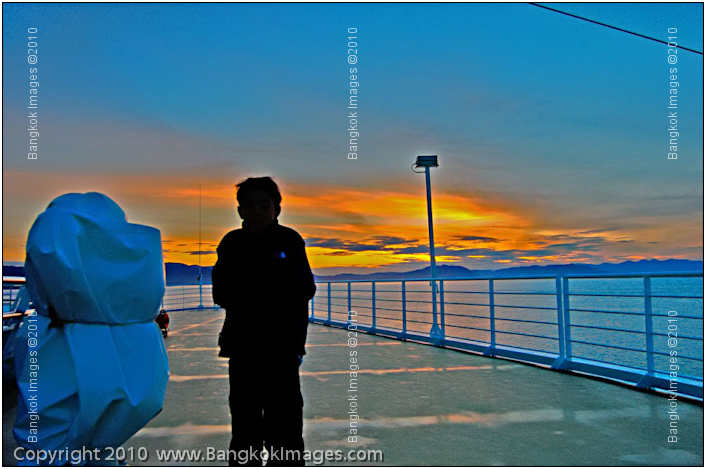
Nikon D2h, Nikkor 17-35mm F2.8 AFS at 35mm. Handheld at ISO 1600
My son came up on deck to get me for dinner.
Nikon D2h, Nikkor 85mm F1.4. Handheld at ISO 800
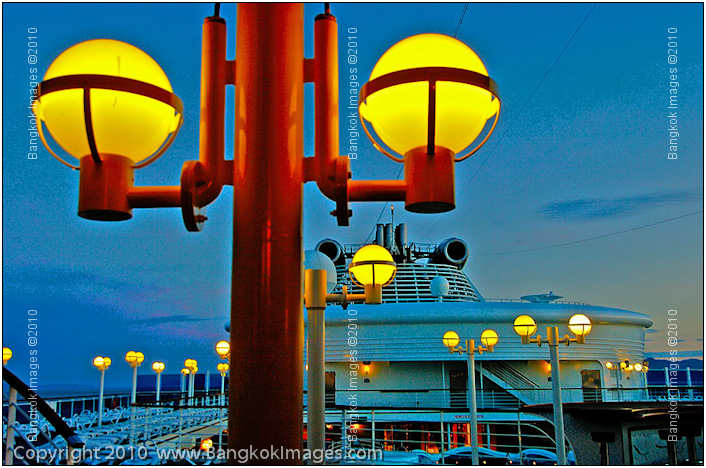
Many nights I’d wander the ship looking for interesting photos that someone else hadn’t already taken thousands of times. This might be an original.
Nikon D2h, Nikkor 28-70mm F2.8 AFS at 70mm. Handheld at ISO 800
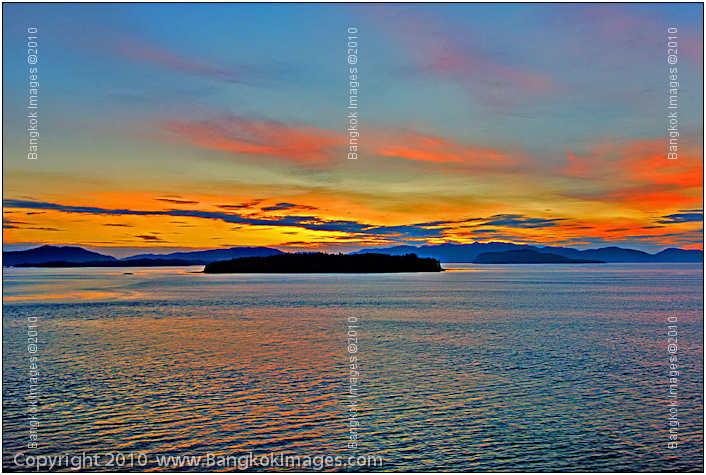
The colors of the sunsets were spectacular, even if the landmasses were unremarkable.
Nikon D2h, Nikkor 300mm F2.8 AFS with Nikkor 2x teleconverter. Tripod mounted at ISO 400
Quite the sharp image for a wild eagle in its nest at an effective 900mm. There are many eagles in Alaska, the trick isn’t in finding or even photographing them, but in photographing them with a degree of sharpness.
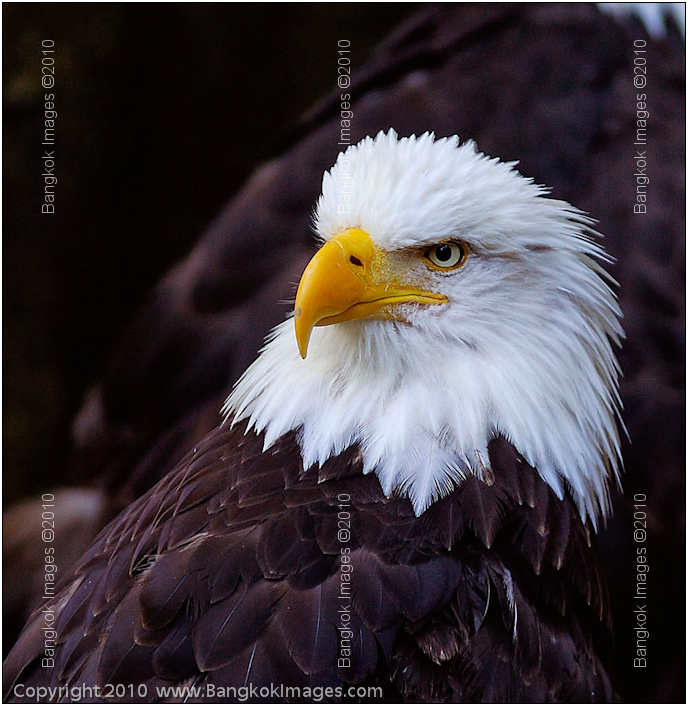
Nikon D2h, Nikkor 300mm F2.8 AFS with Nikkor 2x teleconverter. Tripod mounted at ISO 800
Taken at the same time and the same nest as above. I tried and tried, but there was no way to get both of the pair in focus at the same time no matter how much I stopped down the lens.
Nikon D2h, Nikkor 28-70mm F2.8 AFS at 28mm. Handheld at ISO 1600
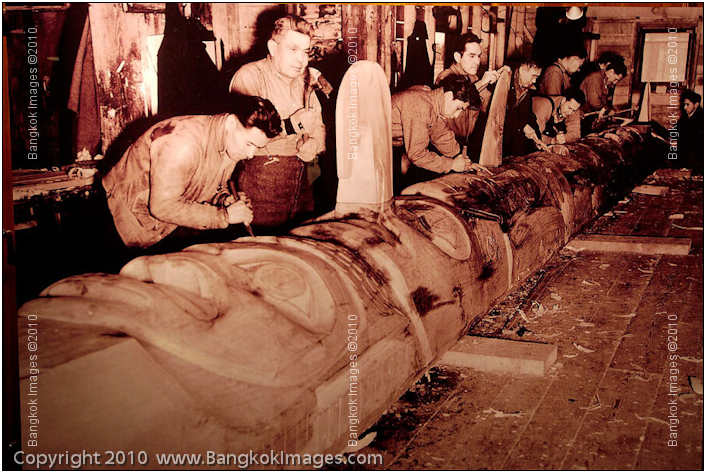
This photograph hanging on the wall of a totem exhibit really intrigued me. It looked very old and was technically very good. The composition was impressive as well.
Nikon D2h, Nikkor 28-70mm F2.8 AFS at 40mm. Handheld at ISO 1600
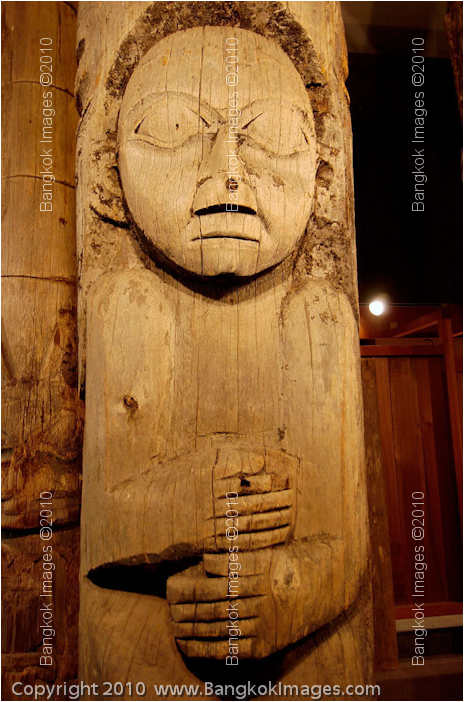
This totem appeared to be otherwise engaged in both a mental and physical activity!
Nikon D2h, Nikkor 17-35mm F2.8 AFS at 35mm Handheld at ISO 400
I captured this during a boring entertainment show. Sometimes it funs to hold open the shutter, move the camera about, and see what turns out.
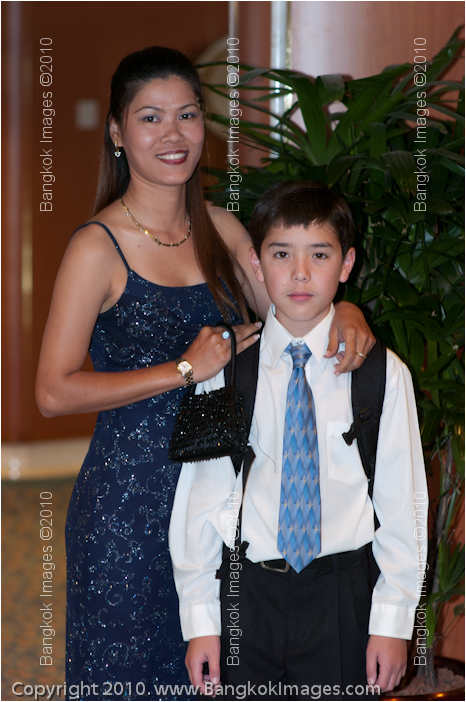
Nikon D2h, Nikkor 28-70mm F2.8 AFS at 50mm. Handheld at ISO 200
The wife and son at one a forest.
Nikon D2h, Nikkor 28-70mm F2.8 AFS at 28mm. Handheld at ISO 200 w/flash
The wife in our closet sized stateroom waiting for me to put my shoes on and go to dinner. We sure did eat a lot on this trip.
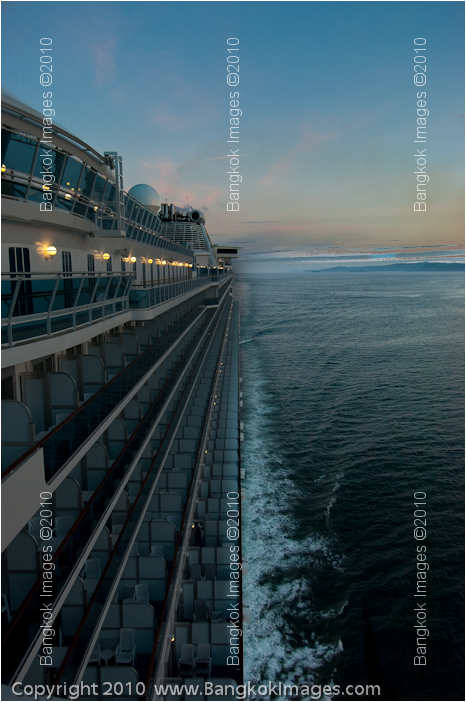
Nikon D2h, Nikkor 12-24mm F4 AFS at 24mm. Handheld at ISO 1600
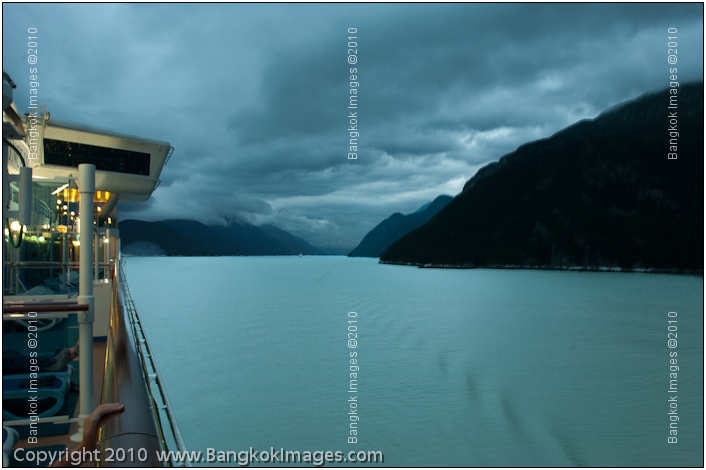
An early evening shot as we moved through one of the many passages.
Nikon D2h, Nikkor 70-200mm F2.8 AFS VR at 70mm. Handheld at ISO 400
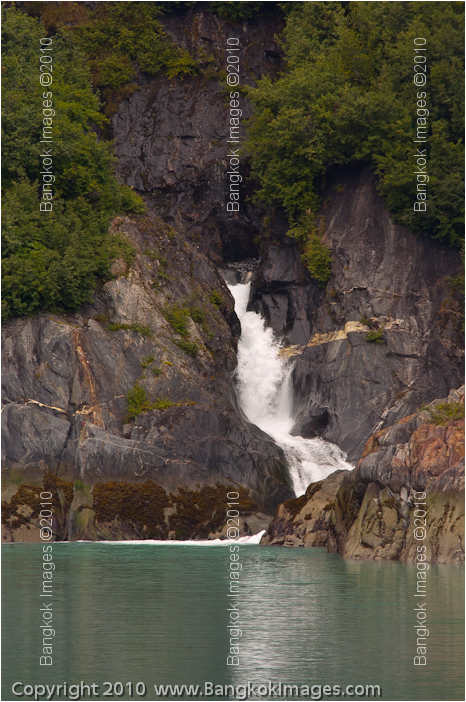
As we moved slowly through the passages waterfalls such as this were everywhere. Truly a beautiful piece of country.
Nikon D2h, Nikkor 12-24mm F4 AFS at 12mm. Handheld at ISO 1600
It wasn’t easy getting in position for this shot and I was lectured by a crewmember for sitting on top of his lifeboat..
Nikon D2h, Nikkor 28-70mm F2.8 at 60mm. Handheld at ISO 200 w/flash
There were several formal dinners where we dressed to the nines and on this occasion sat at the captain’s table. He turned out to be a sour old coot with not much to talk about except his trips to Thailand which he thought the wife would find of
interest. He came close to crossing the line with several comments.
Xrite Color Checker Passport, Hands On Review *menu
Introduction
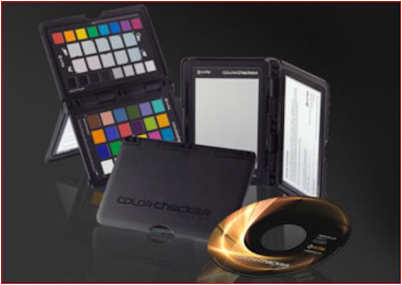
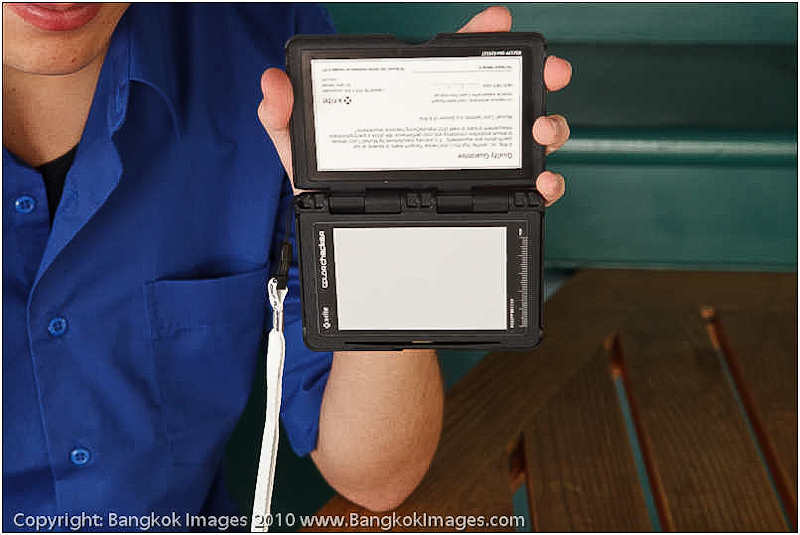
Recently I took delivery of an Xrite Color Checker Passport and I must confess, I own probably every such device ever hawked by the camera con men.. always searching for something
that really helps not only get the proper on-site white balance, but the proper balance of colors as well. This product includes plug-ins for ACR CS5 and Lightroom.
Most people.. when you talk "Correct White Balance" they focus on skin tones, and indeed correct skin tones are indeed the most obvious and easy way to tell if someone got the colors close.. assuming there's a person with
skin in the composition. However, it's entirely possible and even most common, to get the skin tones close but still have your color balance totally off. This is especially true in mixed light.
There is nothing so "right" about an image then the proper balance of color throughout the entire exposure and tonal range. We've all seen them, and they almost always occur under very unusual perfect light or by way of
Photoshop and a real experienced pro. But what does the normal guy do when there's heavy cloud cover and you're taking a picture of your son in front of a colorful building? Do you want it to look like its drab and dreary? This usually
means their skin tones are grayish and not natural looking at all, and the surrounding colors are flat and don't look right.
I've only used the Color Checker Passport for a week, but I plan on testing it much more in the coming week(s). Regardless, it's easy to see this device is in a class by itself and not only does it help you obtain the most perfect
on-site White Balance of any device I’ve previously used, but it also computer generates a custom DNG color profile for each lighting situation that can instantly and easily be applied to one to hundreds of images at a time.
How long does it take to use it? Just two shots, two exposures and you've got what you need for each lighting situation. About 3-5 seconds depending on the technique required by the camera to set a custom WB.. and even the custom WB is optional.
You can still build the custom DNG profile with just one shot.. awesome technology!
Hands on Demonstration with Examples in Lightroom 3.0
First, using the spot focusing area in your viewfinder fill it on the grey card contained in the Passport. Follow the directions for your specific camera to create a custom white balance. This step is optional, but recommended and for many this custom
white balance will be head and shoulders better than their auto white balance setting or what they can do by eye. But we’ll take it several steps further towards better accuracy below.. ;o)
With the Canon 5d Mark II, you take an exposure/image of the grey card, go to the menu systems second tab (or be smart and add these commands to your custom menu) and choose “Custom White Balance”, it will automatically
show the last image you captured (but you can spin the wheel and choose more), hit the “set” button in the middle of your big wheel, and it will then ask you “Use WB Data from this image for Custom WB?” Choose “OK” and then set your camera to use the “Custom White Balance” setting (add this to your custom menu too).
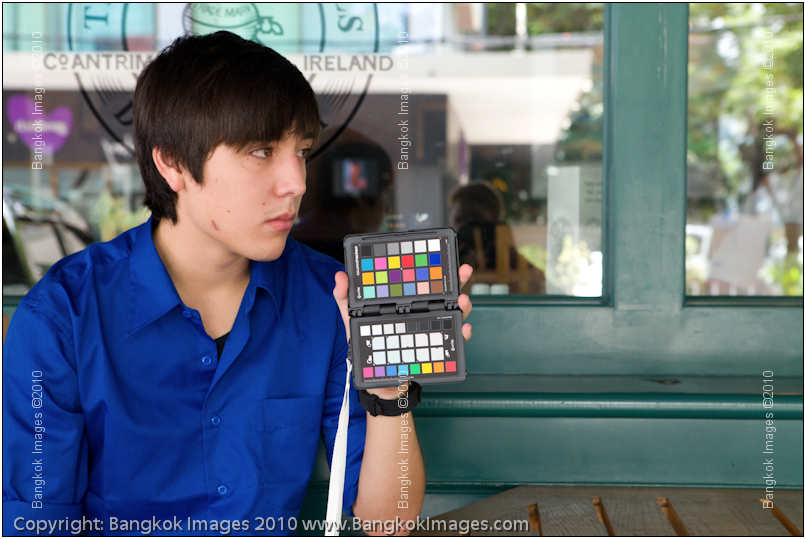
Next, take a picture of the color checker portion of the Passport in the light you’ll be using. You don’t need to fill the frame with it, but I’ve found it needs to occupy approximately 15-20% of the frame to work. Otherwise it won’t
register with the automatic profiler in the plug-in.
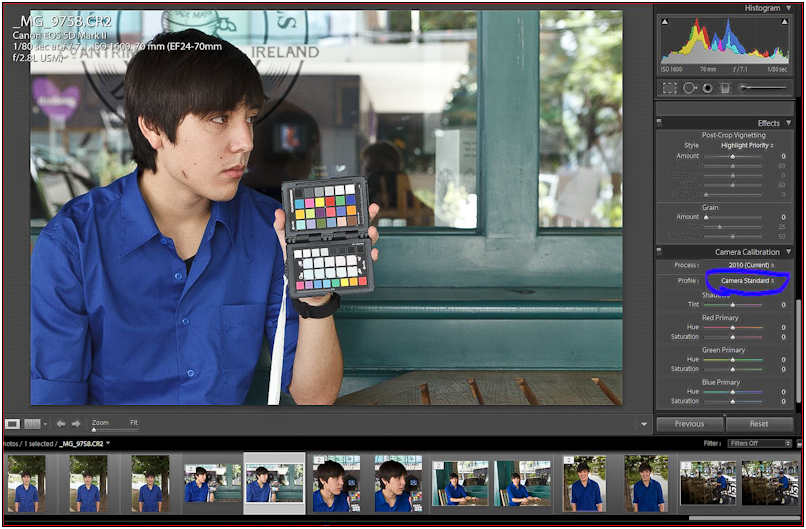
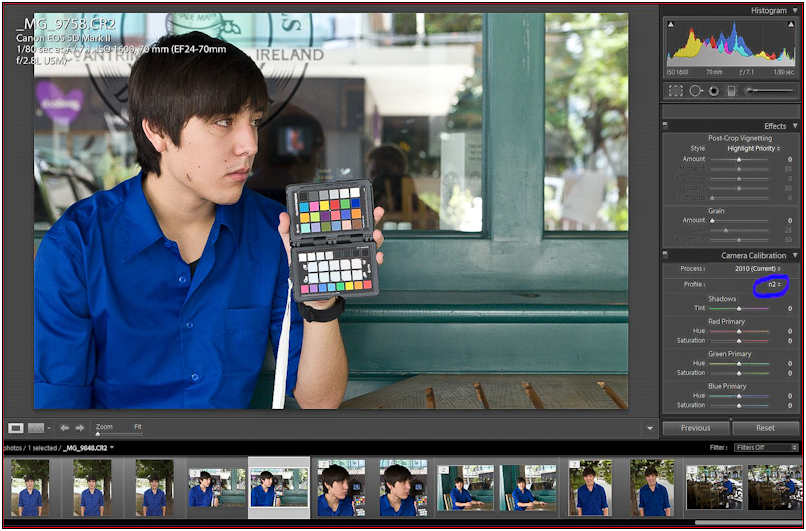
Once you’ve imported your images into Lightroom you can see here where the standard color profile is selected by default in the “Camera Calibration” area of Lightroom.
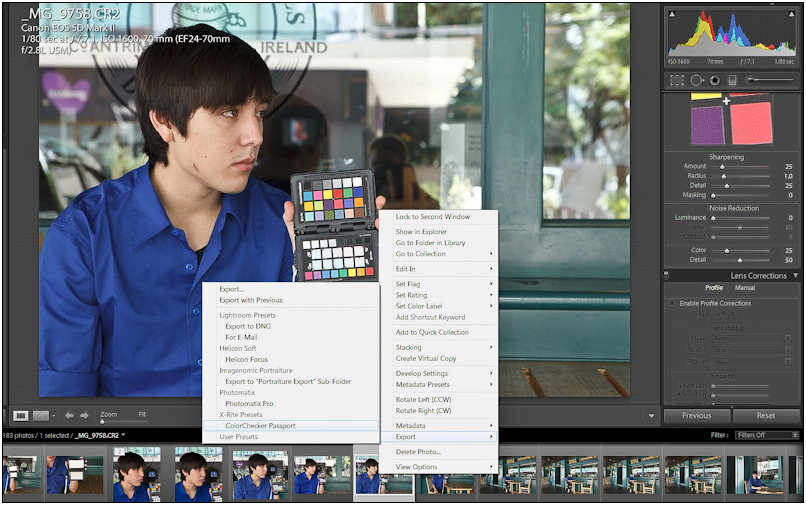
Right click on the image, navigate to “Export”, and then to “Color Checker Passport” and click on it.
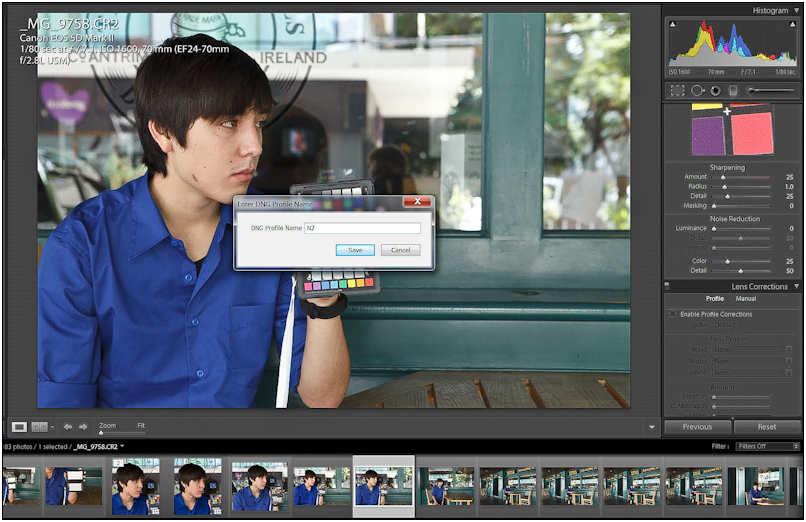
Now it will ask you for a name for the custom profile you’re about to create. In this case I named it “N1.”
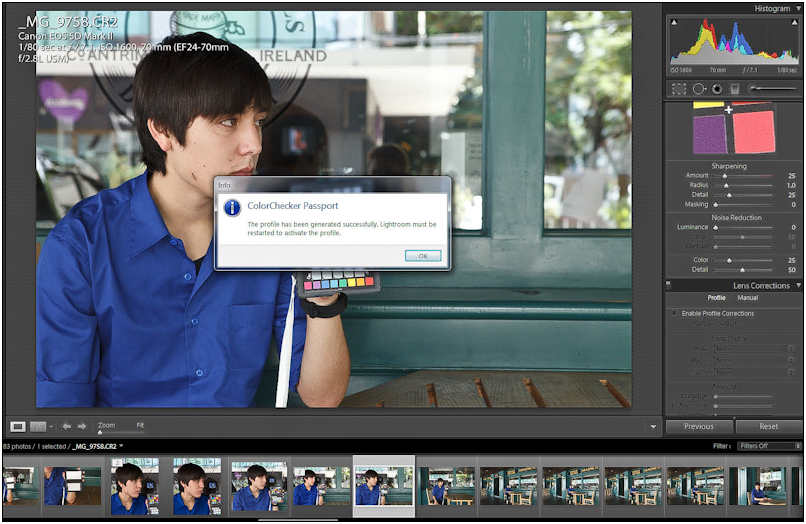
If the profile creation was successful you’ll get a dialog box telling you the profile was completed and you’ll need to exit and then re-enter Lightroom before the new profile is available.
If like me, you took several “sets” of images in different locations, just go ahead and create all your profiles and then exit/enter Lightroom once.
Now you can select your profile and ‘immediately’ you’ll see the effects. Notice the blue shirt has drastically changed (to the right hue) and the green paint as well.. not to mention the skin tones are near
perfect.
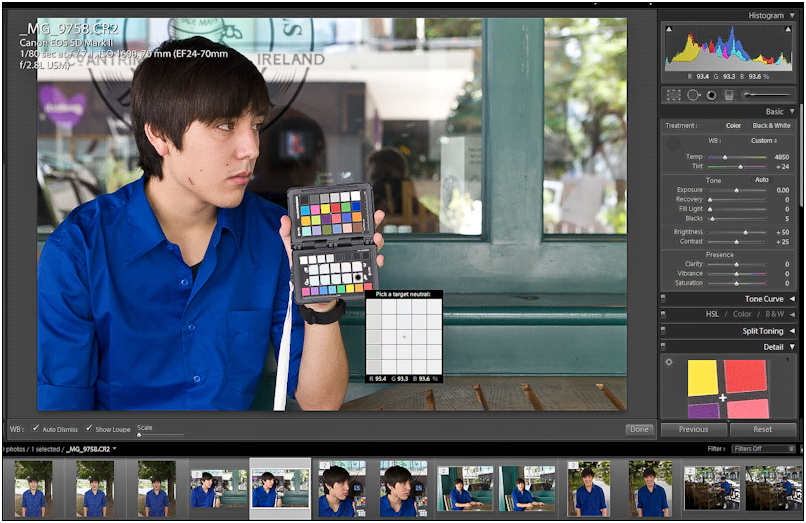
Now you have the opportunity to use the “Warming Squares” to change the skin tones to your taste. As I’ve said many times before, the “correct” white balance might not be the “best” white balance, so these squares allow you to adjust to taste. Use the White Balance Eyedropper and select your first warming square.
Note 1: The Eyedropper doesn’t ‘stick’ with screen captures so I put a black dot on the selected warming square.
Note 2: The color checker is upside down, though it really doesn’t matter.

Notice the subtle change when selecting the second warming square?
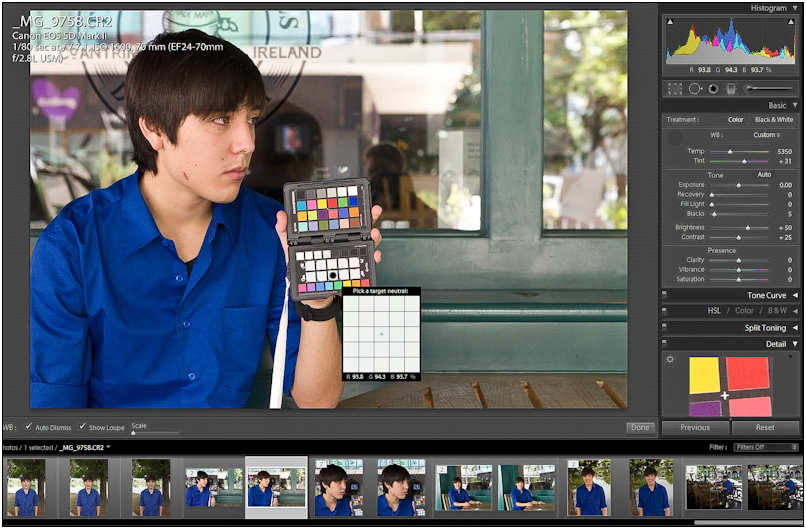
And another subtle change with the third warming square?
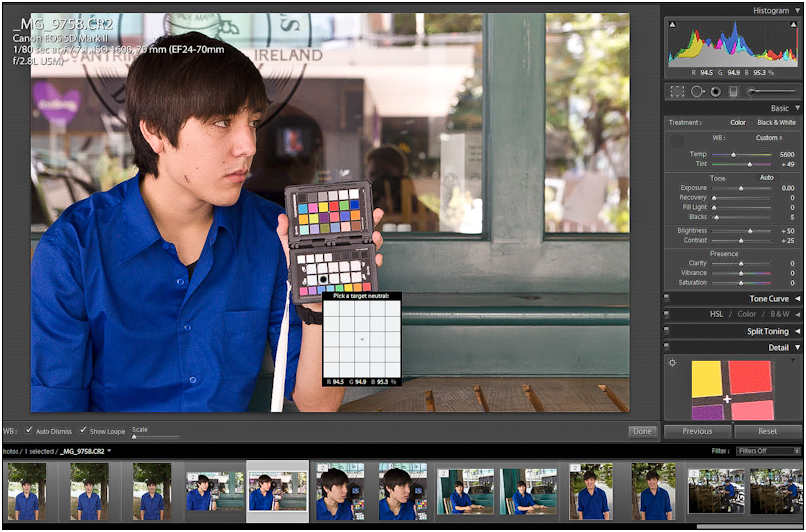
The first warming square was too blue, the second warming square was too neutral, and the third warming square was too yellow.. but the fourth warming square was just right and I ate the entire bowl.. wait.. wrong story.. but you get the idea..
With years of experience adjusting white balance both by eye and many other means, I could not achieve this sort of accuracy. It’s stunning how easily it is to achieve perfect white balance and then bespoke skin tones using this device.
Summary
I'm easily seeing 'more capability' in the realm of color and exposure from my cameras, and this includes my professional DSLRs, my new Sony NEX-5, and even my point and shoots, than any single feature or improvement I
can think of other than proper exposure in the first place.
I'll be incorporating this into my workshops immediately, both in the field and software sections. I'm obviously impressed and I plan on mastering the smaller points of this device over the next few weeks.
And of course it only has a consistent and proper effect if used on a color managed system, so once again I'll be running some future pieces on properly color managing your monitors, your browsers, your applications, and how to tell if they're
done right and which color versions each is compatible with.
(I’m off to throw a few previous such devices in that ever growing box of “equipment I no longer use” with great pleasure)
Photography News of Interest *menu
The Online Photographer is a very popular blog written by a knowledgeable photographer, one of my favorite sites to visit when “reading the news.” This article discusses using
the Ipad as a second monitor for a Macbook when on the road. The idea has great merit, even if the Ipad is a lot glossy and a lot too small. Take a look at the article
and the comments are interesting too.

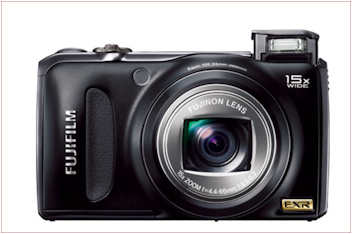
Fuji announces it’s new Fuji Finepix F300EXR with a very useful 24-360mm (35mm Equiv) super zoom, full 720p HD video, and the second generation Super CCS EXR sensor. I love my F200EXR and I’m
sure I’ll love this one too. Much has been improved. Read about it here.
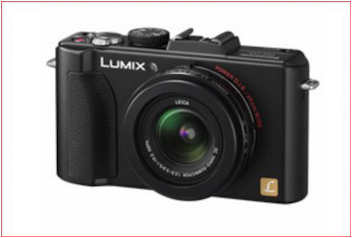
The Panasonic DMC-LX5 premium has just been announced and you can read about it here.
This series has always been popular with experienced photographers wanting a quality point and shoot and if you’re in the market this deserves a serious look.
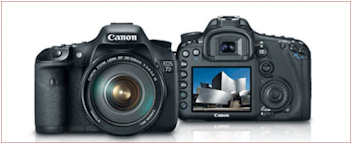
Canon just released a firmware upgrade for it’s very popular and capable EOS 7d DSLR to fix an Autofocus point selection issue and several other bugs that can occur under various
shooting conditions. This is a “must update” firmware upgrade so go here to get your upgrade and
be sure to follow the instructions exactly so you don’t accidently brick your new DSLR
Readers Submissions *menu
Hi Steve
I have been running around and am in Europe right now. Spent about two weeks in Italy and now am in my first full week in Germany. Wanted to share some of the shots I have taken while I have been in Europe. Hope that things are going well for you and your lady. It has been busy for me but that's ok.
Mike
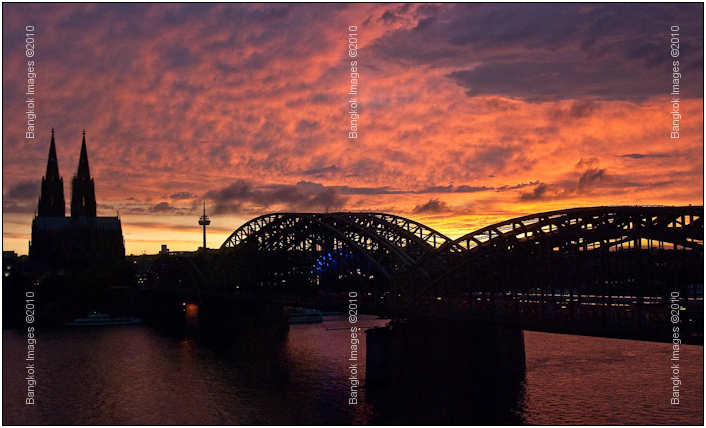
Taken last night out my window. Koln Cathedral. One hell of a storm before this one.
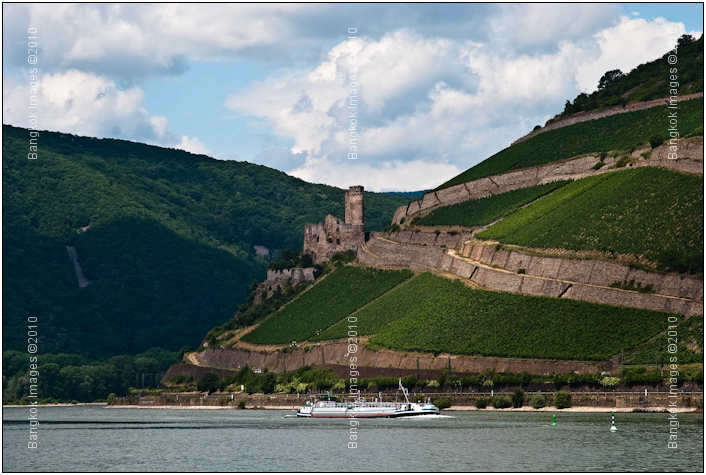
Rhine river
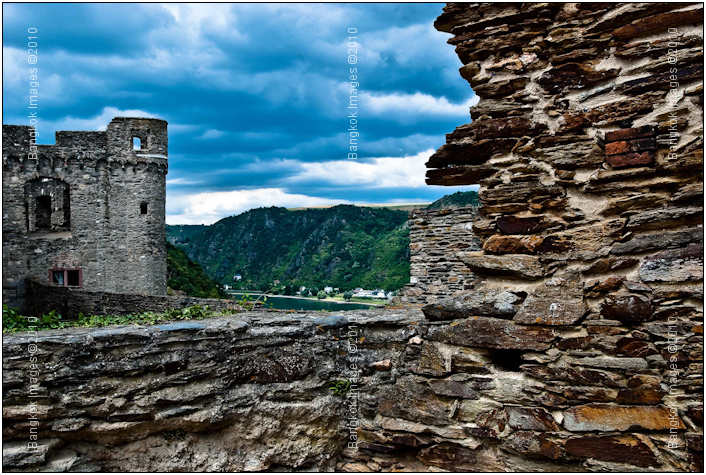
Using what you showed me. Rhinefels Castle St Gore Germany
Siena Italy

Carrivogio painting taken in a church in Rome,
Have more but will send later.
Mike G
Mike –
I think your annual summer vacations are always extremely interesting. I can’t believe how much your photography has improved and I can’t wait to see more of your work. Oy says hello and asks when you’re coming back for another visit.
Steve
Steve.
Just an example of the HDR software results using Photomatix Pro 3.2.
Three bracketed pictures and then final product that was run thru the Exposure Fusion option.
RICKSTER
Go green in 2010, recycle Congress
Rick –
It looks like you’re getting a handle on HDR processing. I’d like to see more examples from you, its hard to tell much from a single setting but it appears you needed a lot more variance in your exposures and possibly more exposures. You
achieved a good effect, but maybe if I could see more I might be able to offer something more solid in the way of technique.
What are your impressions of this software?
Steve
I suspect the readers submissions will be a highly anticipated section of this column and I encourage anyone with photographs and travel accounts they'd like to share to please send them to me at: info@BangkokImages.com
Readers Questions *menu
Steve:
You indicate in your weekly column that submittals are always welcome, well I will keep them flowing.
What information do you have on the Sony LAEA1 adapter for use on the NEX-5 to allow the use of Sony and Minolta lens.
- (EA1 Lens mount adaptor
- Use your collection of A-mount lenses
- E-mount adapter provides compatibility with A-mount DSLR lenses)
With your knowledge and experience with all things camera and lens do you see any down side to using this adapter with A-mount lenses?
Would all aspects of picture equal to what would be obtained using an E mount lens?
My reason for this question is that I still would like to use the NEX as a pocket fit camera and this could be a possible fit.
Rick
Hi Rick –
I have no personal experience.. but have read it works.. but makes for a very cumbersome combination.
I was thinking about the adapter that allows Nikon and Canon lenses.. but then I thought I already have nice Canon and Nikon bodies for my Canon and Nikon lenses.. so besides curiosity there’s not much point for me. Though I did have the excellent
Nikon 45p pancake lens in mind.. it’s manual focus but that’s okay.. I think it would make an excellent match for the Sony NEX-5.. I’m still tempted..
Steve
Steve,
Since a hard drive crash (on the day I bought another disk to "mirror" it!), I have been very backup aware. My problem began as I collected my directories of pictures from a number of different computers and hard drives and consolidated them into a single directory. I now have all my photos in one (two, I do mirror my drive now) place but realize there are a large number of duplicates, scattered throughout my consolidated directory. I am interested in cleaning up my collection and am looking for a good program to identify duplicate images, not just duplicate file names. Any recommendations?
Bryan R
Hi Bryan –
There are two ways of doing this. Finding duplicates by duplicate file names, and Lightroom will do that for you.. or find them by matching visual similarities. Believe it or not, this last technology was brought on by the porn industry. People would
download tons of porn via user groups that would automatically download everything out there.. and they’d end up with tons of dupes. This brought on the need to sort out the same pictures and give you a choice to save the latest date image,
the larger image, or whatever criteria you need.
If you google “find image duplicates” you’ll find a host of programs… some freeware, some pay, but nothing I’ve recently used. Someone I know saidthey had good luck with this one: , maybe you’ll find it useful.
I hope this helps
Steve
Hi Steve:
Hope that things are going well with you. I would love to get back there some time but have been looking at either the area around Egypt or going into India this spring. I will see what I will be doing.
I am looking at possibly getting another camera body. I am looking at a Nikon D 3000 or a D 5000.
They are on sale at Costco for $700 and $900. They have a couple lens that I have already but that is part of the package.
I also picked up a AF Micro-Nikkor 60 mm F/2.8 lens and will be seeing what I can do with it.
I would appreciate your opinion.
Thanks
Mike G
Hi Mike –
Nice pics! Mind if I run them in the readers submission area?
Things are going well here.. Hope everything is going well for you too.
Mike.. I think you're ready for a better camera body than what you're looking at. The two you mentioned really are no better than what you have. Consider the D300s.. or an older D300 if it's discounted enough. There are some great deals
out there on the D700 full frame.. and there will be more when the D700s is released in a few months.
The 60mm Micro is a great lens. I had that one. You'll need to get close to your subject with only 60mm.. but it's as sharp as any lens gets.. wonderful lens. However, a 200mm micro, especially the new Nikkor IS version, will give you a much
more comfortable working distance for real life subjects where 60mm will put you way to close.
Take care Mike
Steve
Please submit your questions to info@BangkokImages.com All questions will be answered and most will show up in the weekly column.
A Snapshot of Bangkok Images Week in Review *menu
![]()
100th Edition of Infocus, Bangkok Images Weekly! 100 columns and I still haven't run out of things to say, stories to tell, or knowledge to share. In the length of time it took to publish 100 weekly columns we've accomplished much, new equipment, photographing many new places and subjects, developed the column into its current format, built a new website, but nothing.. and I mean nothing is as big to me as what I see a great example of in this 100th Edition. What I see is tons of user input and user contributions. Rob opening with the feature photograph, Rick and Mike with both questions and input, Byran with questions.. this column has taken on a life of it's own.. a life that's yours. Thank you for making this column possible.
BkkSteve
A very slow week as I visited with my son. No workshops, and no jobs. However, we did receive some new equipment and spent a fair amount of time setting up and testing. The Xrite Color Checker Passport was one such item and it immediately caught our interest
and worked so wellI pushed its review right to the front.
Our NEC wide gamut colorimeter also came in and we spent a lot of time profiling our monitors. This works very well, in some circumstances nothing else will do, while in most circumstances a regular puck will do. I need to do a bit more testing and build
some samples to share before writing this review.
The “What’s New”
area of our site is becoming popular and I try to update it several times a week with new and interesting information. Check it out to keep track of Bangkok Images exploits and commentary throughout the week.
Still a ton of hardware and software reviews being formed, but it takes a while to properly review software and get a good feel for it. We’re still looking at the second part of the new Sony NEX-5 and our 16mm lens is due in this week, a NEC wide-gamut
colorimeter, the NEC monitors themselves, image hoods, Seagate Momentus Hybrid SSD/Mechanical hard drives (due in Monday), Adobe CS5, Topaz, PTIgui, and the new Office Professional 2010.
We still have a complete system build we sourced the parts for and documented coming your way soon, a high-end imaging system you can get the parts for at Pantip and build yourself. All proven parts, and the new owner of the system couldn’t be
happier as he carried it back to Australia with him.
Infocus Blog, When Did You Become a Geek? *menu
When did you become a geek?
For me it was Jr. High School. I was watching the teacher fumble with the old Bell and Howell projector, invariably screwing up on several times before asking “is there someone here who knows how to do this?” I didn’t,
but during all this waiting and watching her fumble around I had spotted a pictograph of how to thread the film through the mechanism and it just didn’t seem that complicated. I looked around and no one raised their hand so with some apprehension
I raised mine and said “I think I can get it working..”
Everyone turned to look at me and I could feel the all the eyes in the classroom watching my back as I approached the projector, especially the eyes of one cute brunette named Lisa Webster. No matter what else happened to me that year, I would not screw
up in front of Lisa Webster. The Spring Dance was only two weeks away and this might be just the boost my confidence needed to get up the courage to ask her to go to the dance with me. Of course it didn’t matter that I couldn’t dance
any more than it mattered I knew nothing about projectors.
Following the pictograph I carefully threaded the film through the various drums, sprockets, and widgets and looped it on the return reel, double checked my work, triple checked, and then turned to Ms. Wheeler the teacher and said “I think it’s ready to go..” She turned off the lights and walked over and turned on the projector and to my utter amazement it worked perfectly. I don’t remember if she said thank you, or even walking back to my desk to sit down. I only remember thinking “gee, I can follow directions” and “Did Lisa Webster notice?”
Shortly thereafter I learned Ms. Wheeler had given my name to the “Audio Visual Club” which worked out of some dark dank corner of the basement, and before I knew it I’d been given instruction on an entire roomful
of strange looking machines and been issued my first “geek card” so the teachers would know I was capable of threading a simple film on a projector, operating the one handed copy machine, or turning on the overhead projector
and turning the one moving control to achieve focus. But even back then I knew enough to know NOT to show this card to Lisa Webster.. she would not be impressed. Yet, I was strangely fascinated by all the different machines in the AV equipment
room and I found myself there during many lunch periods checking them out and learning how to use them better and more efficiently. It was during this time I find a rifle range in the basement and a locked cabinet full of rifles, but I’ll
save that tale for another time when lock picking comes up.
Without realizing it I moved from Steve the normal student no one noticed, to Steve the AV Geek who if they noticed me at all.. they disdained my geekhood. In Jr. High no one likes geeks and in High school it’s even worse. I can only be grateful
that back then we didn’t have computers so I wouldn’t be tempted to open my big mouth and tell Ms. Wheeler I could get her copy of Windows 7 activated or something stupid like that. Later I figured out most people hold some degree
of resentment for those who can do what they cannot, so they’ll often label you or find some other method of marginalization. And it’s a proven fact that most geeks have higher than average IQ’s so there!
From that moment my fascination with machines and electronics grew and I started building radios, earned my Extra Class Ham Radio License, and even repaired televisions to earn extra money during high school. The folks in my neighborhood who couldn’t
afford a real TV repairman quickly learned to call me.. and I’d carefully remove and package all the tubes from their set (yes, tv’s had tubes back then thank you very much!) and take them down to the Thrifty Drug
Store where they had a tube tester and sold tubes. I’d carefully test each tube, make a list of needed parts for the customer, and they’d give me the money to fix their set plus a “little something for myself” which really never amounted to much. And the fascination grew.
It grew during my military service where I was a Naval Cryptographer with the Intel services, and that grew into much more. It was during this time that I first learned to properly use a camera, something I’d avoided because every geek in Jr. High
and High School all had one thing in common. They could all be spotted by the cameras around their necks! An AV card I could hide in my wallet and pretend I didn’t have one. You can’t hide a big 35mm with a telephoto, especially
if its white! But by this time in my life I’d learned that being a geek with some things was a good, and it didn’t affect the other parts of my life like I feared it might. Lisa Webster went to the dance with me that spring and the
AV card was never brought up.
Fellow geeks unite! I’ll admit it, I love high tech electronics, fast computers, and wonderfully fast and wide lenses. I also love fast cars, jumping out of planes, and all the dances I can manage to wrangle a date to. I suppose that makes me a
balanced geek. Which when you really think about it, it isn’t all that bad at all.. When did you become a geek?
Until next time..
![]()
