Special Edition, Critical Focus
![]()
|
Introduction
This week I’m dropping the normal format of the weekly column and dedicating 100% of my efforts to the area of critical focus.

Many have asked me why my images appear so clear, so dimensional, and sometimes for reasons they can’t put their finger on why they stand out from most photographs they’ve seen of the same subjects. It’s all about drawing a viewer’s eye to the intended focal point, and having the focal point as a vital element of the composition. Images of this type only happen when all your technical skills come together to produce the visualized image. This is the technical part of creating an image. The artistic part of creating an image is using your eye to create and visualize the composition. Today we’ll be focusing mainly on the technical skills, but we will lightly cover the artistic choices of certain example images.
420mm, F4, ISO 100
Everyone is familiar with the megapixels of their sensor. Most believe (and generally this is true) that the more megapixels your sensor has, all else being equal, the more resolution possible. Most believe that more resolution equals more sharpness. There are some finer points to debate on this subject because they don’t exactly correlate, but “generally” the more resolution the more detail you can resolve thereby increasing the “apparent” sharpness. This is a very complex area beyond the scope of this article, things like “per pixel” resolution and so forth become very important. The point I want to make, is that very fine errors in focusing can result in an apparent LOSS of up to 50% of your sensor's resolution / sharpness. More severe errors can run to 100%. Still, ‘fine’ errors, this means errors you generally won’t even notice or know occurred without significant experience, can make your images 50% less sharp.

The term “critical focus” refers to the portion of the image you choose to be in sharp focus. This area is an important part of your composition. Many photographers let the camera choose their focal point and don’t really give focus much thought at all. They think if the picture doesn’t look blurry then the image is fine. This might be true with a really deep depth of field where you intend for everything in the frame to be in focus, and is common with compact point and shoot cameras whose small sensor size virtually guarantees a deep depth of field at almost any aperture.
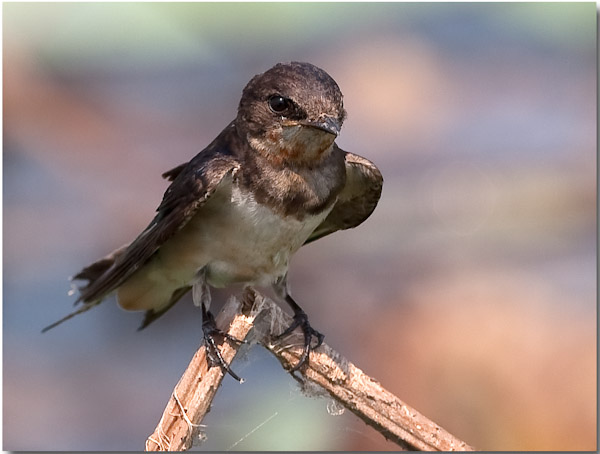
As you advance your skills and learn more about how depth of field (DOF) can improve your composition from ordinary to extraordinary, then focus becomes critical. As you know by now depth of field (DOF) refers to the portion of the image in focus. Let's say you have a bird standing on a floating plant in the middle of a lake. You’ll select if you want the entire image from the very first object in your frame to the very last object in your frame (the direction from the photographer outwards) in focus, or just parts of the frame. In the example below I wanted the bird in sharp focus and I could have done this while using my DOF controls to defocus everything right up to the bird and after the bird.
420mm, F4, ISO 100
Instead, I also wanted to show some of the rich texture of the floating plants while still allowing the bird to stand out against a defocused background in a color that contrasted sharply with the white of the bird. In effect this creates a “dimensional” feel, almost 3d, which lends depth to the image. By selecting only the bird and a small part of the foreground to be in focus I’ve drawn the eye to the bird while using the rest of the frame to support the composition.

As you can see the focal point was critical to my composition. The problem with doing this is that it’s not easy. You need to understand your gear, aperture as it relates to DOF, how to select the lens, exposure, and much more. An image like this happens when all your skills come together to reproduce the image you’re seeing in your mind in your camera, and eventually on print.
Below we’ll discuss the mechanics of critical focus and then provide examples and the gear and technique used to capture them.
Lenses
- Design – The design of a lens is beyond the scope of this article, but I wanted to draw your attention to one area. By design, lenses are optimized to perform their best at certain distances. For instance, a 28mm prime lens is most commonly used for landscapes so they’re almost always optimized for focus at infinity. A 24-70mm zoom lens is almost always used for people and events from 1-10 meters distant and are optimized accordingly. An 85mm F1.2 portrait lens is very specific, used at the distance necessary to fill the frame with your subject. Other lenses like the 70-200mm zoom are very well balanced because they’re often used for people and events close in, as well as animals and even landscapes further out. Knowing the priority of the lens design will help you choose the right lens for your specific need.
-
Characteristics – Even though this article is about critical focus I’m going to say that far too many people put the “sharpness” of a lens as the primary criteria
for choosing a lens. Other areas equally important are color rendition, contrast, bokeh, closest focusing distance, build quality, and more.
- Aperture – As a result of the lens design and purpose the lens will be sharpest at certain apertures. “Generally” lenses are soft (their most “unsharpest”) wide open at large apertures, sharpest at their designed apertures, and the sharpness falls off again at the smallest apertures where diffraction becomes a factor. A landscape lens will tend to be sharpest at very small apertures providing a deep DOF such as F11-16, right up to the point of diffraction. General purpose zooms such as the 24-70mm and 70-200mm tend to be sharpest in the F8-11 region. With some expensive lenses “generally” no longer applies and you’ll see lenses like the 85mm F1.2 exhibiting uncommon sharpness wide open, but still showing significant improvement as you stop it down to F5.6. The expensive and very well designed long telephotos such as the 300mm F2.8 IS, 500mm F4 IS, 600mm F4 IS will be almost at their maximum sharpness wide open and show very little sharpness gain as it's stopped down. This is because these telephotos are designed to be used in the low light of a sports venue such as a stadium lit by artificial lighting or on wildlife which often appears only towards the low light parts of the day such as sunrise and sunset. It’s important to know what you’ll be using the lens for primarily, and to match your needs to the lens design.
-
Diffraction – Many photographers think that since stopping down a lens (making the aperture smaller) makes it sharper, stopping it down even further will make it more sharp. This
isn’t true. Lenses will be their sharpest at what in usually a very small range. As you close down a lens, past a certain point, a phenomena called diffraction starts to occur. The wave fronts of the light waves become modulated and
bend.. resulting in less sharpness.
- Price – Many think price is related to sharpness. The more expensive the lens the more sharp it will be. “Generally” this is true. However, price really isn’t related to the sharpness of a lens other than that “generally” the more specialized a lens for whatever purpose, the higher standards it will need to meet, the more it costs to produce the lens. There are many very sharp lenses out there at modest price points so don’t let the price unduly influence your decision.
- IS/VR – Image Stabilization (Canon) or Vibration Reduction (Nikon) and other trademark names refer to the electronics and mechanics of such equipped lenses which help you stabilize the lens at the moment of capture to help ensure the most sharp image possible. Modern IS/VR systems are very effective and usually well worth the added cost to the lens. However, they are not magic. You’ll still need great technique to consistently produce sharp images.
Calibration
- Factory Alignment – Lenses are adjusted at the factory to be within a certain tolerance. Bodies are also aligned at the factory to be within a certain tolerance. This gives you two variables when it comes to alignment, two variables which could be off just enough to affect the focusing. To be accurate these tolerances are very small and the vast majority of lenses and bodies focus properly right out of the box. Photography forums everywhere are filled with “armchair photographers” complaining about “bad copies” of lenses and so forth and I’m convinced that in almost all cases the problem isn’t with the lens, but rather with the person using the lens. They either don’t know, or don’t employ, the proper techniques necessary to achieve the sharpest focus. Sure, sometimes a bad lens slips through. However, in the last 10 years I’ve personally purchased over 40 lenses (both Canon and Nikon) and have yet to get a bad one.
- Front/Back Focusing – In almost all cases when a lens doesn’t perform properly, it’s not because the lens is defective or broken. It’s simply because the alignment is off and the lens is focusing in front of the intended focal point, or to the rear of the intended point. Simple adjustments from the factory or in newer camera bodies by the user, will correct 99.999% of such issues.
- Micro-Adjustment – The newer bodies allow you as the user to dial in small adjustments. To be honest most of the time I’ve seen people using this feature they’re actually making things worse because the problem is with their technique and not the lens. Still, the option for adjustment is now with the user. To ensure you set things correctly you’ll need to either create your own test setup or buy one of the very useful lens alignment systems you can read about here. Unless you’ve been working with precision lenses for a long time I highly recommend you use a tool like the LensAlign system.
Holding Technique
- Tripod – A tripod, properly selected and used, is the most certain way to eliminate camera shake and achieve the sharpest image possible from your gear. Modern IS/VR systems are now so good it’s possible to get by without a tripod in many instances where one is mandatory without IS/VR, but a quality tripod is still an essential part of a photographers kit. A very good article on tripod selection was written by Thom and can be read here. Thom is a great reference for Nikon users and for general photography knowledge.
- Bracing – Proper bracing makes all the difference. It also takes practice. I can routinely handhold at 70mm to as low as 1/5th of a second and get good sharp results. At 24mm as long as 1/3rd or even longer. These speeds are way under the recommended, but possible with practice and solid technique. I’ve always looked at holding a camera very much as one would hold and shoot a rifle. You want to keep your elbows tucked in and against your body for support, take in a breath and let it halfway out, and then slowly press the shutter release until it surprises you by going off. Use available support when possible. If this means sitting on the ground and using your legs/knees for bracing then do it. Lean your shoulder against a tree to steady yourself. Use a wall. Handrails. Anything more solid than a human on two legs can be improvised to provide a much more stable support. I almost always carry a knapsack, and often put the knapsack on a car top, ground, fence, or whatever there is.. and nestle the camera body into the knapsack for better support. The possibilities are only limited by your imagination. Get in the habit of shooting from the best support and using the best techniques, practice this often, and soon you’ll be turning out sharp images at speeds you never thought possible.
Camera Settings
- One Shot/Single Servo – All DSLRs have this autofocus mode. It’s designed for static subjects such as portraits and landscapes, and even slow moving events like weddings and most social events. In this mode I routinely use a single focus point. I frame the subject in the viewfinder as desired, rotate through the focus points/indicators until I find one nearest my desired focal point, and then lock in on that location.
- AI Servo/Continuous Servo – All DSLRs have this mode as well. It’s for moving subjects. Normally a subset or all focus points must be activated. You frame the subject in the viewfinder, lock the center indicator on the desired focal point, and the AF will track the subject as long as any of the focus points cover the subject. If possible you hold the same focus point, but if the subject is moving fast any focus point on the subject will do and the cameras AF system will automatically move the “activated” focus point from one to another as necessary. This is very useful for birds and other wildlife, fast moving sports, or any moving subject.
- One shot/AI-servo – This seems to be popular on the prosumer DSLRs but not the professional models. I think it’s a great idea. You use it for static subjects that ‘might’ move while capturing the image. You lock on your focus point on your focal point and now if the subject moves the system automatically goes into servo mode and tracks the subject thereby maintaining focus. Why don’t the professional models have this mode? I’m not sure, but I think it’s because the normal servo mode is so sensitive and accurate it can be used in this manner and doesn’t require a separate mode.
- Manual Focus – This probably dates me, but I started using manual focus cameras long before autofocus cameras were even made much less refined enough to be practical. All of my DSLRs have Brightscreen custom focus screens with an extra-large diagonally split microprism center. Almost all of my lenses have the ability to manually focus and override the AF system just by putting your hand on the focus ring and making your adjustments. Quite often when doing portraits and events I’ll want to override the AF system selected focus point and pull/push it towards the focal point I envision but which isn’t there in the scene. What am I talking about? Look at the picture below.
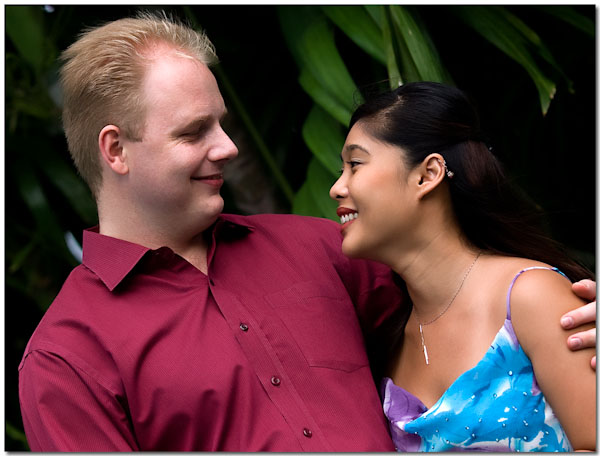
I was using my 135mm F2 portrait lens wide open to achieve my compositional goals. This means the depth of field is very shallow, too shallow to reliably ensure both subjects eyes would be in focus. At the focal distance (approximately 10 feet), F2, and 135mm, my DOF possibilities would be somewhere around 4-6 inches. Depending at the angle I was standing to the subjects, the angle of their heads to each other, and other factors, 4-6 inches just wouldn’t be an option. So, once I had them in the desired pose, which btw is a fluid dynamic set of poses vs. a strict static pose, I simply focused on the closest eye of the closest subject (the female in this case) and then drawing an imaginary focus point right between their two heads I pushed the focus point out a few inches to split the difference between their focal plane by overriding the AF simply by turning the MF ring in the desired direction.. So, instead of the limited DOF starting at her closest eye and extending out/in say.. 1.5-3 inches (half of the DOF), I was able to move the center of the DOF inwards just enough to so both their closest eyes were within the 4-6 inch DOF plane. I hope I’m explaining this adequately. This takes some practice to become efficient at, both in thought and technique. As you can see from the image below the results are very good and more than acceptable for a portrait.
- Auto Focus Sensors – AF sensors are largely misunderstood, relegated almost to footnotes in the instruction manual and rarely given the attention they deserve. AF sensors correlate to the AF indicators in your viewfinder. Each sensor is located in a dedicated position but some can be activated differently. Each camera model is slightly different and I encourage you to look up this section in your instruction manual and read it carefully, but for this article I’ll describe a camera I’m very familiar with and this would be the Canon 1ds Mark II.
The 1ds Mark II’s 45 AF points are all horizontal-line sensitive. This means if the subject moves across the line horizontally then the system will acknowledge the movement and adjust the AF accordingly. However, if a lens is attached with at least a maximum aperture of F2.8 is mounted then seven of these AF points activate in both the horizontal AND vertical planes. This means they’ll acknowledge and adjust for movement in BOTH planes.
Keep in mind that if you have a F2.8 lens mounted, then the aperture remains wide open until the moment of exposure. At the moment of exposure the camera will electronically ‘stop-down’ the lens for whatever the exposure time may be, and then open it up again to the maximum aperture until the next exposure. So, for all practical purposes your AF sensors are getting the full benefit of light allowed by a F2.8 aperture nearly full time except at the moment of exposure, but by then the AF system has already tracked your subject (if in AI-Servo mode) and calculated your focus.
This will change at F4. With a F4 lens mounted (full list of compatible F4 lenses are listed in your instruction manual, all telephotos are compatible) only the center AF point works in both the horizontal and vertical planes, even with an tele-converter attached. The remaining 44 AF points will remain in the horizontal model only.
What advantages does this offer? AF speed and accuracy. With both planes of movement activated autofocus will be both faster and more accurate. However, to take advantage of this feature you’ll need F2.8 lenses to activate all 7 cross-type AF sensors and at least a F4 lens to activate the one cross-type center AF sensor. You’ve all probably heard others say that “F2.8 lenses are a waste of money, if you don’t shoot at F2.8 then why do you need to pay for F2.8?” Well, now you know why. Increased AF speed and accuracy. This becomes even more of an advantage in low or tricky lighting.
So why do the very expensive telephotos like the 500mm F4 IS and 600mm F4 IS only come in F4 models if a F2.8 model would result in faster and more accurate autofocus? Two reasons.
- At this focal length a F2.8 aperture would require the lens to be very large and heavy rendering it largely impractical for its intended use. Canon makes both a F2.8 and F4 version of it’s 400mm telephoto, but ask anyone who’s used the F2.8 version why they ended up selling it. Too big and heavy. Canon and Nikon’s excellent 300mm F2.8 IS/VR lenses are perhaps their finest lenses period. At 300mm the size/weight requirements of F2.8 are on the practical end of things, and to achieve this space age high-tech metals and plastics are used to reduce weight.
- The perceived speed of moving subjects will be much greater at a shorter focal length such as 24-70mm, or 70-200mm.. because the subject is much closer and will require more lens movement to keep the subject in frame when compared to a 400mm or 500mm lens on the same sized subject. The shorter focal lengths almost require the enhanced AF performance, while the longer focal lengths do just as well without it for the same size/speed of subject. Imagine sitting under the backboard at a NBA game photographing Kobe Bryant flying in for a dunk. The closing speed would be incredible and the required focal length would be on the wide end at 24-40mm’s. Now, imagine sitting on the 50 yard line of a NFL game photographing a linebacker running at full speed from the 10 yard line. You’ll need a 300-400mm focal length or greater to frame the same size subject, and even though both subject were running at full speed, the one furthest away will appear (to the AF sensors) to be moving much slower.
Now you can see one of the critical reasons why professional bodies cost more than prosumer bodies and why many pros and serious amateurs choose to spend the extra money for F2.8 lenses, or F4 telephotos. How much of a difference is there? A HUGE DIFFERENCE. If your needs include photographing fast moving subjects, whether it be sports, wildlife, or fast paced events then you WILL benefit greatly from a professional body and fast F2.8 lens or F4 telephoto.
- ISO – ISO directly affects the detail of the image. Most people think it only affects the noise, and it does affect the apparent noise. The higher the ISO, the more apparent noise in the image, even with the best cameras. But ISO also affects detail. The disadvantage to higher ISO’s that is rarely talked about, is the loss of detail that occurs in a mostly linear fashion as ISO increases. This is part of the trade-off you pay in exchange for being able to capture images in lower light. Depending on the DSLR vintage and quality, you might not notice significant detail loss until you exceed ISO 800, while on older models you’ll notice it past ISO 200. If you examine the image very closely you’ll notice it past ISO 100 on every camera. So, what appears to be a not so sharp ISO 1600 image, could in fact be focused perfectly with a very good lens, but it won’t appear as sharp as expected because of the detail loss experienced at higher ISOs.
Choosing AF Points
- Portraits – For portraits you’ll usually want to choose a single AF point and place it over the eye closest to you. If the closest eye is in focus then the image will appear correct, if not nothing will make it appear correct. I can’t overstress this point enough, your focal point should be the closest eye towards you with very few exceptions. This also holds true for static animals. Frame your subject, and then select and activate the AF point nearest the closest eye. Move the AF point ON to the eye, focus and lock, and then reframe. There will be no accuracy penalties for reframing UNLESS the DOF is very shallow and you’re very close to the subject, such as F2.8 and below and under 8-9 feet.
- Landscapes – Landscapes are most often photographed at infinity because most people shoot landscapes with an unlimited DOF desired. As you advance your skills with landscapes and start including foreground, mid-ground, and background elements vs. just a background, then you’ll want to choose your AF point and DOF very carefully which is beyond the scope of this article. I have however covered this technique in several past columns and I encourage you to go back and read them. For landscapes you’ll also use a single AF sensor placing it on the desired focal point.
- Static scenes – Again, if the scene is static such as a building, statue, flower, you’ll use a single AF sensor placed on the desired focal point. With such scenes the desired focal point is very much dependent on your composition.
- Groups of people – This includes two or more people. You’ll need to choose a aperture for your desired DOF and split the difference between the subjects with a single AF sensor placed on the desired focal point. Please see the example provided above under “Manual Focus” on how to split a scene.
- Moving subjects – This is very generic, but if it moves, you’ll want to use your AI-Servo AF mode which automatically activates either ALL your AF sensors, or your pre-selected subject of 7 or 14 AF sensors (Canon 1ds Mark II, your camera may vary).
Camera Settings
- JPEG – Depending on your camera the resulting JPEG “out-of-camera” images will range from good to horrible when it comes to sharpness. When using a JPEG mode you will be given choices of sharpening levels. You’ll need to experiment with your individual camera to find the best settings for your uses.
- RAW – RAW images apply no default sharpening. You’ll achieve more detail with RAW images. You’ll also need to sharpen your images in post processing. Depending on your workflow you’ll either apply sharpening in your RAW convertor (for instance Lightroom) or as the very last step if processing in Photoshop.
Post Processing
- Culling – We will all capture many many unsharp images. It helps to view your images at 1:1, allowing you to cull the images you don’t find acceptably sharp for your uses.
- Unsharp Mask – Unsharp Mask, either in your RAW convertor or in Photoshop is the most commonly used sharpening tool. I don’t want to go into the details of using USM in this article because it’s a subject all by itself, but I will tell you that each camera outputs images that will benefit from the same USM settings for almost all images. For my Canon 1ds Mark II I use a level (in Lightroom) of 95, a radius of .9, and a detail level of 25. In Photoshop the same image benefits the most from a Amount of approximately 160-180, a radius of .9, and a threshold of 0.
- Smart Sharpen – Smart Sharpen is a Photoshop tool you’ll find under “filters” that allows correction for motion and lens blur. This tool is useful for slight variances in sharpness due to vibration, slight movement, or very small imperfections in the lens. Again, the use of this tool is beyond the scope of this article, but I encourage you to use the Smart Sharpen tutorial provided by Adobe.
- Focus Magic – Focus Magic can be a lifesaver! On the surface it appears to duplicate the same functions as Adobe Photoshop’s “Smart Sharpen”, but in my experience it does much more. It can effectively compensate for the loss of sharpening due to the inclusion of the anti-aliasing filter found on all DSLRs, motion blur, and lens blur. The Focus Magic website provides some very good tutorials and demos. You can visit their website here.
Examples
From this point on I’m simply going to show you some images, explain why I selected certain focal points, and anything special about the image that you might find useful. Please keep in mind that at the reduced resolutions required for display in this on-line column, none of the images will show their true resolution or sharpness. I’ve attempted to compensate by showing 1:1 crops when I think they will be useful. Also, please note that my active archives include over 135,000 images. It would take forever to go through these archives to select the very best images, so instead I used the metadata filter and pulled the first images that came up for the lenses and apertures I wanted to demonstrate.
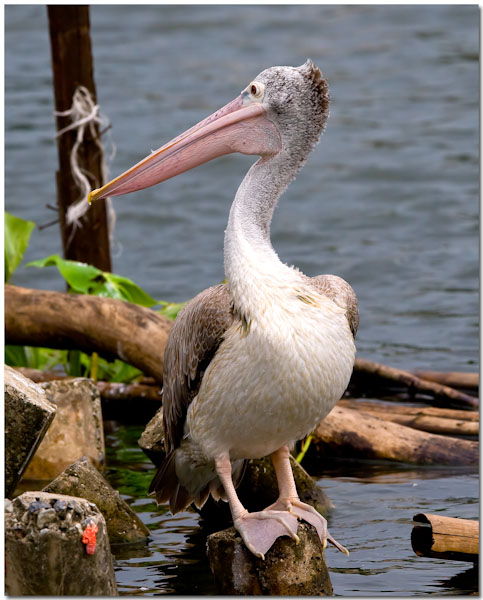
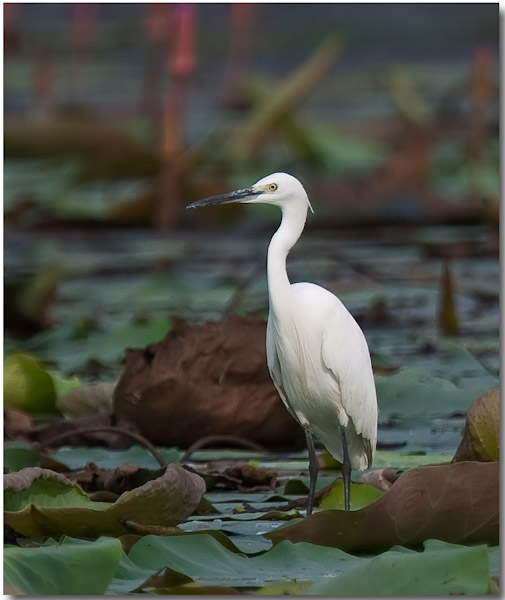
300mm, F8, ISO 100
This is a critically sharp image taken with a Canon 300mm F2.8 IS lens at F8. I chose F8 because the bird has a significant distance between the tips of its feet, to the end of it’s beak. Also, I wanted to include the red lure stuck on the piling and the other wood detail behind the bird. I felt it made the composition more interesting than just merely defocusing the entire background.
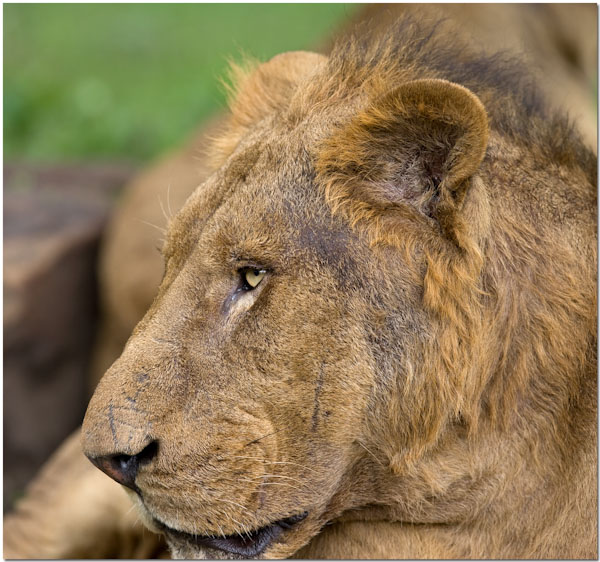
300mm, F4, ISO 100
This is a critically sharp image intended with a full size print to show the detail of the iris of the lions eye and the texture of it’s fur. I used F4 vs. F2.8 to ensure I had enough DOF to show sharp focus from the tips of her whiskers to the bridge of her nose.
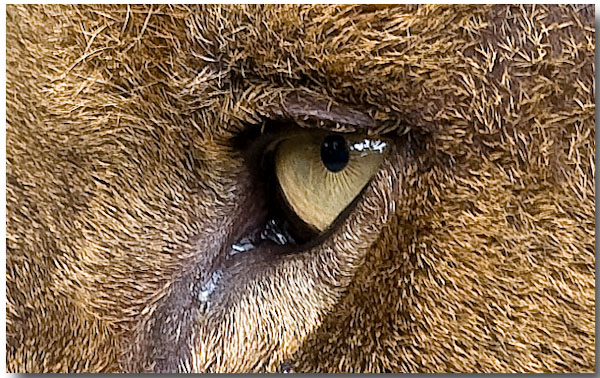
This is a crop of the lions eye and surrounding fur. Notice the detail of the eyes iris? This makes for a huge visual impact on a large glossy print.

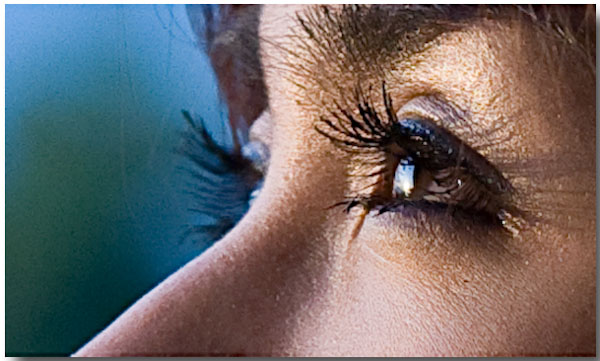
60mm, F5.6, ISO 100
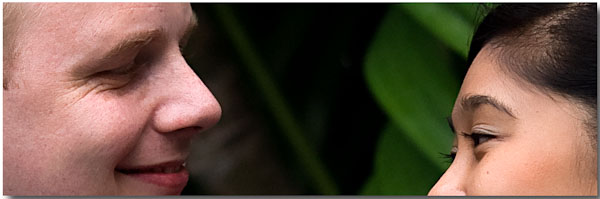
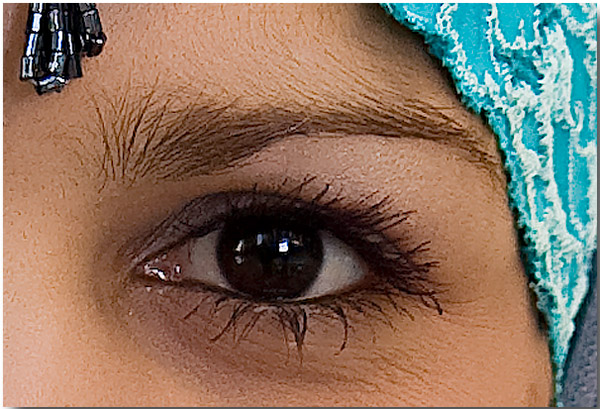
This critically sharp image was captured from approximately 5-6 feet away using a single strobe from 30 degrees. The focal point is the top eye. I selected F5.6 because the 24-70mm F2.8 lens I was using is very sharp at F5.6, sharpest at F8-11. F5.6 allowed a deep enough DOF to have critical focus from the hand to the hair on her head.
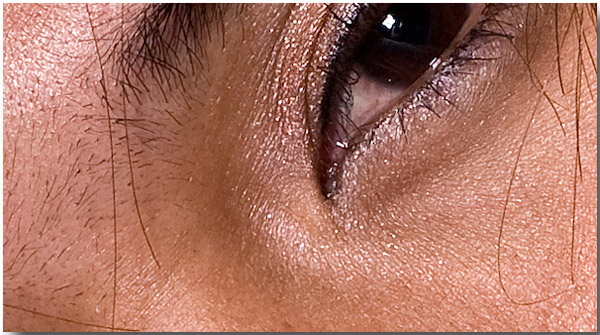
Notice the sharpness of the eye? You can count the individual eyelashes, eyebrows, and see the pores of the skin. This image is so sharp that it will need to be softened for large prints lest it show too much detail.
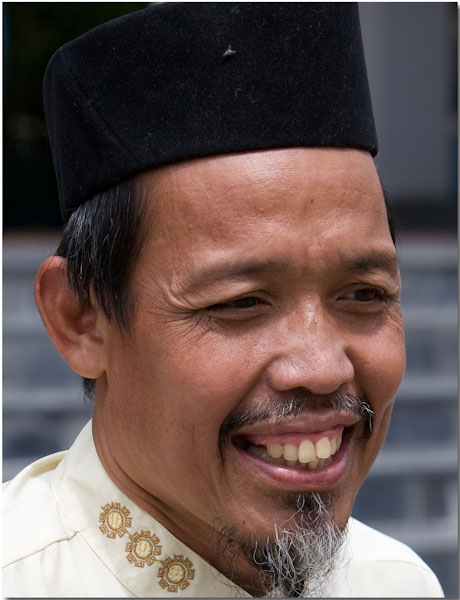
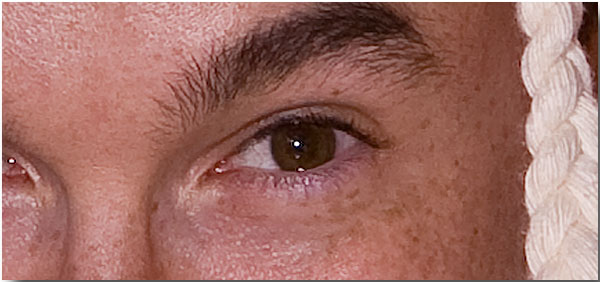
This image was captured in Yala using the Canon 70-200mm F2.8 IS lens. This is the perfect photojournalism lens. I was roughly 15 feet from the subject who was moving. I used AI-Servo, ISO 200 for the appropriate shutter speed, and F8 to ensure every part of his face from his goatee to the creases in his eyes were in very sharp focus. Many faces show more character, age, and definition when all the features are in sharp focus.
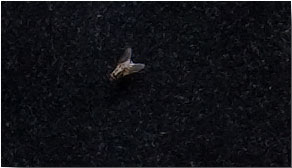
For fun I cropped just the part of the image showing the fly on his headgear. This is only 300×200 pixels at a 1:1 crop, but it shows that even a small fly was as much in focus as you could expect without specifically focusing on the fly.

125mm, F5.6, ISO 100
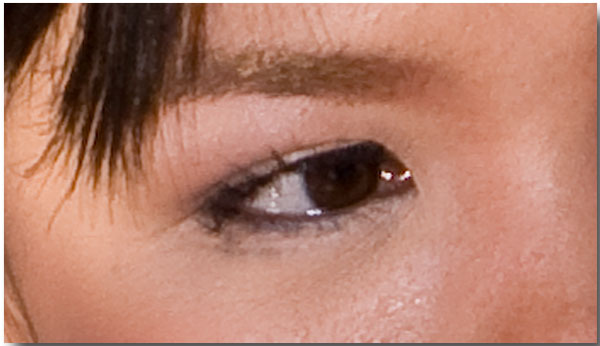
This image was captured in Ang-Thong at a roadside fruit stand using the 70-200mm F2.8 IS lens. At a normal print size of 11×14 or smaller, this image is perfectly sharp. However, it is NOT suitable for anything larger. Why? Because there is a difference in sharpness, due to limited DOF, between the eyes of both girls. At the time I took this I was mentally debating how much of the background to defocus vs. the DOF necessary to capture both eyes sharply. I misjudged.
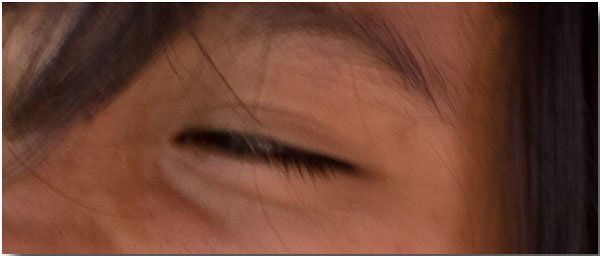
See how the girls eyes on the left are blurry?
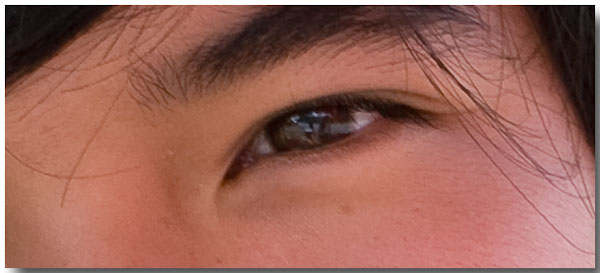
And how the girls eyes on the right are perfectly focused? This is because I put the AF sensor focus point on her right eye.
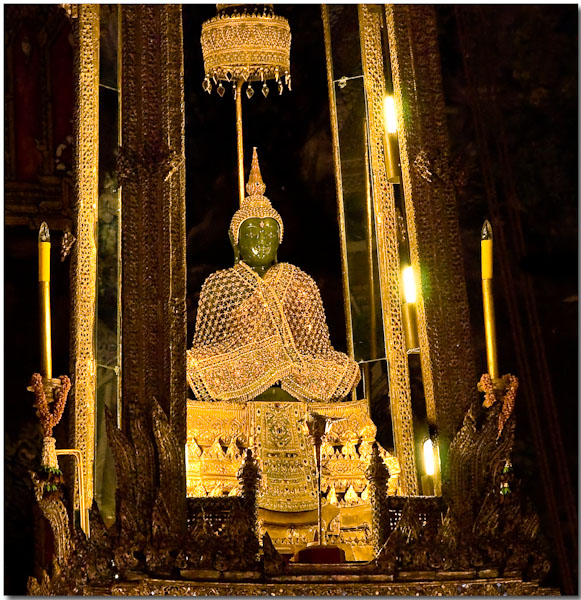
This was a very difficult shot of the Emerald Buddha. As you know you cannot take pictures inside the temple. By sitting on the steps outside the temple, and aiming over the heads of the tourists entering the building, I was able to frame the subject. I was far away, perhaps 50 meters or more. I handheld the camera while tourists were jostling my arms while passing by. The lens used was Canon’s 70-300mm DO IS lens which is a very practical and very good compact travel lens. It’s sharpness is very good and its IS extremely good. I’m not fond of it’s bokeh character, but there must be some compromise with such a lens design. It doesn’t get very sharp until F8, and is sharpest at F11. This required an ISO of 400. Compromises all around, but the resulting image was acceptable if not critically sharp.
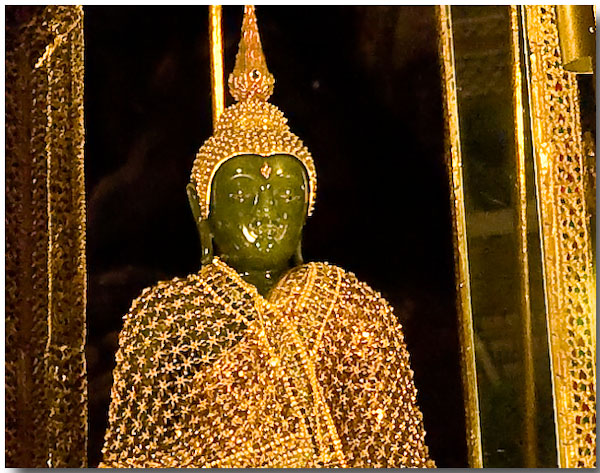
This is a 1:1 crop of the above image so you can better see the detail captured. I used Adobe Photoshop’s “Smart Sharpen” to compensate for a bit of motion blur.
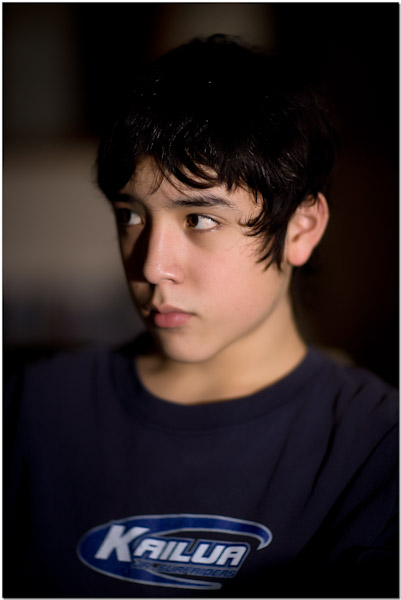
This image was taken is near darkness save for a bit of window light. I used Canon’s fine 85mm F1.2 lens wide open at F1.2. I also handheld this at 1/10th. I was approximately 12 feet away and the distance helped create enough DOF where the closest eye is in critical focus and the rest of the images defocuses into a very pleasing bokeh outwards from the eye. This image was taken while testing a recently adjusted body.
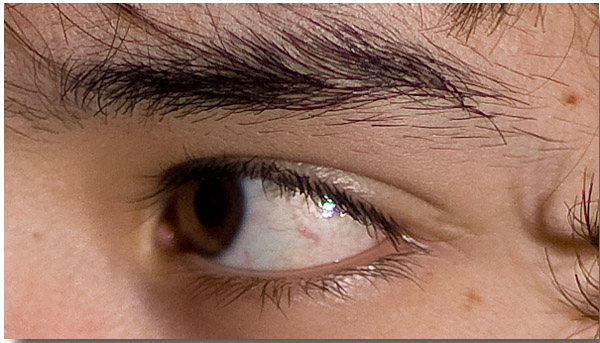
This is a 1:1 crop of the above image. You’ll hear many people tell you that wide aperture fast lenses won’t be sharp wide open, so it only makes sense to not waste your money and to buy the less expensive 85mm F1.8 version. However, as you can see, correctly used, these lenses are indeed VERY sharp wide open. Do keep in mind that the 135mm F2 and 85mm F1.2 lenses are special purpose lenses and require special techniques/knowledge to get the most out of them.
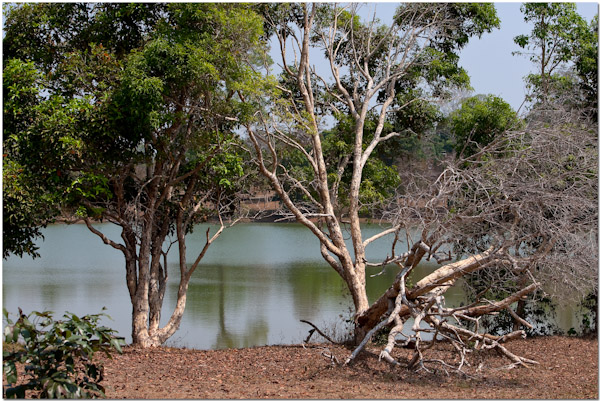
This image was captured in Khao Yai National Forest using the 70-200mm F2.8 IS lens. I loved the detail of the tree trunks and limbs and through they contrasted nicely with the green leaves and water. I wanted enough DOF for all the tree parts to be in sharp focus and for most of the near water. I wanted as much DOF as I could achieve using this focal length. I selected a focal point on the tree trunk which is laying down about 3-4 feet in front of the standing trees, F8 because this lens starts to show diffraction after F11. Notice the nearby shrub in the lower left of the frame? This was about 3-4 feet from the lens and is blurry because it’s not in the DOF range provided by this lens and it’s settings.
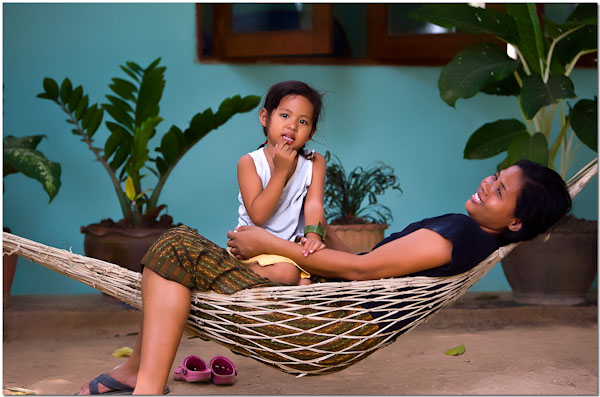
This image was captured near Suphanburi and is defective. When taking the shot I knew that at F8 and 125mm and my focal distance, that I wouldn’t have enough DOF to get both the little girls eyes and the mothers eyes in focus. So, I split the DOF as described above but still didn’t achieve the desired DOF which resulted in both of the subjects eyes being out of focus. However, I submitted this image by accident for selection in a book I was contracted to provide images for and the image was selected! I attempted to talk them into another image but they loved this one. I was stuck, I had to make it work!
Using Focus Magic I was able to make the image presentable at the sizes necessary for a book cover and several commercial website images.
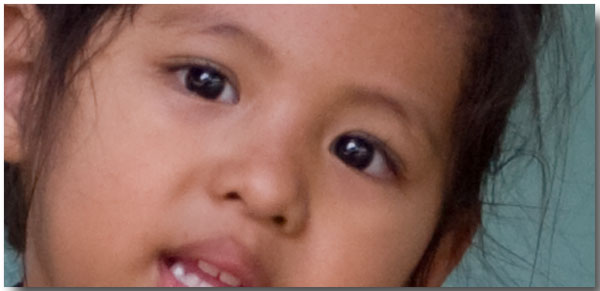
As you can see when examined close up, the image doesn’t look critically sharp. In fact, it looks blurry. But the full size image treated with Focus Magic appears just fine!

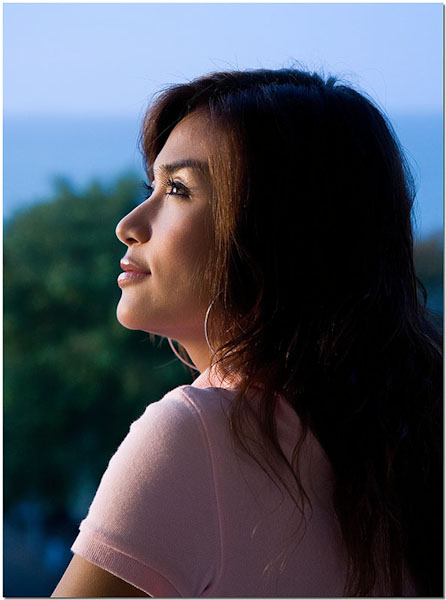
This image was taken with the 85mm F1.2L lens wide open at F1.2 at a distance of about 15 feet. I wanted the background totally defocused, but the focal distance required for a full body shot resulted in a partially defocused background, but with the very creamy and attractive bokeh you’d expect from a lens of this caliber. At F1.2 I knew the DOF would be shallow, but not as shallow as it would be if my focal distance was shorter like I’d have used for a head only shot. Focusing on her closest eye I was able to keep both eyes within the DOF and in sharp focus, and create a pleasing defocusing outwards.
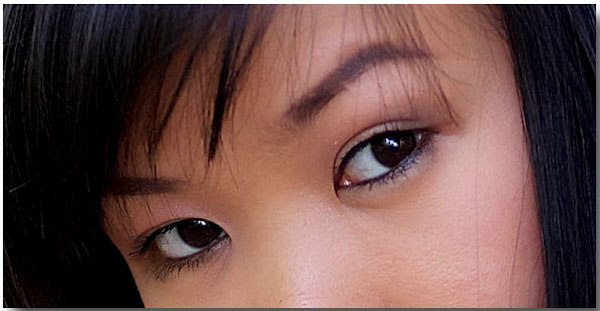
This is a 1:1 crop of the above image. Notice the amazing sharpness and detail? And this was after running this image through a softening filter because there was too much detail!
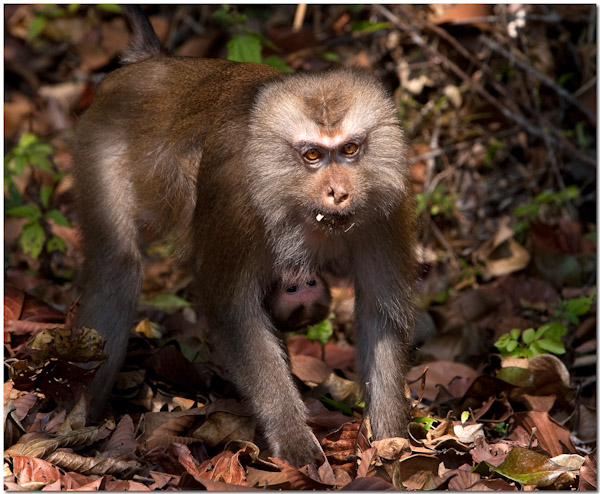
This image was captured in Khao Yai National Forest with the 70-200mm F2.8 IS lens. I used one-shot focus and just as you would with a human I placed the sensor over the monkey’s closest eye and selected F8 because I also wanted the baby’s eyes in focus, and they are! This image meets all the requirements for a critically sharp image and could stand up to almost any size enlargement practical, at least a 20×30 inch print.

This image was captured with the 24-70mm F2.8 lens at F5.6. I wanted as sharp an image as possible, but with as much of the background defocused as possible. I’m fairly pleased with the results, the image is critically sharp, but the background could have been more defocused. Really, I should have used the 85mm F1.2L lens at F2.8 and I would have achieved my goals, but I left it at home that day.
This is a crop of the above image showing the sharpness expected of a lens of this quality. Notice that you can clearly see the eyelashes and eyebrows? If you cannot, then the image is not critically sharp.
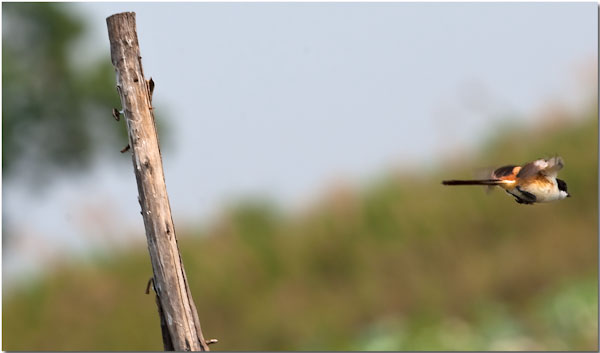
This image was captured at the Beung Boraphet Wildlife Preserve Wetlands. This small sparrow was sitting on the wood pole and I was waiting to catch it flying away. By pure luck he took off at a 90 degree angle staying in the same plane of focus as the wood pole which created a very interesting image since both are in focus.
This image was captured AFTER dark, using a streetlight for lighting and a long exposure of 1/5th handheld! This allowed me to catch the light in the sky (dark and black sky to the naked eye) remaining. The lens uses was the Canon 24-105mm F4 IS lens. This is an excellent lens and you’ll hear many people tell you it’s not sharp or as sharp as the 24-70. Don’t believe it! Both lenses are equally sharp, contrasty, and render the same color. The 24-105 has a longer focal range and IS, the 24-70 has F2.8 which is important for AF speed and accuracy in low light as explained above. It’s a trade-off which one is better, properly used both produce excellent results.
This is a 1:1 crop that shows the sharpness you’d expect from a critically sharp lens, yet you can see significant detail loss because of the 1600 ISO. Overall, much better than you’d normally expect under such circumstances. I braced carefully, used proper breathing technique and shutter release technique, effectively employed the IS system, locked focus on the closest eye, exposed for my composition, and achieved pretty good results.
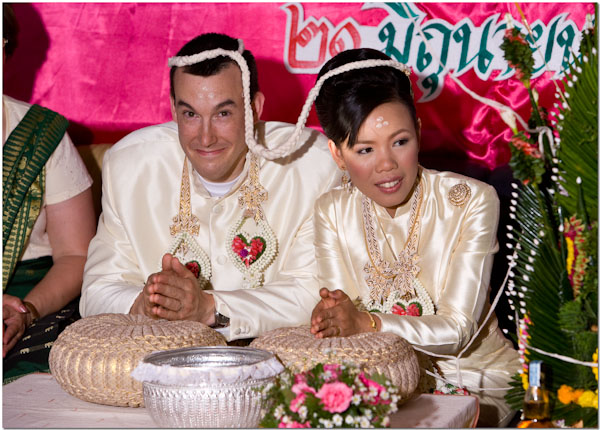
This image was captured under a tent using the 70-200mm F2.8 IS lens. I knew this was going to be a difficult capture because of DOF issues. At this angle, the only angle I could maneuver into, I knew I had no chance of creating enough DOF at this focal length to keep the eyes of both subjects in focus. I compromised by using ISO 200 and F5.6 for enough light, braced well to shoot at 1/50th, and manually split the focus between the two subjects, but ended up more towards the man. At 11×14 sizes the image looks fine, but lets examine what we’d get if we enlarged past this size.
Notice how the mans eyes are acceptably sharp?
And the woman’s eyes are not? Close and good for a 11×14, but not beyond that size.
This is a crop of the flower arrangement at the front of the frame. Not so critical, but a good example showing the varying DOFs in this scene.
Conclusion
As you can see achieving critically sharp images is very possible, yet sometimes we must make compromises for practical considerations. It would have been easy to show you a bunch of perfectly focused images but this would have created the illusion that’s what you should/could always achieve. Nothing could be further from the truth as your environment and subjects create variables you cannot predict.
This article covers a lot of information. Using this information you should be able to select lenses and use them effectively to create images of the same or better quality using the techniques described. You should also expect to make many of the same mistakes.
I’ve always said the technical part of photography is nothing more than balancing the variables you’ve been dealt. I maintain this to be true once again.
I hope this helps you improve the critical sharpness of your images.
Until next time…
