Composite, Queen Sirikit Botanical Gardens
![]()
|
• Al Bustan Hotel Sharjah • Al Salam Palace Suites Hotel • Sharjah Rotana Hotel • Oceanic Hotel Khorfakkan |
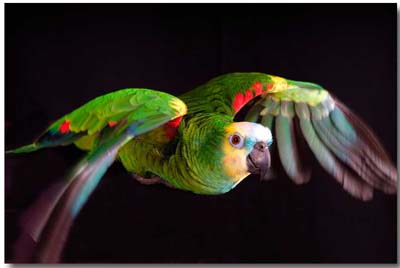
Feature Photograph
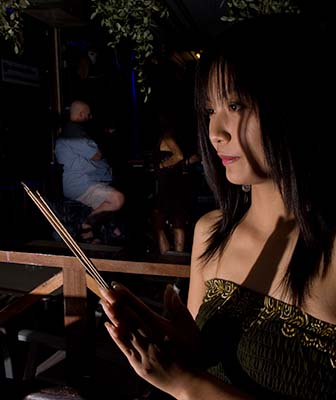
I really had to wrestle with this one. I’m sure I’ll offend someone, but please know offending is not my intention. Let’s cut to the chase. This weeks photo is significant because it’s of a girl I suspect to be under 18 who is working in bar and going with farang men and is passing herself off as 18. Imagery is powerful. When you get used to looking through a viewfinder, especially if you shoot a lot of young ladies, you start to notice things others don’t see right away.

I was out and about in the farang based bars looking for the right girl to pose for a project I was working on. Everyone has different tastes, but I like to think I can pick out the faces the majorities will find most attractive. Twenty or so bars later I walked in and saw a young lady whose face was hidden under heavy bar girl makeup, wearing bar girl clothes, and doing bargirl things, but her facial features were striking. Unfortunately for this project I needed her exactly as I found her, looking like a bar girl. I set up my camera and my portable strobe and prepared to take her picture. I discovered the battery for the portable strobe had failed and being the professional I am I had left my spare battery at home because I didn’t feel like carrying it. $600 batteries aren’t supposed to fail, but the point was taken. I made arrangements with the young lady to come back in two days time and explained that I would need a release signed and how much I would pay her for her time. She agreed and I left upset with myself for failing to at least put the spare battery pack in the car.
Two days later my new temporary assistant and myself appeared back in the bar and this extremely young teenage girl who looked ready for Jr. High bounces up to us with a big smile obviously happy we returned as promised. I’ll admit that even after 20 years in Asia and 6 in Thailand, I was shocked. I really had to look closely to see this was the same girl. Until she talked and I recognized her voice I even considered it might have been her younger sister.
Bless her heart, she had her hair freshly prepared, makeup perfect, what looked like a nice new sundress, and it was obvious she had went to a lot of trouble to look her best for the photo session. Unfortunately I needed a picture of a slutty looking bargirl, not a Jr. High School student. Still, she went to great lengths to look her best so without saying a word about her change of style I asked her to sit down and I’d explain the model release. Model releases aren’t really necessary in Thailand, but I prefer to use them anyway, especially for a paid commission that would be published.

The moment I walked in this night I suspected she was not 18 but I didn’t want to spook her away or cause her to lose face and I wasn’t planning on shooting her nude or anything like that so age for this particular purpose didn’t matter. When she signed her signature I asked her to do what I ask all models to do, hold the signed release (one each in Thai and English) up next to her face with one hand, and her ID card in the other hand. This is the industry practice. She said she left her ID card at home. I whispered to my temporary assistant if she could inquire about her age during our shoot and she said yes. This time when I set up my camera and lights everything went well and 30 minutes later we were done. I paid her and she looked very proud to have earned so much money just because someone wanted her picture.
She skipped her way to the back room of the bar like a giddy school girl and disappeared. My assistant told me she couldn’t get a straight answer about the age, but from some timelines she’d given her about other people and events in her life she didn’t think she was 18 either. I had to slightly rewrite this because I’d estimated an age significantly below 18, but that would be a guess. The fact is I don’t know for sure what age this girl is, she could be 30, she could be 14.
The mamasan sat down with us at this moment and asked me if we were pleased with the pictures. I said we were, that she was a very pretty girl. Mamasan told us “she works bar, 2000 baht long time?” She was asking me if I wanted to take this child for the evening! Looking around the bar I counted 4-5 farangs, most probably over 60 years of age, and all of a sudden I didn’t feel well. I left the bar, and have since decided to process the images for my original purpose not because I’ll use them for this purpose, but because I want to get some prints made and return to give them to her. I keep thinking there must be something else I could do.
Often, I’ll have students in my workshops who want to learn to shoot their girlfriends and wives in the bedroom or a hotel setting. This is a lot of fun for most guys and it’s a lot of fun to teach them. Once the student said he’d pick out his own model and meet me at the agreed upon location and he did. Right when we got to the point where she was supposed to disrobe I asked if she’d signed the release and if he’d seen her ID card. Something, probably my experience with faces, had alarm bells going off. It turns out she was 16! We sent her home and both of us knew we’d narrowly escaped unknowingly doing something very bad. Since, I select my own models from these areas when necessary and I check their ID cards very carefully.

I’m sure there are plenty of sick guys who get off on underage girls and I hope they get caught and put away. But I’m equally sure there are plenty of men in the bars taking girls back to their rooms who have no idea they’re about to have sex with a minor, which could get them jail time in Thailand and their home country and ruin their life. Men, be especially careful out there. If you have any doubts at all ask to see their ID card and then inspect it very carefully. It’s the right thing to do.
Weekly Photo Outing
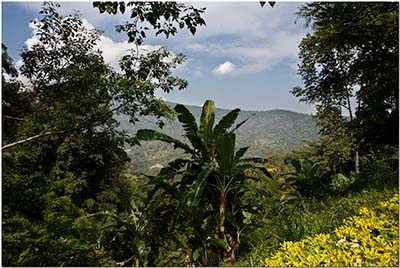
This week we’re traveling to the Chiang Mai areas and visiting the Queen Sirikit Botanical Gardens. You can visit their website here. The gardens opened up in 1992 with the name “Ma Sae Gardens” and were renamed in 1994 to their current name.
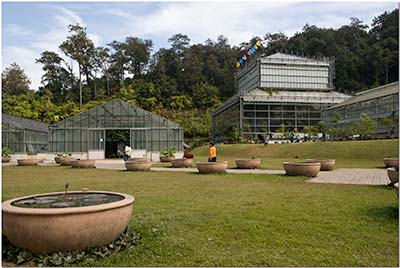
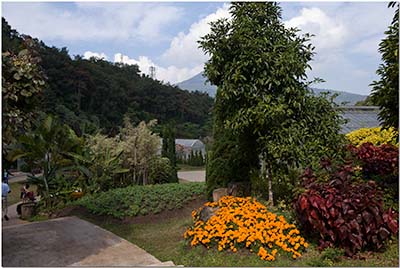
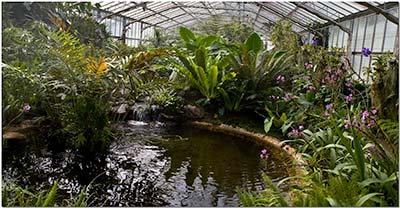
The larger permanent greenhouse structures were very impressive. Designed to last decades they’re very well built and their designs attractive. The most permanent gardens are inside these structures and I very much enjoyed myself as I walked around taking in the beauty every step revealed.
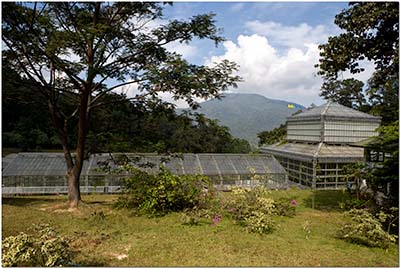
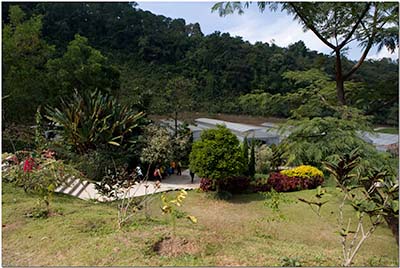
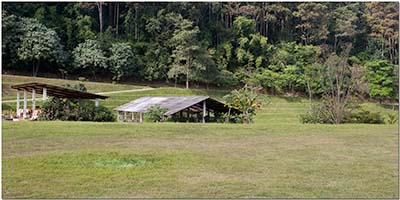
The grounds are spacious and nestled in lush green rolling hills with a view from three sides. It takes some time to walk around the entire area, but there are plenty of places to sit down and rest and admire the view.
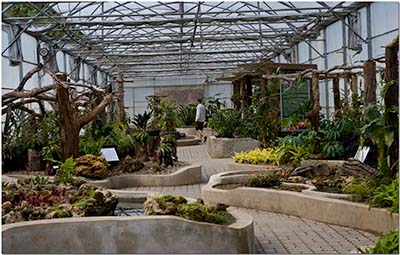
Inside the smaller greenhouses you’ll find cement forms holding plant species of all types. These are interesting because there are all sorts of smaller projects and experiments going on that you can read about and observe.
As you walk out one door you might see a vista view of the mountains, and walking in the next greenhouse beautiful ponds with fish and water plants.
If you like learning about plants, looking at flowers, and a nice quiet relaxing stroll around a beautiful garden then I highly recommend a visit.
Composites
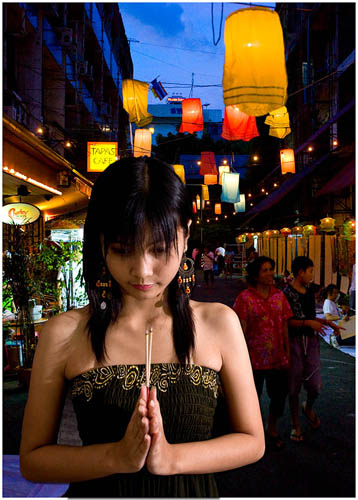
This week we’ll stray away from the basics and do something fun, something many might not be ready for yet but hopefully it will motivate you to learn the basics so you can have fun producing your own composites!
I’ll often have students or clients show me certain photographs and ask “how did they do that?” Sometimes the lighting seems very complex, the image quality (colors, contrast, noise) too high for a night shot, or other features they’ve tried to duplicate on their own and failed. They want to learn “how the pro’s do it” so they can make their own such images. Images like the one below for instance, a fun image that includes a portrait, a colorful night background, and a strangely present iguana. The purpose of this image was to catch the attention of a shopper and make them more closely examine the product it’s on.
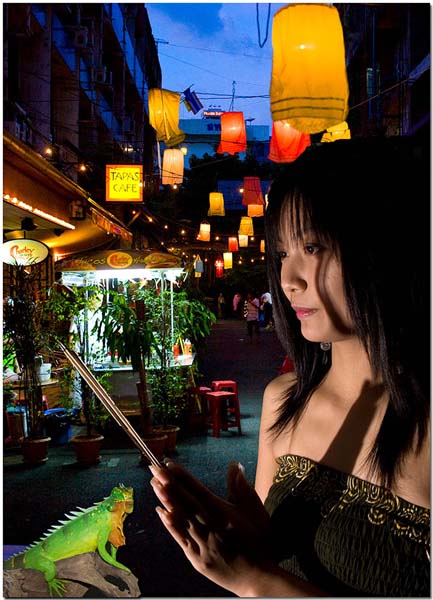
Looking at the picture it becomes hard to imagine how the image quality could be so high, how all the color is so saturated, and how all the elements appear to be perfectly exposed making for an impossible shot. The secret is: It is an impossible shot! This is actually a composite of three different images carefully masked, layered, and prepared in Photoshop. We won’t get into the Photoshop techniques in this learning topic, only the overall concept. Lets look at each of the three images separately and discuss how the were taken.
This is the photo as taken on the porch of a dark bar at night. I used a portable strobe for directional hard lighting just like you’d find in the finished image. Perhaps a porch light would be lighting a passerby, a motorsai light, or some other source of hard light. Its important to match the light temp, hardness, and direction properly if you want the finished image to be believable.
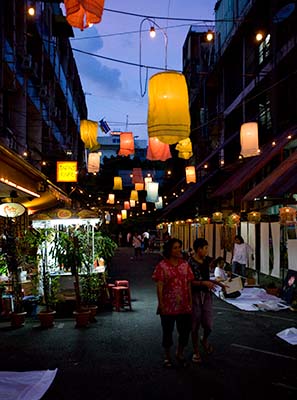
This next image is obviously of the soi we used as a main background. We cropped it in to give the appearance the model was right in front of us and adjusted the levels and colors for effect. This was shot a kilometer or so from the bar we obtained the first picture at. It was shot at sunset during a five minute span of natural light when the sky would be the right brightness and color and would match the brightness of the artificially lit colorful lanterns hanging across the soi. This image by itself is a major challenge, the same technique of timing and matching the different light sources can be very effective for compelling portraiture.
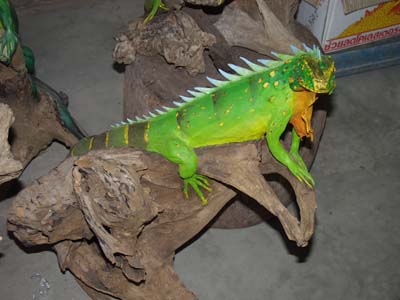
A friend I was preparing this to share with at joked about having an iguana in the background. I remember back about ten years I was at the floating market and had snapped some picture of some life like wooden carvings with my trusty 2mp point and shoot. I dug those images out and found one I could use.
By carefully adjusting each individual image for light, color, perspective, skew, and scale.. and then carefully masking each and placing in adjustable layers in the right order, I was then able to adjust the opacity of each layer and create a mostly believable image. The iguana probably gives it away, but it made me laugh. Composites can be a lot of fun.
Photography News of Interest
Here’s an interesting story on saving money by using vintage lenses on your DSLR instead of the newest autofocus lenses. I know many people who through adapters or even lenses that fit their current mount, use much older lenses they find at pawn shops and eBay specials and save a lot of money. Read the story here.
There is no doubt that the media is biased one way or the other towards certain political leanings, and they often choose election and campaign coverage photos to suit their biases. Now you can read about how well they’ve planned and executed election photojournalism that worked! Here.
Ken Rockwell is one of the most controversial photography bloggers on the net today. Either you love him or hate him. Half of what he says is biased nonsense, the other half well reasoned and useful information. Depending on who you are, the halves can be on either side. ;o) Take a look at his site here to see some examples of out of the camera pictures with him using his new Canon G10 compact. Great colorful pictures! I’ve enjoyed my G9 for over a year and I’ll probably be picking up the G10 to try out very soon. Look here..
Readers Submissions
Steve –
This trip to the Great Wall was about getting up early, using a tripod and low ISO, to get some decent images in the golden light of the morning. We were thwarted a little by a cloud bank on the horizon, that really didn't allow for a graduation of light, as it popped up over it quite quickly.
In the early light, I took this photo showing the layers
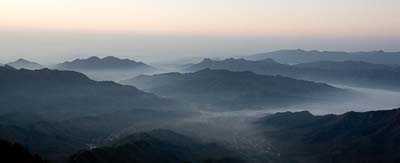
In this light, there are many options. I wanted to maintain the detail in the mist, so I metered off that. I used the cameras focus points to pinpoint the metering area and then I selected the f-stop I wanted. I always use Av mode, so the shutter speed self selected. I like the effect.
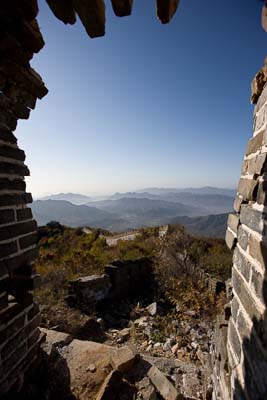
While on the wall, there are always framing opportunities. The Towers are in varying states of repair, and I liked the "Teeth" effect of this shot. Composition and lighting are everything, and this one had it all. I did no cropping in post production here.
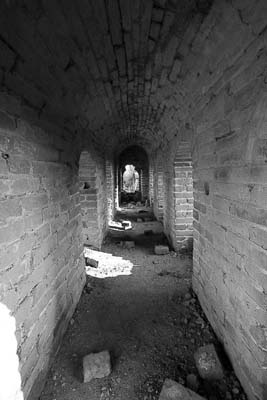
Again I used the tripod in a dark dark alley. This is the inside of a Tower on the Great Wall. After 600 Years, it's still in amazing condition in places. "They don't make Great Walls like they used to"

This photo is about composition and exposure. I could probably axe a little of the right "space", but the exposure is excellent. When shooting against a bright background, I always use +1/3, +2/3 or even +1 into a blue sky. Shooting into the sun, however, takes HDR techniques, luck, or some artistic impression!!
Enjoy, Questions are welcome
Rob
Rob –
Wonderful Submissions! I really enjoyed the pictures and the narrative illustrated them well. You’re invited back anytime.. ;o)
Steve
I suspect the readers submissions will be a highly anticipated section of this column and I encourage anyone with photographs and travel accounts they d like to share to please send them to me at: QandA@Bkkimages.com
Readers Questions
Thanks Steve – great to hear from you.
May I take a few moments to ask you something about photography?
(1) I was so proficient with my Nikons – especially the F5 – I think it was the best camera ever made. However, I have to confess that I know nothing much about digital photography. I have been thinking about getting back into it when I come to Thailand next year.
(2)I could try and get back in with Austral Press and submit stuff from there. I have a little Sony Cybershot and it takes good pics for a compact, but after having so much latitude with my Nikon SLRs – I find it very limiting.
(3) My question relates to how much I would have to spend – or better still – at what level of entry I would have to aim at to get a decent digital SLR? I always buy good things and don't believe in junk, so I would probably prefer a top range professional camera. However with the hit my finances have taken that level of entry may be too expensive.
(4) I like Nikons – do you know much about their specific cameras and which one would suit me?
(5) How much fiddling around do you do in the computer afterwards – or do you try and nail it in-camera?
(6) I think Stick is into photography a bit isn't he?? do you make your living in Thailand from Photography?
Phil
Phil –
You asked some really great questions, each one deserving of its own learning topic. Allow me to briefly answer your questions here, and if you have further questions please forward me the topic and I’ll add it to the list I use to pull topics from and will get to it as soon as I can.
- I used a Nikon F5 professionally for a few years. It’s a fine film camera. The new F6 beats it in almost every way though, check it out, it’s Nikon’s last film camera.
- You are going to find that stock photography has greatly changed in the last decade. I used to make a pretty decent income each year from stock, but now that Getty Images and many others are offering “micro stock” with images being licensed for use for as little as $2-$3, many find it not that profitable or worth the trouble any more. More, the agencies (the good ones) demand certain cameras be used. Everyone has a digital camera these days so they tend to be very selective.
- This depends heavily on what you need. I spent over $50,000 to get into Nikon on a professional level seven years ago. Two years later I sold that gear and spent about $60,000 equipping myself with Canon gear. Others buy a $800 DSLR and start shooting weddings the next day. This heavily depends on what services you intend to offer and how well you intend to perform those services. On an amateur level, for a hobbyist, it’s easy to spend a solid $5000,00 getting started.
- I’ve very familiar with both Nikon and Canon. If I purchased a Nikon DSLR today for myself, it would probably be the D700. Again, it depends on what you plan on doing with it.
- With my workshops I plan on spending AT LEAST 50% of the time on the computer teaching how to process files. Of course you always try to do as much in the camera as you can, but digital photography has really changed how things are done. Consider your computer as you did the darkroom. Both take significant skill and time to master those skills.
- Stick is an avid hobbyist and turns out some good work. Take a look at his galleries he posts on this site. I have a very important gig coming up this November and I needed a qualified assistant. By qualified I mean someone who not only knows how to carry my gear, but also can shoot side by side with me on an equal basis. I asked Stick to work with me on this important assignment.
I know these answers will probably spark many more questions and I’ll be glad to answer them as separate topics. For now I hope this helps
Steve
Please submit your questions to QandA@Bkkimages.com All questions will be answered and most will show up in the weekly column.
A Snapshot of Bangkok Images Week in Review
Well.. this week wasn’t so good. The only thing I had going was a commission I was fired from, told I’m a lousy photographer, a pretender, and that expensive equipment does not a photographer make! At least one of those comments is correct.. ;o)
Perhaps I’ll do better next week.
Infocus Blog
Moving from Film to Digital
This question was asked above in the Readers Questions area, but I suspect there are a lot more of you out there who are curious about this question and it deserves a more complete answer. I’ll relate my own experiences and perhaps you can relate them to your own.
For over two decades I shot an Olympus 35mm film system. I had the expensive OM-3ti and OM-4ti bodies which were truly ahead of their time, and I had most every type of Olympus SLR made. Because I’d often be ‘roughing it’ in the field with the military I always hesitated to bring my expensive bodies with me, especially on a servicemen’s salary. So, I’d visit the pawn shops and stock up on OM-1n bodies. The OM-1n was a very capable and tough fully manual SLR with a manual shutter and only required batteries for the built in light meter and those would last several years. I’d try to keep 4-5 of these bodies at hand, taking two in the field with me everywhere I went. I rarely paid more than $35 for these bodies in pawn shops. I also had/have a very nice selection of Olympus Zuiko lenses, motor drives, winders, large capacity film backs, bounce grips, and the rest of everything in the system. Wonderful gear!
The above shot was taken with Fuji Velvia 50 ASA Slide Film. Olympus OM-4ti SLR. Zuiko 24mm F2 lens.
Almost ten years ago my surgically corrected eyes started to fade and at the time there was no fix save for glasses, so instead of glasses I opted to move to a more modern SLR system that included state of the art autofocus capabilities. After months and months of research I decided to go with Nikon and I purchased a beautiful F5 film 35mm and that month they’d just come out with the consumer grade D100 Digital SLR (DSLR) so I ordered one of those two and decided to play around with it.
The above shot was taken in a relatively dark chamber using a F1.2 lens wide open with ISO 1600 Kodak Ektachome Slide Film. Olympus OM-3ti SLR. Zuiko 50mm F1.2 lens.
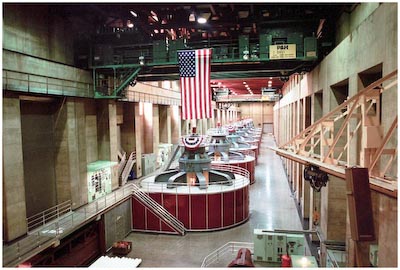
The above shot was taken inside Hoover Dam using a F1.2 lens at F4 with ISO 1600 Kodak Ektachrome Slide Film pushed one stop to ASA 3200. Olympus OM-1n SLR Zuiko 50mm F1.2 lens.
The above shot was taken while test driving a Nikon F5 with a crappy Sigma 28-300mm lens using Fuji Sensia 100 ASA slide film.
The above shot was taken while test driving a Nikon F5 with a crappy Sigma 28-300mm lens using Fuji Sensia 100 ASA slide film.
The above shot was taken when I owned my own Nikon F5 with an excellent Nikkor 70-200/2.8 VR lens. Fuji Sensia 100 ASA slide film. Captured while bouncing over the water at over 50 knots. I was immediately sold on Nikon’s vibration reduction, their brand of image stabilization.
Before I purchased the Nikon F5 I borrowed one from the local pro shop and test drove it for a week. I almost didn’t buy it after seeing how terrible the pictures were, but knowing it was probably a lens I went ahead with my purchase which included some professional lenses. Along with the D100 everything arrived in a big box and it felt like Christmas time.
As you can see from the above photos I had really mastered my Olympus gear and after two decades I was very comfortable with it. I knew which lenses produced the best sharpness, color, and contrast and the results were very positive even in some very difficult locations as I demonstrated above. It took a few months to become barely competent with the F5 and learn to effectively use its excellent autofocus. Just because a camera has autofocus, it doesn’t mean it focuses all by itself as you wish it would every time. You must learn how the autofocus system works in its various modes, when and how to use the modes, and when to forget autofocus and revert back to manual focus. Many people get very frustrated when moving from a point and shoot compact to a DSLR because the autofocus can be very hard to get used to, it took me months and I was shooting professionally at the time.
The new Nikon D100 DSLR sat idle for a few months because I didn’t have time to fully devote myself to learning how to use it. Yes, I put a few hundred shots through it and they all looked terrible. Looking on forums I was seeing great results from the D100 so I knew the problem was with my knowledge of digital cameras and not the gear.
Finally I took a months vacation, locked my F5 film SLR in a drawer, and committed myself to learning to use the D100. Initially I shot straight jpegs and used the in-camera adjustments such as sharpening, color, and contrast. I soon discovered that the included Nikon software was less than adequate and it was no surprise my outdated computer was so slow processing pictures that it was pure torture. I hadn’t upgraded my computer in years, so this started weeks of more research catching up on all the latest computer hardware and what worked best for digital imaging.
UPS dropped off my new computer and I was up all night assembling, installing software, and finally seeing what my images looked like on it’s display. The images looked terrible! Frustrated I read book after book and forum after forum, gleaning whatever pearls of wisdom and experience from those who came before me. It took me months to discover I needed to color profile my monitor, that RAW files offered great advantages, and just a few tricks in Photoshop. Heck, for the first 3-4 months I didn’t even sharpen my images because I didn’t know DSLRs had a anti-aliasing filter and needed sharpening. So, I learned how to sharpen images and for the next few months I over sharpened all my images. Every time I learned a new way to adjust my image I abused the heck out of it before finally getting some sense and learning how to balance things.
Almost six months went by and I was still shooting film professionally because I knew film and could do it well, and my digital results, even using the exact same lenses on both cameras, were terrible. There was a lot more to digital photography than I first thought and this was becoming painfully obvious.
By the end of the first year I was finally ready to start using my D100 on ‘some’ professional jobs, I’d finally learned enough about the differences between shooting the two types of cameras, and how to use the software, and prepare files for the printer, to output truly professional results. It was very slow going.
Looking back at things it would have saved me much time and money if I’d just paid someone offering 1-1 workshops for a 4-5 day course. I would have learned MORE in those 4-5 days by someone who knew what they were doing, than by all my experimenting and the mountain of books I’d digested over the course of the last year. A quality workshop probably would have saved me the entire second year of learning as well. I’m not exaggerating even a little bit.
Really, the transition from film to digital depends on the person. The more computer experience you have with imaging software the smoother the transition. But do be warned, it can be very frustrating and time consuming. It can make you feel like you’ve wasted a great deal of money and time. It might even make you cry at times.. ;o)
My recommendation? Complete a quality workshop. See if you can find a instructor who can take you on individually and supply a quality DSLR and accompanying lenses BEFORE you buy. Make sure the instructor has a quality computer workstation set up for you to use. Without spending a dime on the gear or computer, you will not only be able to directly start using a professionally setup system, and professionally selected camera gear, but the instructor will know how to teach you to get the most out of everything and almost immediately start producing quality images on your own.
A good instructor will answer all of your questions, be patient if you want to take notes, and make recommendations about which computer, software, and gear to use. He should be able to demonstrate why he’s recommending one piece of gear/software/equipment over another. If you already have a decent laptop bring it, and let the instructor help you set it up so you can start turning out quality images immediately.
If the workshop is truly professional and well set up, don’t be surprised if the instructor tells you you’ll be spending as much or more time on the computer, as you will with the camera. With digital photography the computer becomes your darkroom and it takes just as much time and effort to learn to be competent on the computer, as it does to become competent in the dark room.
It took me over two years to become barely competent with digital photography. Since, I’ve built on these skills every single day for an additional eight years. If I was starting over I’d go the workshop route without question and save years of time, not to mention being able to test drive cameras and lenses so I’d be prepared to make the right purchases the first time, and not end up having to buy and resell a ton of gear as I learned.
I found this old shot I captured with the D100 at about the two year mark. I was finally there.