Exposure Compensation, Bang Chang
![]()
Feature Photograph
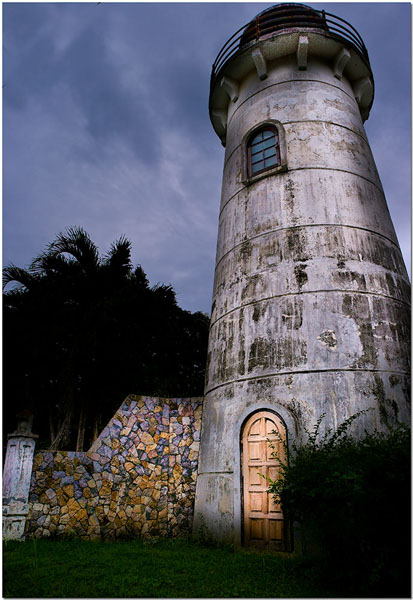
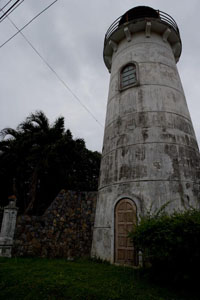
This week's feature photograph was taken near Bang Chang, along the sea shore. I was driving the area looking for photo opportunities of something unique. When I first laid eyes on this scene I very much wanted a great picture of the lighthouse. Ideally you’d have a dramatic sea and sky as a background, a decent perspective to shoot from so there’s little to no distortion, and from an angle that catches something interesting about the main subject. All I had with this shot was an interesting door and upper window shutters. The sky was drab, the background was unremarkable, and a good perspective wasn’t possible because this was right on the road and there was a ton of power and telephone wires running right (less than 4 meters) along the front where the door was. The other angles didn’t include the wall, shutters, door, or anything interesting. What to do?

I accepted there would be distortion, so I decided to create even more distortion and make the lighthouse appear imposing and/or intimidating. I turned a weakness in the composition into a strength and was able to avoid most of the wires and cloned out the rest. From experience I knew the sky would be interesting if I underexposed it. The door, shutters and wall would be interesting if I drew attention to them in a positive way. I set up for my shot, bracketed shutter speed, and took three shots with a single burst, each one stop different from each other. My intent was to process them as HDR (high dynamic range) which is a very useful technique I’ll talk about in future columns. Instead, this was our lucky week because Adobe released the final version of Lightroom 2.0 and I wanted to process a sample to share with you. I was able to process this image in under five minutes to completion using Lightroom 2. 95% of my adjustments merely varied the exposure in different parts of the frame. There was very little change in color or saturation. This is what I started with out of the camera.
Weekly Photo Outing
This week we travel to Bang Chang in the Rayong province. Bang Chang is about 20-30 minutes south of Pattaya and has quickly become one of my favorite places for a quiet getaway. There is small expat community there made up of some retirees, but mostly workers in the oil industry who service the nearby refineries. Below is a map with Bang Chang marked in relation to Pattaya and also shows the location of the lighthouse.


One of my favorite places for interesting photographs is the refineries. I expected security to be much tighter and restrict access, but for the most part I was able to drive just about anywhere I wanted with no questions or worries.

Nearby you’ll find kilometer after kilometer of unspoiled seafront properties untouched by commercial interests and void of the uber rich. For the most part the homes right on the water have been there for decades and are owned by those of common means. There are a few developments, but most were left unfinished during the financial crisis of 1997. One develop was eager to sell seaside properties half completed. In one of the pictures below you can see a very nicely sized home right on the water, roof on, but the windows were never installed and the inside finished out. There are many such properties and I’m told they’re a real bargain.
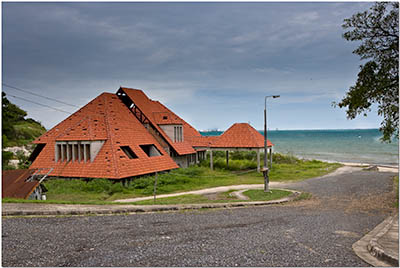

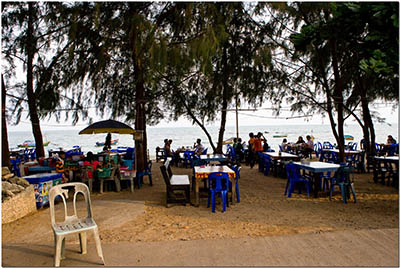
Close by you’ll find several very nice beaches with plenty of places to eat, scenic views, old fishing boats and a very quiet and pleasant feeling. A few kiliometers inland and you’ll come upon rubber tree plantations, coconut trees, small mountains, fields, and many places of natural beauty. Bang Chang really has a lot to offer for someone looking to retire near the seaside and a nice quiet town with decent infrastructure, but probably won’t be of much interest to those on holiday looking for a good time.

Bang Chang is in my GPS’s memory which I’ll pull up whenever I want to enjoy a few quiet and inexpensive days in a place not even two hours from Bangkok.

Exposure Compensation
Last week when we talked about taking advantage of your digital cameras histogram I mentioned “Exposure Compensation” and I wanted to explain more about this. Most casual photographers with compact digital cameras leave their cameras in “automatic” or “program” modes. We’ll talk more about these modes in future columns. How the camera works in these modes is by dividing the scene into sections, and reading the light in each section. Some cameras will have 20-30 sections, while some advanced cameras like Nikon’s D3 will have 1005 sections. Some will read the light levels as an aggregate, while the more advanced read the light levels present in the three basic colors of red, green, and blue (RGB). Obviously the more sections it reads and at the most levels, will yield the most accurate results.
How does this compare to the old fashioned light meter your grandfather used to use with his Kodak Brownie? Light meters would read an entire scene with just one reading, and this reading would be used to set the cameras exposure manually. We still use light meters today, but mostly in the studio where we’ll measure the light on the nearest cheek of a model, or the most important part of a product, and then we’ll set the exposure by this reading.

Digital compact cameras in a way are really more advanced light meters. Many pros use small digital compacts with manual controls and the LCD display to ascertain the best exposure, and then transfer those setting to their medium and large frame film cameras to get the best exposure possible while not wasting film.
A digital camera in program or automatic mode will read the light in the sections of the frame, and then compare those sections of the frame to a database of such readings to help it determine which type of scene it’s exposing for. This might be a portrait with the person against a bright or dark background, a landscape, or any number of many possibilities. Once it’s CPU finds a match in the database closest to the scene it’s metering, then it accesses the best settings stored in it’s programs and makes the adjustments for you. In other words, each time you press the shutter down halfway to autofocus your camera, it’s reading the light in your scene, by sections, comparing this data to a database of such data, and once finding a match it sets your cameras exposure accordingly. A camera will normally have from 20,000 to 50,000 and more “scenes” in it’s database for comparison. All this takes place as fast as you can take pictures, which on the fastest DSLR’s can be up to 11 frames per second. Quite different from your grandfathers light meter!
Exposure Compensation, often abbreviated “EV” merely alters the settings, increasing or decreasing, from whatever settings your camera set for you in program or automatic mode. EV is something you must set yourself. On most cameras once set it stays that way until you change the setting, turn your camera off, or some other way so it’s good to read your cameras instruction manual and know how long it holds the setting. You’ll also need to read the manual to learn how to set EV values.
What is EV good for? Even though your cameras automatic mode does its best to give you the best exposure, often it’s off by a significant amount. EV allows you to correct this for the best exposure. How do you know how much EV and in which direction (increase/decrease) to set? Your histogram is the best indicator of exposure, and how much EV you need to achieve a perfect exposure. A histogram is a photographers best friend. Learning to read it, and adjust EV, is one of the easiest and most effective ways to improve your photography.
You don’t need to change or set the EV for each picture. If you’re taking a group of portraits in the same location, then you take a single picture using the automatic settings. Then you check your histogram. If the histogram shows you need ½ stop of positive EV, then set in ½ stop of positive EV and take another picture. Examine your histogram. If the histogram is now showing perfect exposure, then you can continue to shoot pictures at this scene using that same settings, until the scene changes. Enthusiasts with DSLR (digital single lens reflex) cameras operating in either program, automatic, aperture priority, or shutter priority, will routinely take a picture, check their histogram, and adjust EV for the best exposure, for almost every scene they encounter. After a while your eyes will do the metering for you and you’ll know if you’ll be setting in negative or positive EV, and soon you’ll be able to accurate estimate how much EV before you even see the histogram. This is a very important basic skill I make sure the students in my workshops master, and there’s no reason a casual photographer with a much less expensive camera cannot benefit just as much from the same technique.
Photography News of Interest
Scott Kelby writes many photography “how to” books including his recent Lightroom instructional books. He’s now sponsoring “Photo Walks” all over the world, directed by “walk leaders” to promote his new book “Lightroom 2 Book for Digital Photographers.” A Photowalk will be held in Bangkok on August 23rd. You can find out more about the walk and how to sign up here.
Read here about how your laptop could be “detained” upon entry into the USA.
In other articles I’ve written on nude and glamour photography I’ve STRESSED you can never been too careful, or take too many precautions, to make sure your model knows what’s going to happen during the shoot and that she’s comfortable with everything. I’ll even go so far as to have the model sign a statement to the effect that she fully understands the photographer/model relationship during a shoot. This story is about a nude/glamour photographer now charged with sexual assault. No details were given, but for me it reinforces the need to be extremely careful.
I’m always open to learning new techniques, and what could be better than creating art with Polaroid film? This story might be of interest to anyone who still has some Polaroid film laying about.
PhotoKina is next coming next month. Perhaps the most eagerly awaiting announcement is the replacement for Canon’s three year old 5D DSLR. Will it be able to compete with Nikon’s D700 DSLR which is already in stores?
Readers' Submissions
Now here’s something you don’t see much of these days, a submission taken with a ONE MEGAPIXEL camera. The original was bigger and I downsized it for this column, but the original was plenty large enough to share with friends and family and still see all the details. Another nail in the coffin of the megapixel marketing race from the major manufacturers.

Shot taken with an AGFA 1mp camera. No zoom, no focus, no settings. The original “point and shoot.”
THANK YOU Mikenbkk for your submission.
I suspect the readers submissions will be a highly anticipated section of this column and I encourage anyone with photographs and travel accounts they’d like to share to please send them to me at: QandA@bangkokdigitalimaging.com
BREAKING NEWS UPDATE
Seriously folks, we have a late breaking Readers Submission that I hope will be of interest to everyone, and I don’t mind telling you that I stopped the presses while I contacted this photographer and begged for some pictures.. J
When you tuned in your television or opened your newspapers this morning you probably saw dozens of pictures of the 2008 Beijing Olympics opening ceremony. Nice pictures, but they become even nicer when they’re captured by one of our own and Lecter of Schoochers fame is one of our own and he had the rare opportunity to not only be in China at the right time, but to be in the right place for some incredible photographs.
In the future I’ll write more about what it takes to become a part time correspondent, but today I’ll say it’s often just catching a break and being in the right place at the right time and having the necessary skills with the camera. Lecter certainly was in the right place at the right time, and his skills with a camera are very good indeed.. You can see more of his work on CNN’s iReport here.
Lecter begins:
Beijing, 8th August, 2008 (or 8/8/8).
It's an auspicious day, date and time in Beijing / China's History. We decided not to stay indoors and watch it on TV (The prospect of doing this with only Chinese commentary was not overly exciting) and headed out into the fray that is Beijing.
With Security unprecedented in Beijing, we encountered almost deserted streets all the way to the Northern 4th Ring Road. There is a huge police and security presence, but it's not suffocating away from the actual arenas. We quickly got a taxi, and after some short convincing, got him to take us where we wanted to go.
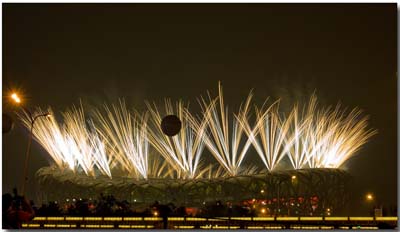
Once at the ring road there was no choice but to walk. It was completely locked off, with people emptying out of the the buses and cars to get a look at the Fireworks. The 4th Ring Road is a eight lane expressway that's usually about as busy as any road in the world gets, 24×7. Really weird to see it stopped, the other side of the road empty.
We had with us my camera / tripod combination (Canon 1Ds MkIII, Gitzo 1348, a RRS Ballhead, and a 16-35/2.8 / 70-200/2.8 lens setup.) and a JVC Video camera. The latter was of little use, although we got some nice footage of the final burst of Fireworks.
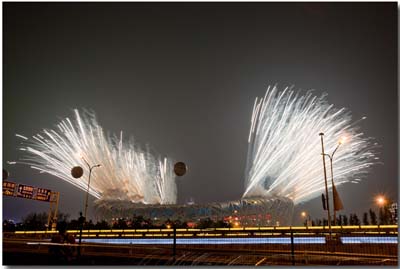
There were quite a few cameras / photographers there, but not in the numbers you'd see in Thailand or in the West. It is an emerging market, after all, and the monied people are inside the stadium, not slumming it outside with the likes of us!! Camera phones and "point & shoot" cameras are virtually useless for this type of photography unless you know how to set them up. Also a tripod is mandatory. Hand held is wasting your time.
I used F16 and Bulb mode for the captures. This gave me total creative freedom based on what happened in front of me. I use a remote shutter release (hand held) and did exposures from 1 second to 6 seconds. Based on some of the images I saw from those around me (who sought advice, in that pidgin, hand gesture way we often communicate here), there was not a lot of experience in capturing these types of images. It is easy, but you need to use a suitable technique.
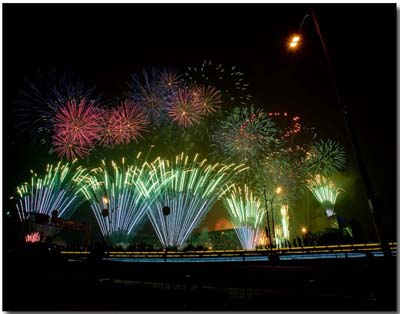
The people around us were generally friendly and only once did we have to ask someone to move who deliberately tried to take our view of proceedings. I like to let the images speak for themselves. The black balls, or spheres in the images are "Beijing 2008" balloons set up around the perimeter….. In the cheap seats, we had to take the best we could.
Lecter
Readers Questions
“A tougher pic. Using the f100d. Reflections! How to avoid them so as to improve the pic? Example provided.”
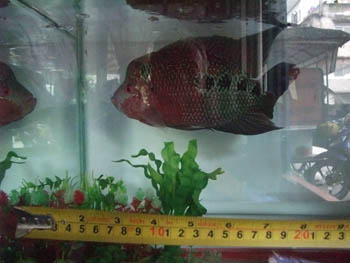
I raised tropical fish as a kid, and as an adult I remember standing in a huge aquarium in Oregon trying to photograph Keiko the whale and still asking myself the same question! Since, I’ve helped a few hobbyists photograph their salt water reef tanks and we’ve worked out some adequate techniques. First, reflections are a killer and are ALL caused by unwanted light. Completely darken the room containing the aquarium, and then light the aquarium with only the hood fluorescent lights. Don’t forget to set your white balance for the light source used. If you’re using a bright enough hood light, and a high enough ISO setting on your camera, and your photograph at a 90 degree angle to the specimen, you should be able to avoid reflections and achieve decent results. Make sure you clean the glass very well, and get as close to the glass as possible. If you want to shoot at a lower ISO for higher quality, you can try what we did. We used strobes normally used for underwater photography INSIDE the tank, with the camera on the outside. If you do this, please make sure you use a professionally made waterproof cable, or better yet an infrared sync, strobes carry more current and “shock” than stun guns. You might be “stunned’ with the results.
Tips for sunset, low light pics Example provided.
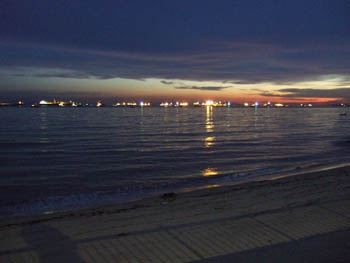
This topic really deserves to be a feature article so I’ll add it to my list to cover in the future and I’ll summarize here. Use a solid tripod mount, manual exposure, either an external shutter release or the “self-timer”, and frame the scene as desired. Experiment with your ISO, shutter speed, and aperture to achieve the best image quality while obtaining the ideal exposure. The answer to this question in a nutshell is to obtain the ideal exposure and this takes some experience. It might help to know that even after the sun sets, after you can no longer see the sun and it’s dark, for about the next 30-90 minutes enough “color” will remain in the sky to make a spectacular sunset. “What colors if everything is dark?” The naked eye sees darkness, but if you lengthen the exposure you’ll find exiting color in the skies. Depending on conditions and timing the colors and intensity will vary. In that 30-90 minute window, there will be a 2-4 minute period I like to call the “magic minutes” where results will be vastly superior. I’ll talk about this more and show examples during a future column.
Please submit your questions to QandA@bangkokdigitalimging.com. All questions will be answered and most will show up in the weekly column.
A Snapshot of Bangkok Images Week in Review
This week I had a student travel from down south to spend a few days with me in Bangkok. This man is already an accomplished photographer and well versed with the computer processing side of things, yet felt he could benefit from some one on one instruction with Adobe’s new Lightroom 2. While he was here we also “test drove” a few lenses, evaluated capture techniques, and overall had a great time.
Some have asked the question “exactly how will a workshop benefit me, and what makes it worth the cost?” The answer will be different for everyone, but allow me to use the student above to give just one example. He is an accomplished photographer, has his own signature style (this is something that many never develop, and those who do takes years), and is very quite knowledgeable in most areas of photography. He has the photography skills, the equipment, and the experience. All he was lacking was the knowledge to connect these skills together through modern software. In a couple abbreviated days we were able to fill in the missing pieces of knowledge enabling him to connect the dots. Minor stuff really, but if I had to put a number on it, I’d say his ability to produce a quality output (prints, web images, etc) increased over 50%. His knowledge only increased approximately 1-2%, but in two abbreviated days the quality of his output increased 50%, and he has been a photographer for years. Associated “value?” For me personally I find this sort of workshop personally satisfying on a grand scale.

Mirrored Blog
I update the blog on my website inconsistently, from 4-5 times a month, to only once a month. I don’t blog for the sake of blogging. However, when something catches my attention or a relevant topic arises I’ll often find myself at the keyboard adding yet another blog entry. When I find an entry suitable for the purposes of this weekly column I’ll duplicate it here for the Stickman readership. I hope you enjoy.
A Requiem in Memory of HRH Princess Galyani Vadhana..
Filed under: Uncategorized, Composition, New Cameras & Equipment,
Musings, Bangkok Photography Outings..
This February 21st a friend of mine was gracious enough to invite me to a performance by the Bangkok Symphony Orchestra in honor of the late HRH Princess Galyani Vadhana. It’s not every day we get to be one of the few, so being one of the few hundred attendee’s of this Requeim is something I’ll always remember.

In preparation for this event I hinted around if perhaps I could bring my camera to capture the events and was told in no uncertain terms that I was invited as her ‘guest’, not to work or perform a service. Readers of this blog will immediately
understand that this was an event we’d love to photograph, so it would have been a privilege and not work to have brought a camera, but I left the serious guns at home and snuck my new Canon G9 in my bag just in case.. I’m glad I
did.
While waiting for the lovely young conductor who was to be my date for the evening I found myself seated in the entrance way of the Cultural Center with about 20 minutes to spare. Looking around I didn’t see much in the way of interesting compositions
so remembering what I often tell my students “a lack of a composition only indicates a lack of creativity” I dug a little deeper in search of interesting subjects. Finally I had 3-4 interesting compositions
in mind so I pulled out the handy Canon G9 and spent a few minutes capturing the desired scenes noticing that without the flash enabled I was shooting at ISO 800 which is the upper limit I choose to use this camera at.
Sitting under the first balcony I had a great view of the stage and orchestra, and just when I was thinking of pulling out the G9 a person came on stage and requested no pictures of videos be made, and no applause be given at any time. Looking around
at all the black suits and dresses it couldn’t be more clear this was a somber event, so no pictures were taken. I’ve got to comment on this, I’ve never seen a more respectful and disciplined audience at such an event, the
Thai peoples love for this Princess and their King was evident.

Also, it was interesting to note that this Requiem had a Christian theme, perhaps unusual in a Buddhist country? The musicians were superb! Perhaps my favorite performances were made by the Thai Youth Choir and a solos by Monique Klongtruadroke
and Teeranai Na Nongkai. A special mention should be given to Conductor Pawasut Piriyapongrat
for the splendid performance of her Thai Youth Choir. A wonderful performance overall.
