A Home In Khon Kaen Part 3
In July, N came to NZ to study English for three months. I had been feeling more satisfied with progress after the ceilings had been done, but was about to enter a rocky patch – with the house and employment. Noy had left instructions for the ceilings
and eaves to be painted – one coat of alkali resistant primer/undercoat and one coat of white ceiling paint, as well as for the wood trim to be primed and painted with two coats of top coat blue. I was in for a shock on my next visit! This
came earlier than expected because in August I lost my job in NZ. At the time I was relatively unconcerned as two organizations in Asia had expressed some interest in me and in early September I was off to Hong Kong for an interview. The interview
went well and I arranged to stop in Thailand for three days – just enough time to get up to KK to view progress. I am sure you could have heard my swearing in Bangkok! The paint had been applied with a roller on a stick – over the
top of my nice new downlights, dripped all over the ceiling fans and down the walls and was unbelievably patchy. I had left money to buy more paint but when the workers had run out of my oil based timber primer they just continued to paint the
wood trim with the topcoat direct to the bare timber, with bleeding and mould already showing through. Then they had run out of the topcoat and rather than get the correct water based paint from Home Pro they sourced an oil based paint in the
village which I guess might have been an approximate match to a blind man! Then one of the worker’s children had decided he would apply some white paint to the varnished and heavily carved front doors – which no-one had bothered
to clean up. And the difficult high parts of the house had just not been painted at all! This was a forerunner of things to come…

There had been heavy rain and part of the drainage field had been denuded of soil by the runoff rainwater. It was clear to me that substantial investment in retaining was going to be necessary. Not in a good mood I returned to NZ and vented
my spleen on poor N. A couple of weeks later I was asked to Singapore for an interview with the other organization and as I was no longer working I arranged to spend a full week in KK to try and move the project along. I now had a smattering of
Thai and thought I would be able to manage communication with a combination of my limited vocab and some demonstration – as I had done successfully in Russia with far less Russian than my Thai. N was not at all sure about this and she was
proved right – the dumbest Russian peasant is intellectually superior to the average Thai!
First on the list was to install guttering for two reasons: I wanted to store rainwater as the village water supply is poor quality and completely unreliable, and secondly to stop the water eroding the mound on which the house was built.
I had spent some time looking for gutters – I wanted colour steel but nothing was available. Gutters are fairly rare in Thailand and those that exist are mostly custom made jobs folded up from galvanized steel (a little thicker than cooking
foil!) and soldered. This didn’t appeal. After a long search I finally located a company manufacturing fiberglass gutters – these would have been excellent as they had a good profile and copious capacity but were inordinately expensive.
(These have since become available in Home Pro). Eventually I found a company in KK that sold white UPVC gutters and downpipes – both a little smaller than I would have liked but reasonably well moulded.
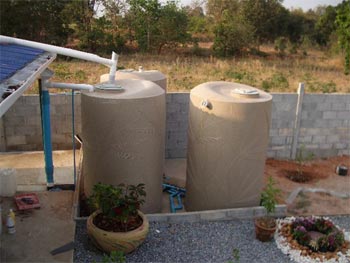
Rainwater tanks were also a problem. The standard plastic 25000 litre rainwater tanks common in Australasia were nowhere to be found. Wanting something attractive as well as functional, I settled for three 2000 litre plastic tanks with a
sandstone appearance – I will add a fourth next year when I have some more money. These tanks are designed more as mains water storage tanks from which water may be pumped to solve the problem of poor water pressure than as rainwater system
tanks and the way all three outlets were clustered together was to prove a damned nuisance. It is possible to source quite cheap locally made concrete tanks and a number of these are in evidence around my village, but they would not permit the
multiple water quality measures I wanted.

50,000 baht poorer I was ready to do some work. First up – install the guttering. I wasn’t confident about the ability of the local workers to do this how I wanted, so I accepted the shop’s offer of an experienced team
– it wasn’t cheap but it WAS the right decision. Even so I had to supervise closely – initially they were going to install them with too big a gap between the roof lip and the gutter. The roof overhang was a little short but
nothing I could do about that. I wanted three downpipe connections to the tanks and sloped the gutters accordingly. The gutters on two sides of the house sloped to the rear and on the rear lean-to extension to one side. But I was concerned the
small downpipe diameter would not handle the volume of monsoon rains, so I installed additional downpipes at the high end so if water backed up the gutters it could flow down those. Initially I dug a drain and installed 4 inch pipe to take this
away but then I had a rush of blood to the brain and decided to make a fishpond and farm fish on a small scale for home use. I know nothing about fish farming so if any readers out there can help me with advice I am keen to learn.
I installed several water quality devices into the system. First of all I used leaf shedding screened rainheads which I purchased in NZ, rather than the locally available droppers. These have a large opening from which the rainwater falls
onto a 45 degree angled 1mm stainless steel screen. Leaves and other debris hit the screen and fall to the ground, and dirt particles, lizard shit and other undesirable tank water additives are prevented from entering the downpipe – as
are mosquitoes. Secondly I installed first flush diverters. For the two long runs on each side of the house I decided to use pressure diverters I sourced in Australia. The water, after running through the 1mm screen enters a canister with a hole
in the bottom above which a small ball is suspended by elastic cord. The first flush of water from the roof which includes all the dust and ash that settles on a roof over time washes through the canister hole. But when the pressure of water is
high enough the ball is forced down against the hole and seals it so that the now clean water is able to run through the downpipe connection higher up on the side of the canister and feed the rainwater tanks.
On the lean-to extension roof downpipe I installed an ordinary post style first flush diverter. The downpipe runs into a length of 4 inch pipe which has a ball floating inside. When this length of pipe is filled with the first flush of dirty
water, the ball floats up and seals, diverting the water out the side into the tank. The bottom of the 4 inch pipe has a small opening which allows the dirty water to slowly drain away and a plumber’s cap which can be removed to clean out
any debris that gets past the leaf guard screen.
6000 litres is not a lot of water but it is heavy. I decided to mount the tanks on a reinforced concrete pad but as this would be on the boundary I had to get the retaining wall done as well. Local retaining walls are usually done with the
thin concrete blocks and weak posts I have already mentioned. I decided I would use this for the bulk of the wall, but well reinforced with steel, a strong poured footing and good drainage, but the section holding alongside the concrete pad for
the water tanks would be in poured reinforced concrete. Despite my best efforts at supervision the forms for the concrete work I had asked the workers to knock up out of plywood and 3×2 were not adequately braced. I was seriously cheesed off with
the first concrete delivery’s lateness and excessive water content. I had chosen a large national concrete company in the hope of getting a good product and service but it was a mistake.
The first batch of ready-mix I ordered arrived at 5pm instead of 1pm as I had requested and was far too wet. By the time the driveway had been poured the sun had set. When it came to the retaining wall, the poorly braced forms bulged under
the extra wet and so heavier concrete and additional emergency bracing had to be put in partway through the job – in the dark. The result was not at all what I hoped… but I put a lot of steel and a deep footing so it will be strong enough
– even if not very attractive. I estimate that this section of the wall took double the concrete I had planned.

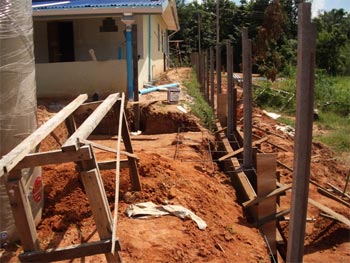
The photos below, taken in October shows the rear of the house with guttering installed, posts and foundation drains dug and the formwork taking shape. The first gives a view of the post style first flush diverter with the leaf guard screen
and the preliminary work for the pad for the tanks (there was a lot more steel than this but I don’t have a photo). You will also see that the lean-to house extension hangs quite low – this was a problem as my tanks are 2 metres
high and I had to get the rainwater into the top. So I had to cut away the ground for the tanks to rest on.
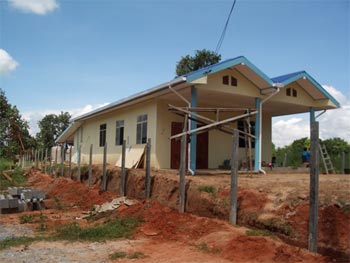
The second photo gives a sense of the height of the retaining required. Note all of the downpipes you can see at the front of the house are only “overflow” downpipes and are connected to underground drains to the fishpond..
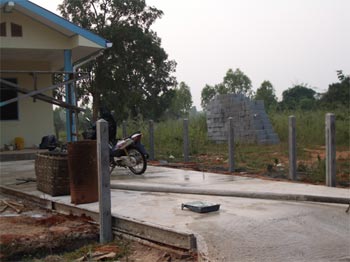
The third photo shows the driveway which was reinforced with mesh and quite thick.
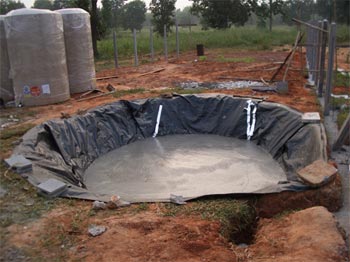
My concreting woes were not over. I found a local company to provide the next batch of ready-mix to complete the footings for the rest of the walls and also to provide what was intended to be a thin floor for the fishpond, which I had lined first with
heavy plastic sheeting. The quality was good – the concrete had the consistency of thick porridge – perfect! But while I was making sure the workers were poking the air out of the footings the driver got exuberant and poured half
the load into the fish pond – my intended 3 inch floor ending up 8 inches thick! I estimate the wasted concrete in the wall and the fishpond meant I had to buy another 4 metres. Anyway, here is a photo of the fishpond floor.
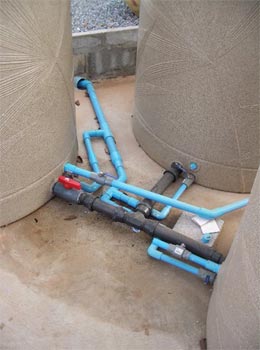
Now back to the rainwater system and water quality measures… The tanks I bought had two 1 inch inlets and one two inch inlet all clustered together at the bottom of the tank. I didn’t like this much but decided to work with it rather than try
and retro fit new inlets. I brought over 2 inch Hansen fittings from NZ and connected the three tanks together with 2 inch pipe. I added a ball valve to the pipe from one tank – the tank from which I would take the water – so that
this could be isolated. The rainwater would feed the other two tanks and I wanted to be able to isolate the supply tank either for cleaning or in the event my water inlet quality measures broke down..
One of the 1 inch inlets in each tank had factory installed pipe inside the tank that lead to the top of the tank. This is designed for the installation of a float valve so that mains water enters the tank at the bottom and is turned off
by the float valve when the tank is full, and turned on again when the level drops. In the supply tank I cut the pipe off from the inlet leaving a short length to which I attached a floating out-take. This is simply a length of flexible pipe attached
to a large float which keeps the out-take that supplies the house at the top of the water – where the water quality is best – rather than drawing from the airless and dirtier water at the bottom of the tank. The out-take also had
a 1mm round screen attached to ensure than particles are not sucked into the pump. The same inlet on the other two tanks is for the time bring simply plugged but when I get a fourth tank I will use these two to connect it.
I then connected the remaining 1 inch outlet in each tank to each other via a ball valve and thence to a drain pipe that runs into the fish pond so that if I ever drain the tanks the water is not just wasted. (The fishpond overflow will ultimately
feed a couple of the cheap locally available concrete tanks with water than will be stored for the garden.).
Three further additions to the system were required. Firstly an overflow. I fitted a 100mm overflow pipe in the top side of the supply tank. This was fitted with a 1mm stainless steel flap valve to ensure again no nasties getting into the
tank. The overflow will also run to the fishpond. Time will tell if one overflow is enough. To this I added one further water quality measure. I added a 90 degree elbow to the inside of the overflow pipe in the tank and fitted a length of 100mm
pipe that runs to the bottom of the tank with a serrated end. I drilled a 1 cm hole in the corner of the elbow. The idea here is that when the tank is almost full, water will run through the 1cm hole into the pipe, which when full overflow via
a siphon effect from the dirty water and debris at the bottom of the tank rather than the nice clean fresh water coming in at the top.
Secondly to the other two tanks I added 1mm screened vents to ensure that the tanks cannot become pressurized. One of those may also suffice as an emergency overflow if the main overflow is inadequate.
Thirdly, I needed to run a mains backup to the tanks as 6000 litres is not very much water and so there is little prospect of storing enough rainwater to last the summer. An alternative would have been to simply switch the supply to the house
from tank to mains but I needed the pump to provide pressure, the mains water is often not available and I wanted to run it all through a whole house filtration system. I installed a Rain Aid valve purchased in NZ which is installed at the top
of one of the tanks to which the mains supply is piped. This has a couple of weights suspended on a cord two thirds of the way down the tank so that when the tanks are less than a third full the valve opens and mains water enters the tank, and
when the tanks are a third full the weights float and the valve closes. I installed a canister filter with a 30 micron cartridge on the main line to ensure that the village water does not carry excess sediment into my tanks but this has proved
inadequate – it clogs after only two months and with cartridges at 1200 baht each is uneconomic. I will need to install a sand filter near the meter that I can simply back flush every couple of weeks so that the cartridge filter does not
have to work too hard.
I decided not to buy the locally available 70mm downpipes as I was able to purchase 80 mm pipes for the same price in NZ. The only problem was how to get them to Thailand. In the end I cut them into 1.5 mm lengths and brought them over in
three separate trips wrapped in plastic tarpaulin without difficulty. I assembled and glued them together and ran them to the top of the tanks – which had no inlet installed so I had to cut these with a hole saw. There is an access hatch
in the top of the tank and Thais typically just run the downpipes to this but that leaves the top of the tank open to all kinds of undesirables – I wanted a tight system.
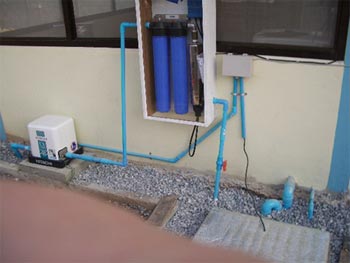
So rainwater and/or mains water directly enters two of the tanks and from there to the third supply tank, hopefully depositing any sediment that eludes my quality control measures in those two tanks before entering the supply tank.. Water
is then pumped to the house via a Hitachi automatic pump from the supply tank but first enters a whole house filtration system that utilizes a large 5 micron cartridge followed by a large 1 micron cartridge and then a decent sized UV sterilization
unit that will kill any remaining organisms and ensure that all house water is drinking standard.
Now the system is finally completed and working (early March 2008!) I wish I had spent the extra money and got a decent Grundfos bladder pump. The Hitachi 230 EX I bought was not cheap but it is crap and the pump cycle pauses allow pressure
drops which play havoc with the overhead water heater for the shower so it is difficult to get an acceptable constant pressure for the heater to operate properly. All the other taps however are fine. Long term goal will be to replace this pump
with the Grundfos which is another 8000 baht more but provides more constant and slightly higher pressure.
I have jumped ahead to give readers a view of the whole system but in fact I have only recently got to this stage and there was a whole lot of other things happening on the property meanwhile which I will cover in the next episode.
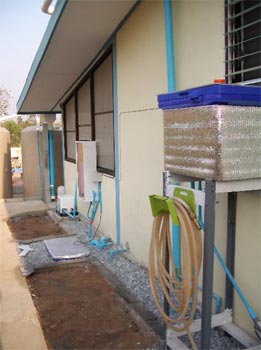
Meanwhile however I want to describe one further important water saving measure I installed. I was concerned that the drainage field could be overwhelmed by effluent prematurely especially given the small size of my septic tanks. I also wanted
to conserve my use of the high quality water in the house. So I decided to use the washing machine water to flush the toilet. I set an outlet for the machine hose through the wall with a coarse plastic screen inside to which I could add anklet
stockings as cheap replaceable particle filters. (Afterword – this is not working – the water backs up too much and runs on the floor so had to give up the stocking filters). I bought a large ice chest from Makro for a 2 or 300 baht
and set this in the ground to collect the water from the machine. I cut a 45 mm inlet and a 30 mm outlet near the top and also a 30mm overflow which I connected to a drain. I installed a second smaller ice chest on a stand to act as a header tank.
I put a submersible pump in the sump tank and wired it to a weight operated switch in the header tank so that when the toilet flushed and the demand from the cistern causes the level in the header tank to drop, the pump will automatically pump
more washing machine water from the sump. To ensure the pump cannot run dry I installed a mains back up to the bottom of the sump and protected the main line with a one way valves. I used ice chests because they were cheap tanks but also to try
to keep the water cool – the warmer dirty water gets the more uglies it will grow. I am hoping that we will turn over the water before it gets smelly but if necessary I will dose it with hypochlorite – but only as a last resort as
this is not ideal for septic tanks – although chlorine does break down quickly. I have also screened the top of the sump chest and top and sides of the header tank chest with foil insulation in a further effort to keep the water cooler.
So far the system is working well and cost me all up about 4000 baht of which the pump was the most expensive part. You can buy a proprietary system in NZ for around $3000!
Here is a photo of the rainwater tanks. The big blue pipe you can see under the rain head is the post style first flush diverter. The gutters have a few leaves after six months and I will clean them out in April – I didn’t bother
with gutter guard mesh as the tree are not close to the house.
This next photo shows the connections between the tanks. The big plastic ball valve connecting the two receiving tanks to the supply tank is leaking at the screw join to the tanks and I will have to drain the tanks and replace it at some point –
I have bought a brass gate valve to do this which should be easier to get a decent seal on.
Here are two photos of the pump, filter system, and washing machine water recycle system. Note the pump will have a weather proof housing – next on my project list for late March.
|
|
On last comment – I really hate the system of blue plastic pipe and glue. You get everything all joined together and then check for leaks – if you have one you have to hacksaw the offending section off and do it all again – this is
bloody crazy. I failed to use enough thread tape on the screw end of one of my ball valves on the tank drain system and I had to dump the whole lot and start again – expensive and time consuming. Also the mainline recently split lengthwise
underground and a large section had to be replaced when we investigated the fallen pressure and discovered the soggy ground. If I could do this again I would have ignored all the local advice, used a 1 inch steel main supply pipe, used black alkathene
and Hansen fittings from NZ for all the tank system fittings and copper in the house and damn the cost.
Comments, feedback, questions and or advice (especially re: growing some decent fish for home-eating!) are welcome – email rahirithai@hotmail.com.
Stickman's thoughts:
It looks like it is coming along nicely. I must swing by to check it out with my own eyes.
