Critical Focus Might Be Genetic/An Amateur’s Perspective of the Four Seasons of Korea/Magic Jack Plus In-Depth Review
![]()
Quick Click Links
Critical Focusing Might be Genetic! An Amateur's Perspective of the Four Seasons in South Korea Magic Jack Plus In-Depth Review Photography News of Interest

Readers Submissions Readers Questions A Snapshot of Bangkok Images Week in Review Infocus Blog, Impossible Without You!
T
Critical Focusing Might be Genetic! *menu
18 months ago I wrote this Steve’s Musing’s piece titled “Two Boxes of History” http://www.bangkokimages.com/Articles/Steves-Musings/entryid/691/Two-Boxes-of-History.aspx which told you about my grandmothers passing and subsequently the two boxes of my grandfather’s old cameras my sister sent on to me with a picture and description of each.
You’d think with all these cameras there would have been a ton of negatives. Some must have surfaced because today the postman dropped off a parcel with a copy of those DVD’s Costco gives you when they make scans of old prints and negatives. There weren’t enough to account for the everything so I’m going to ask about that. But there was one image that stood out as both amusing and interesting. I hope you find it and the accompanying story to be the same.

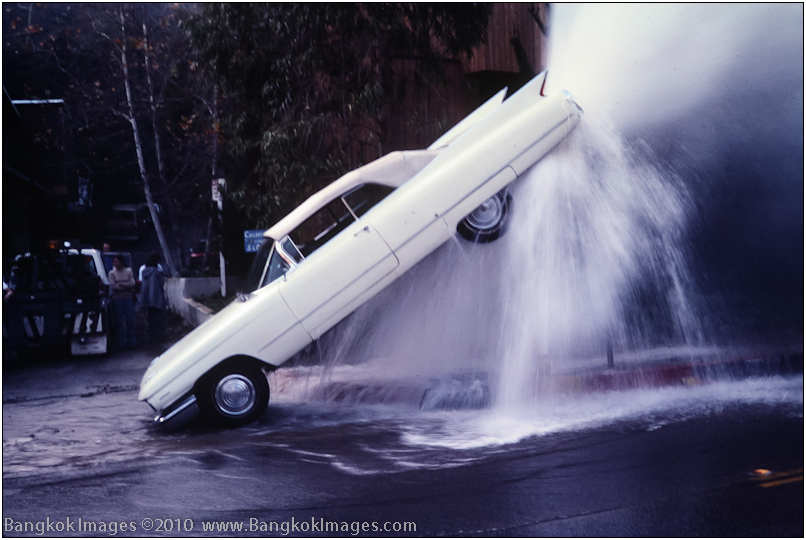
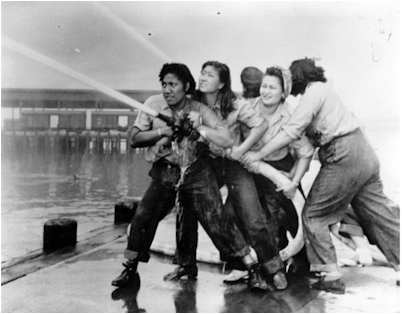
Above is a scan of a print my grandfather took of my grandmother’s 1963 Cadillac Eldorado Convertible, quite a car in those days. Yup, it’s suspended in the air by the stream of water coming from the fire hydrant underneath it. This is a great example of a childhood legend being proven true.
I remember as a young boy riding in this car as my grandmother skillfully navigated Beverly Glen Drive on our way to the Farmers Market on 3rd and Fairfax. To say the car was grand for its day would be an understatement, and my love for convertibles began the day my grandmother hit the power top button and that huge top folded into the rear of the car. This might have been where my love of technology began as well because Cadillac’s of that period were full of electronic wizardry you weren’t likely to see anywhere else. My grandmother loved that car because my grandfather gave it to her for their anniversary.
One afternoon the phone rang and my mother started talking excitedly to my grandmother about something to do with her Cadillac and the fire department. It wasn’t until a visit several weeks later that my grandfather filled me in with the “real” story. Not the story my grandmother was telling everyone about the defective parking brake. Nope, it seems when the fire department finally turned off the hydrant and the car came down to rest on all four wheels my grandfather looked inside to find the car was still in drive and the parking brake was never set!
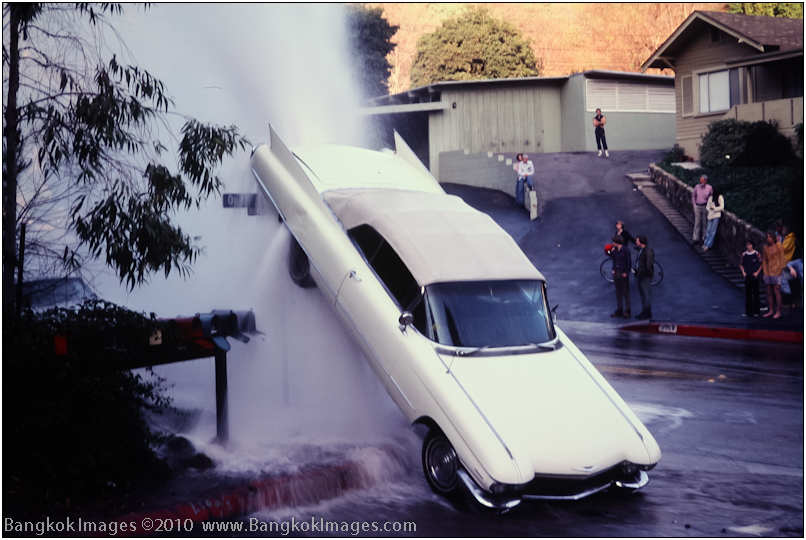
You see, they had a steep driveway similar to the neighbors drive you can see in the background. She came home from work, “parked” the car, and went inside. A short while later the phone rang and a neighbor was giving her the good news.

Unfortunately what would now be a classic car was totaled by the insurance company and my grandfather wisely told no one else the real facts of the incident. To be honest I’m not sure he was telling me, or talking to himself, he was a bit agitated at the time. And to prove he was really wise and not lucky, he quickly replaced the car with a newer Cadillac Eldorado Convertible. Isn’t life grand!
This photograph is significant for several reasons. First, it verified a story I’d been told about but had never seen. Second, what better example of a “photo opportunity” do you need? And third and perhaps most important do you realize both of these images are in critical focus?
Sure, these are old prints ran through a box store scanner so I’m sure if I had the actual negatives we’d see a lot more detail and more hints at critical focus. And let’s remember cameras from the 1960’s, at least normal consumer cameras, required a bit of skill to manually focus the lens. Which leaves me wondering two things. Where are the negatives (I’m working on this) and is the ability to critically focus a genetic trait? J
I miss my grandparents. Both sets. I’ll always count myself lucky to have such great memories from even better experiences. I add them to the list holding my parents, a boy who was like my own son, friends, and shipmates who are no longer with us. During this new year I’ll try to honor and remember them all.
Am Amateur's Perspective of the Four Seasons in South Korea *menu
BigJoe is a name you’re going to hear more of. BigJoe is career Army currently serving his twilight tour in Korea and we’ve been corresponding regularly for some time concerning photography. He displays a strong natural eye for composition and lately he’s been turning out some really nice work and it just keeps getting better. I enjoy his narratives as well and I think you will too. You can send Feedback to BigJoe here. Bigjoe.jh64@gmail.com
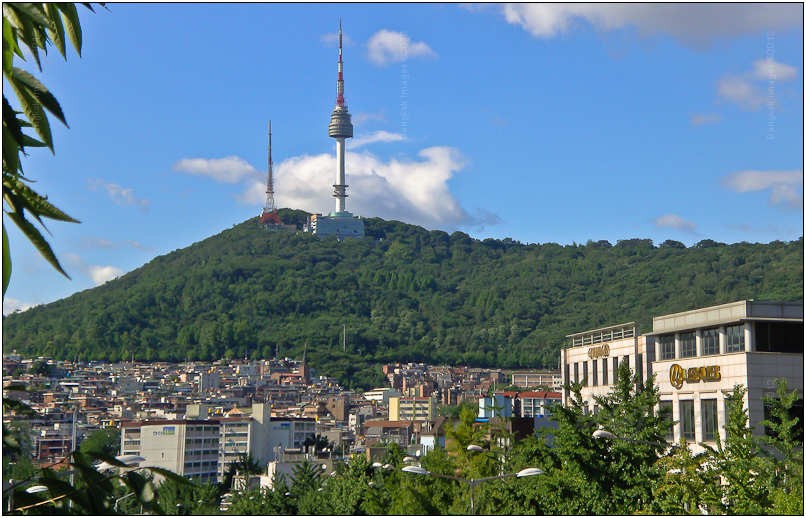
Sony DSC-W300 Cyber-shot; f/8.0 1/320th sec (handheld) 15mm ISO 80
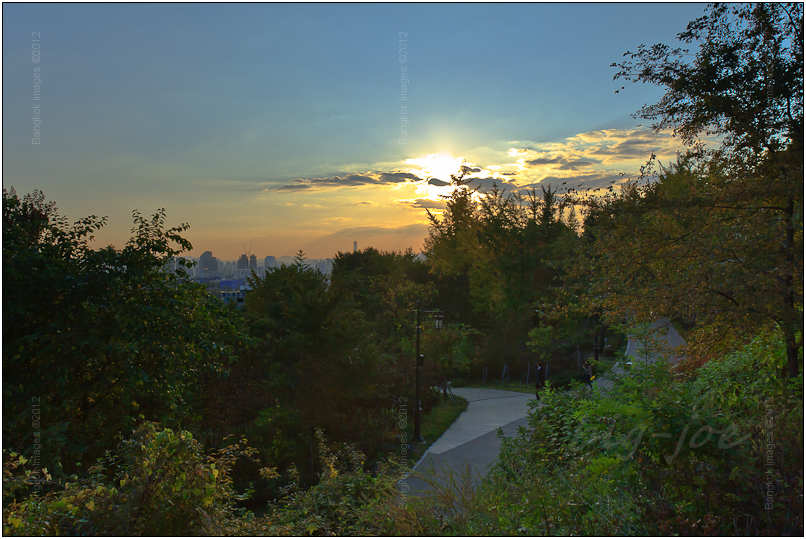
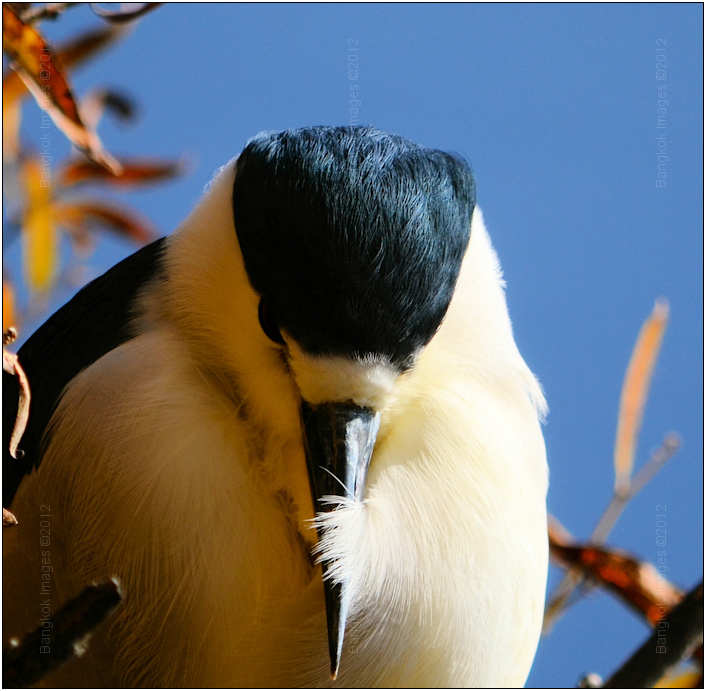
Almost daily my return trip from work was under skies filled with grey clouds shedding rain. On this day the summer rains had stopped clearing the skies of all but a few clouds that loitered over the city. Taking out my point and shoot I captured shots of the mountain and city streets below. Months later as I walked along the ridge of that small mountain the cold December wind pierced the leafless trees biting at my ears. Wishing I had worn a hat I quickened my pace in order to make it to my objective before the golden hour vanished. During my climb the temperature had gone mostly unnoticed as the south side of the mountain captures the warm sunlight and blocks the northern winds. My thoughts were on images of the skyline from a vantage near the tower when I came upon a Korean photographer. From the exercise trail she was intently composing shots of the sun as it dipped behind a bank of clouds to the south. I slowed to take in the scene and noticed light reflecting through the top of the dead grass. Deciding this was one of those “Kodak” moments I un-shouldered my pack, grabbed my Rebel T2i, mounted it on my monopod and captured the next and last images of this article.
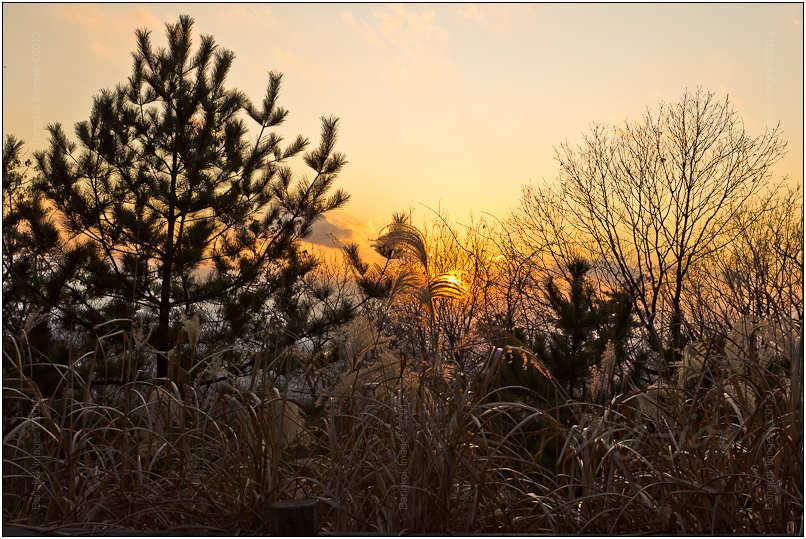
Canon EOS Rebel T2i 550D, EF 24-70 F/2.8L USM @ f/8 1/60th sec (on a monopod) 24mm (38.4 mm equivalent) ISO 100
Living in Seoul, South Korea over the past year has been a great experience. Lucky that my job requires me to travel throughout the country I’ve been able to explore many different places and immerse myself into the deep rooted culture. Throughout my travels I carried my camera and practiced photography as often as I could.
The Korean Peninsula has a climate with four distinct seasons. The difference between summer and winter is extreme, with milder weather in the spring and fall. Each season, however, presents a photographer with a challenging set of conditions in which operate.

Canon EOS Rebel T2i 550D, EF 70-200 F/2.8L USM @ f/5.6 1/100th sec (handheld) 70mm (112mm equivalent) ISO 160
When spring approached last year I was anticipating nice days with colorful landscapes, instead the skies were filled with Asian dust otherwise known as yellow sands from china. This is a seasonal meteorological phenomenon where intense winds blowing across the deserts of Mongolia, Northern China and Kazakhstan pick up and carry soil particles with fine sand across the Korean Peninsula and Northern Japan. The yellow haze that fills the air is believed to carry with it a myriad of pollutants to include viruses, bacteria and fungi. The US Army issues health advisories to its soldiers limiting outdoor activities on severe days and many Koreans cover their mouth and noses with face masks, especially during strenuous activities such as bike riding. Keeping electronic equipment such as camera sensors and computer vents clean and protected can be problematic.
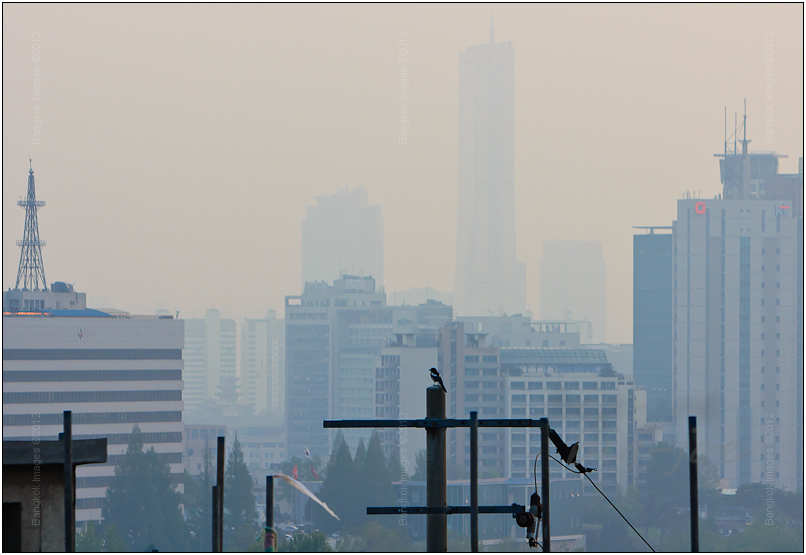
Canon EOS Rebel T2i 550D, EF 70-200 F/2.8L USM @ f/5.6 1/200th sec (handheld) 140mm (224mm equivalent) ISO 125
The ever present city smog of Seoul compounded the yellow haze problem making capturing clear images difficult at best. The above shot taken from the roof of my apartment was about as good as it got for several weeks.
Canon EOS Rebel T2i 550D, EF 16-35 F/2.8L USM @ f/2.8 1/50th sec (handheld, braced against a ledge) 16mm (25.6mm equivalent) ISO 100
The arrival of rain in the late spring washed the sand and smog from the air making for better conditions and marked the onset of summer. The addition of an umbrella to the backpack became a necessity as the rains continued steadily well into the summer. When a clear day presents itself during this time of the year it is advisable to take advantage of it. The above shot was taken from the roof of my apartment during the summer in between rainy days.

Canon EOS Rebel T2i 550D, EF 16-35 F/2.8L USM @ f/10 1/60th sec (handheld braced against railing) 16mm (25.6mm equivalent) ISO 100
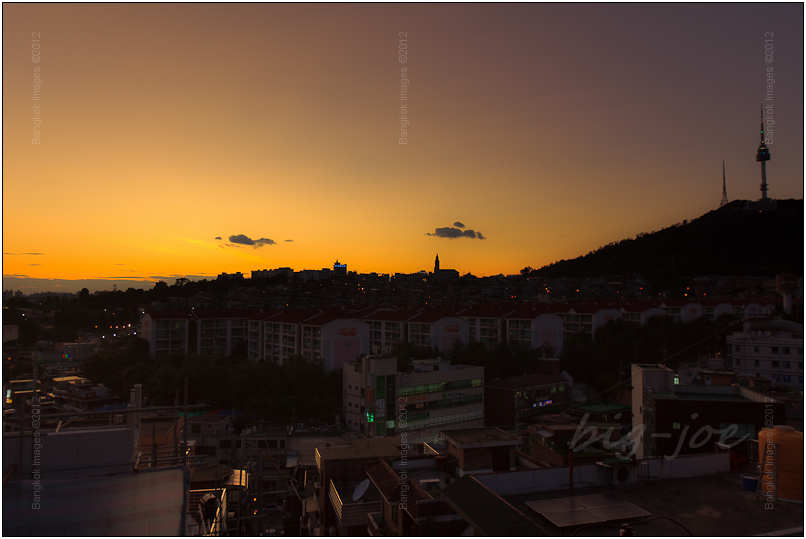
Long summer days provided useable light late into the evenings making work days viable for getting out to take in the sights. The above image is of the sun setting behind the radio tower next to the Seoul tower.
Canon EOS Rebel T2i 550D, EF 16-35 F/2.8L USM @ f/10 1/200th sec (handheld) 16mm (25.6mm equivalent) ISO 100
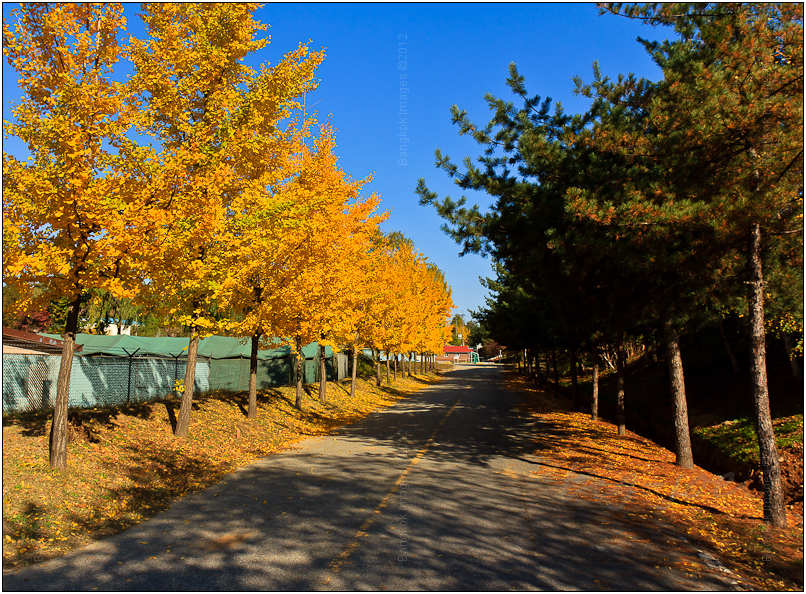
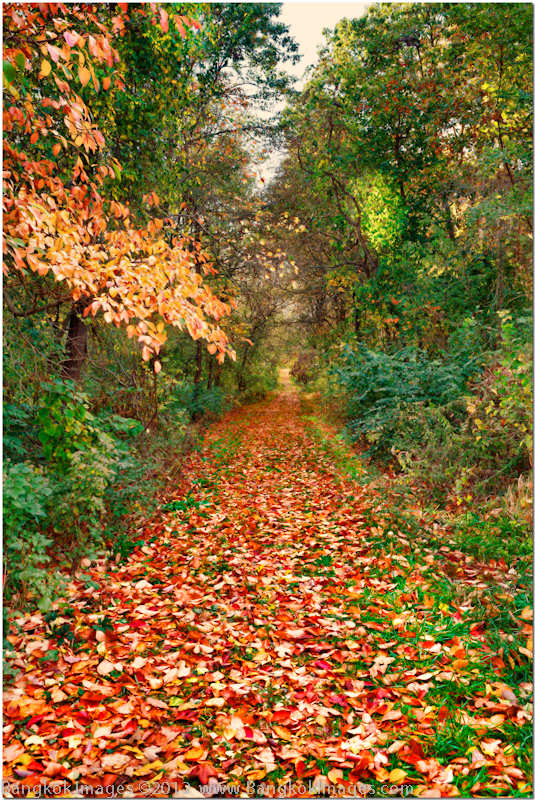
Summer turned into fall which brought vivid colors and what I felt to be the most favorable conditions for photography. The mild temperatures made for pleasant outings with little to no atmospheric obstruction to deal with. Above is a road near work and I like the contrast of the evergreens and deciduous trees flanking it.
Canon EOS Rebel T2i 550D, EF 16-35 F/2.8L USM @ f/8.0 1/4th sec (on monopod braced against a railing) 35mm (56mm equivalent) ISO 100
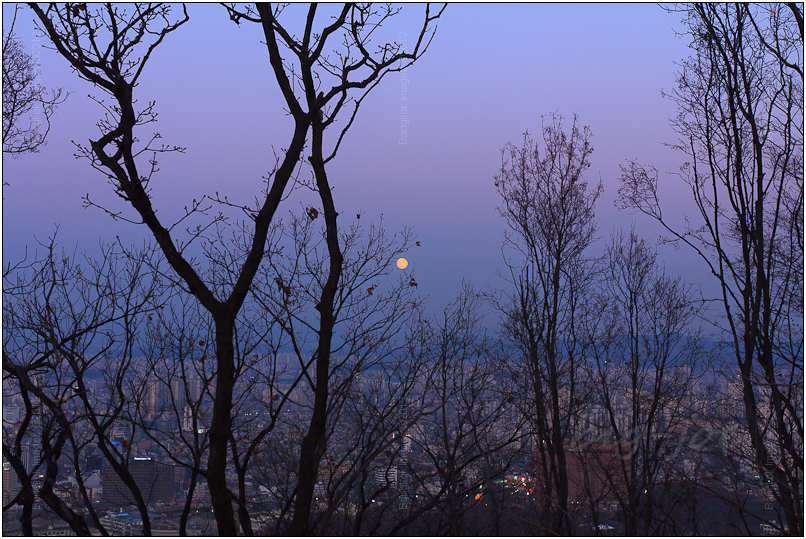
As fall slipped into winter new scenes were revealed through the bare branches of once colorful trees adding a new challenge to compositions in a dormant landscape. The above image was taken from the top of Namsan Mountain facing to the East with the Seoul Tower directly behind me.
Canon EOS Rebel T2i 550D, EF 18-55 F/3.5-5.6 IS USM @ f/7.1 1/100th sec (handheld) 24mm (38.4mm equivalent) ISO 100
Last winter snow fell from time to time, never more than eight to ten inches, presenting brief opportunities to capture winter landscapes before melting away or taking on the cold winter grayness.
Throughout the changing seasons I packed my camera with me wherever I went and spent many hours exploring and capturing images in and out of the City. With my billets within walking distance of Namsan Tower (Seoul Tower) it became a convenient focal point for many outings.
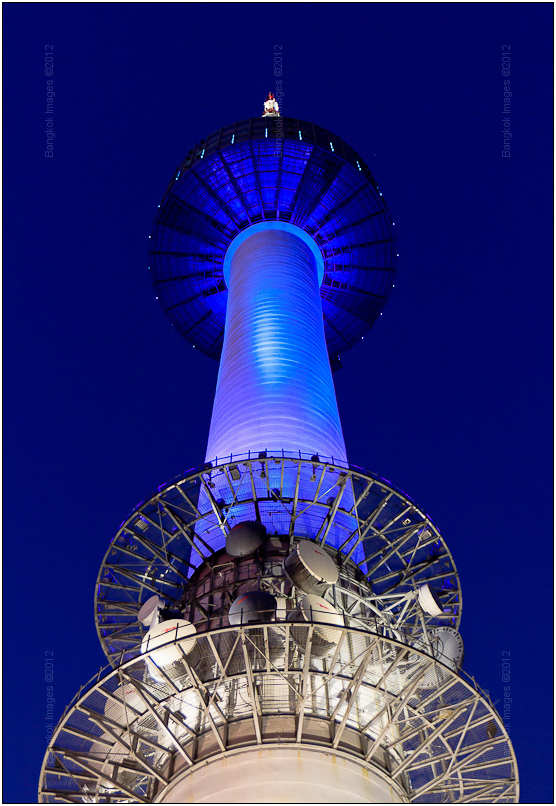
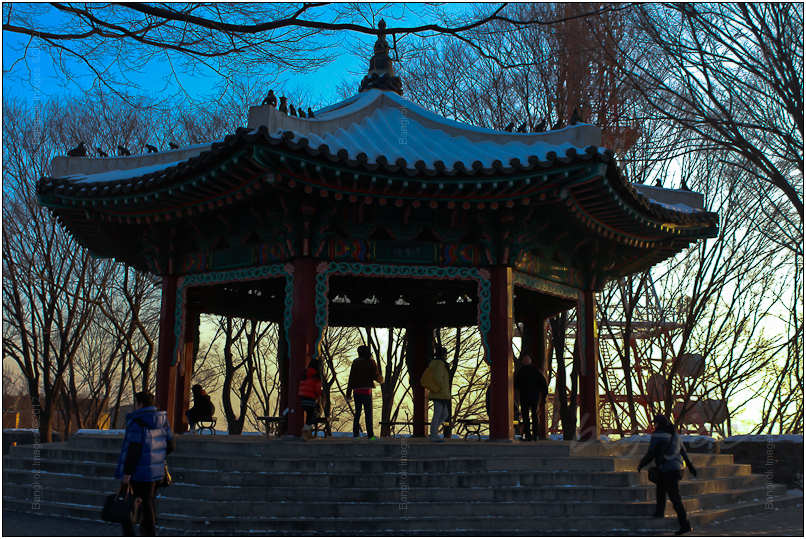
Canon EOS Rebel T2i 550D, EF 16-35 F/2.8L USM @ f/2.8 1/20th sec (handheld/braced) 22mm (35.2mm equivalent) ISO 100
Standing at the base of the tower amongst the busloads of tourist I captured this image. In a future piece I plan to focus on the tower from different perspectives and hopefully show it from angles that the busloads are missing.
One thing most tourists don’t miss while visiting the Seoul Tower is the outstanding view from the observation deck at the base of the tower. The problem is you have to get through a crowd to get to the railing where taking quality images without being bumped or jostled can be tricky. After politely working through the crowd on my first trip I decided to go in search of an alternate location. I found a wooden platform about a quarter of the way down the tour busses access road. Here there are rarely more than ten people on the roomy deck and the view, while not as extensive as on top, works very well for cityscapes. I walked to this spot many times in order to capture Seoul under varying conditions and will include a few in my piece on Namsan Tower.
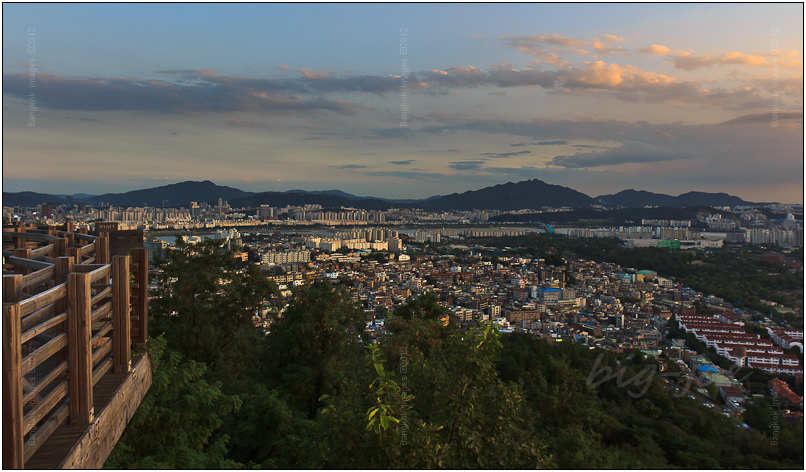
Canon EOS Rebel T2i 550D, EF 16-35 F/2.8L USM @ f/10 1/13th sec (resting on railing) 16mm (25.6mm equivalent) ISO 100
This image taken at sunset includes a portion of the deck, the parks, a portion of the city, the Han river and the mountains to the south of Seoul. Here you can see the diverse landscapes Seoul has to offer.
The city streets and rooftops of Seoul made another interesting and convenient subject. Old construction contours to the hilly terrain creating a maze of small roads and pedestrian alleyways. The sharp topography and unique architecture make for interesting compositions of this concrete jungle.
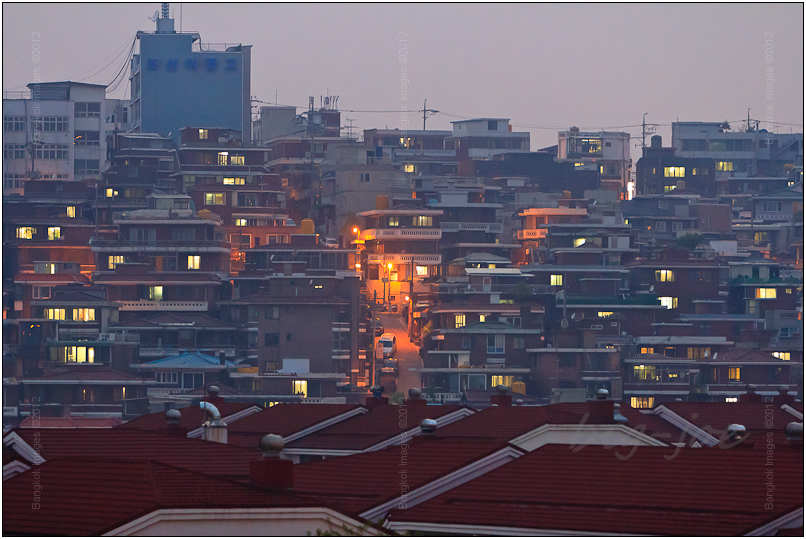
Canon EOS Rebel T2i 550D, EF 70-200 F/2.8L USM @ f/2.8 1/50th sec (on a cheap tripod) 145mm (232 mm equivalent) ISO 3200
This shot was also taken from the roof of my apartment building in the spring. I hope to complete a piece featuring the “Seoul City Streets and Rooftops” in the coming months.
Inside the diverse landscape of the city there are many shopping centers and districts where you can find a jumble of merchants selling just about anything.
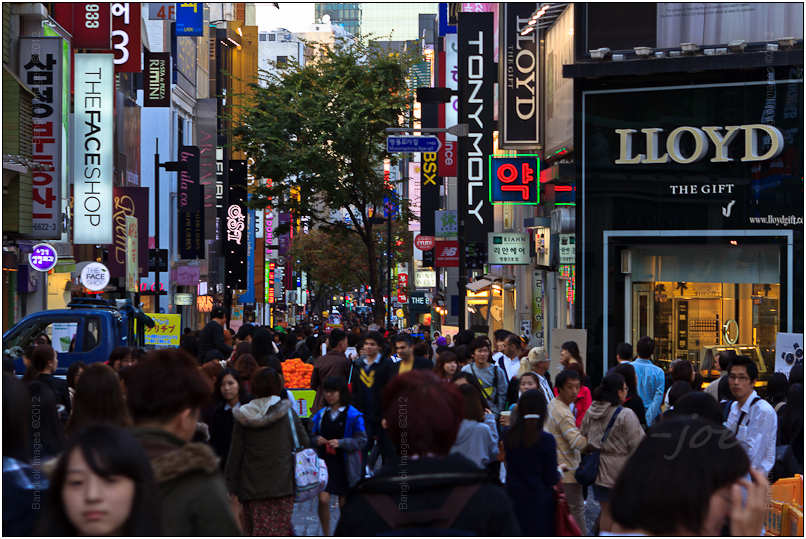
Canon EOS Rebel T2i 550D, EF 24-70 F/2.8L USM @ f/6.3 1/30th sec (handheld) 70mm (112mm equivalent) ISO 100
This was taken in the Myongdong district, a very popular place for Koreans and foreigners as it offers a large variety of name brand merchandise. Caution is advised as you may not be getting a real Louis Vuitton bag or Cannon lens, even if it’s sealed in a box as if it came straight from the manufacturer.
Also amidst the Seoul landscape are great places to get out and enjoy nature. You can get out of Seoul without leaving the city by checking out some of the many city parks.
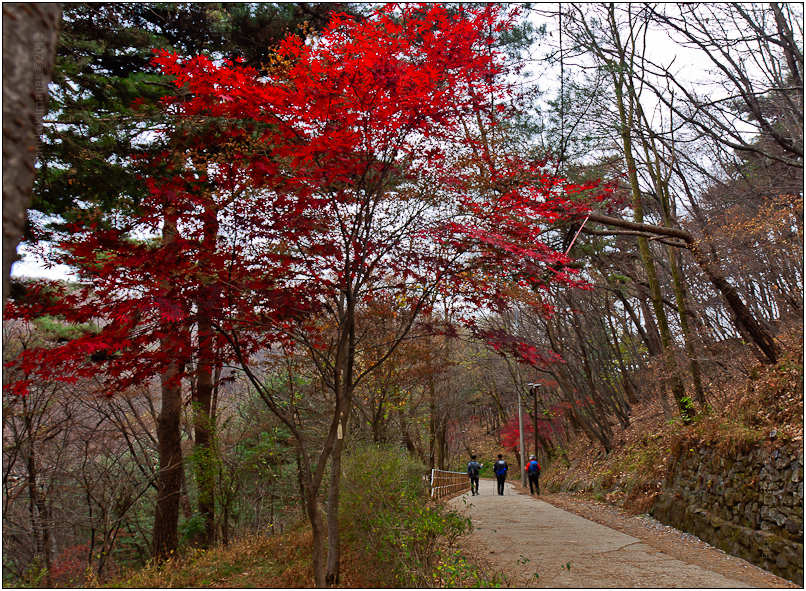
Canon EOS Rebel T2i 550D, EF 16-35 F/2.8L USM @ f/6.3 1/400th sec (handheld) 16mm (25.6mm equivalent) ISO 100
These parks are well kept, clean and safe. They have many paved and unpaved trails for exercise or a leisurely stroll with the camera. This shot was taken partway up the south side of Namsan mountain in the early fall. I hiked and ran all over Namsan park this year and I am still finding new trails to investigate. It is one of many South Korean parks (lol) and a photo tour of a few parks will be coming to your favorite Bangkok Images site soon.
The National Palace located north of Namsan mountain is a popular tourist destination. During my visit I intended to check out the Palace grounds but became sidetracked and ended up in a park on a mountaintop overlooking northern Seoul. I wasn’t lost but kept finding myself wanting to see what was around the next corner. It was a relaxing day full of exploring the city through the lens. On my next trip I will try to stay a bit more focused and take in more of the palace.
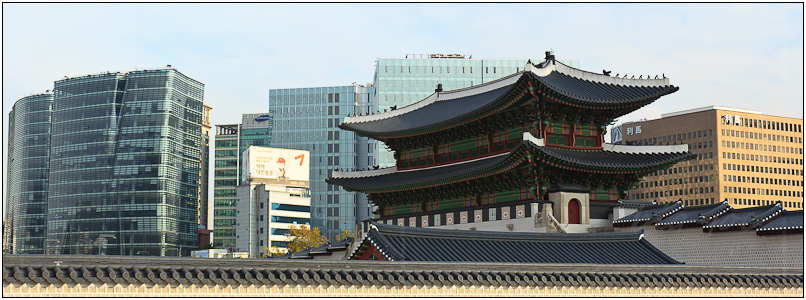
Canon EOS Rebel T2i 550D, EF 16-35 F/2.8L USM @ f/5.0 1/320th sec (handheld) 30mm (48mm equivalent) ISO 100
My intent with this image was to show the contrast of modern and ancient Seoul. Again, look for more of the National Palace in an upcoming piece on Korean parks.
Another way to relax is to actually leave Seoul to get away from the city. I highly recommend doing this as I spend a few days a month outside the city and the relief from the traffic alone is a sanity check.
Canon EOS Rebel T2i 550D, EF 16-35 F/2.8L USM @ f/8.0 1/5th (resting in the crook of a tree) 16mm (25.6mm equivalent) ISO 100
This image was taken in a park near my work just outside of Seoul. The South Koreans love to trek all over the place and they dress the part. It’s not uncommon to see a group decked out in their alpine gear on the subway heading to one of the mountains near Seoul. Mountainside trails and parks can be found from Deagu in the south to the DMZ in the north all with accommodation nearby usually in the $30-$45 range.
During my excursions out of the city I found many things to photograph. A specific event I would like to highlight is the Republic of Korea Army Day Celebration. Because of my work I was able to attend the two week train up in august and capture many images of the event. During this time I worked with the ROK/US High Altitude Low Opening (HALO) parachute team. I had my camera with me every day and captured some awesome images.
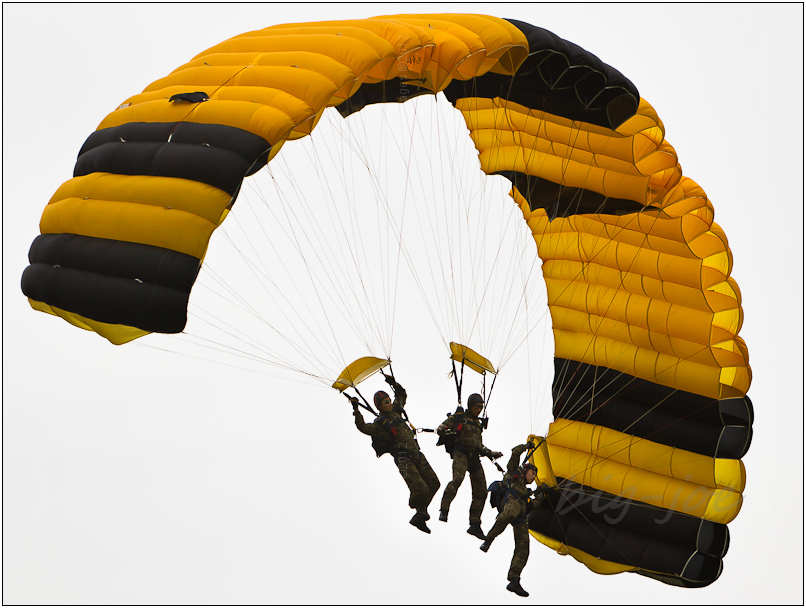
Canon EOS Rebel T2i 550D, EF 70-200 F/2.8L USM @ f/2.8 1/2500th sec (on a monopod) 170mm (272mm equivalent) ISO 100
This is a three man canopy work team that connects and flies their parachutes together after opening at a very high altitude. It’s one of many images I plan to feature in a special on the ROK Army Day.
One thing I do regularly is take in Seoul’s colorful nightlife. I wish I had more images but I don’t normally carry a camera with me and if I do it’s my point and shoot. The fact is I’m usually preoccupied and forget the camera is in my pocket. There are many nightlife areas but I tend to stick to Itaewon which is within walking distance. This area offers a wide range of venues from dining to a mixture of bars and clubs. In the past the maze of streets primarily catered to the US military but has changed drastically over the past ten years. Previously “drinky” bars lined the streets but has now been transformed to an international district with the venues of ill repute being pushed into out of the way, lesser obvious locations. The legendary Hooker Hill still exists but is hurting for business as what made it famous has now become a target of reform. An effort has been made by the US Army in conjunction with local residents to change the image of the community. The whole area is now promoted as an international tourist area where you can find a mix of young Koreans, international tourists, expats and American soldiers in popular restaurants, bars and night clubs. While there is still the occasional lady of the night peddling her wares it is not as obvious nor visible on the main streets as it was in the past.
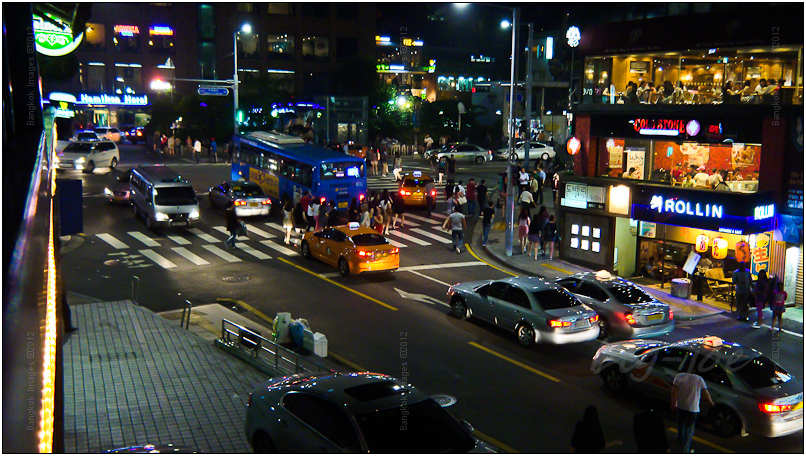
Sony DSC-W300 Cyber-shot; f/2.8 1/25th sec (resting on the window ledge) 7.6mm ISO 400
This image taken with my point and shoot is of the main intersection in Itaewon right over the subway station. There is a light crowd out enjoying the summer evening making their way to their favorite watering hole. I’ve made it a goal to get more images of Seoul’s nightlife and will see how that goes for a future article.
This last image was taken at the same time as the second image in the article. While I don’t feel the composition of these sunsets, trees and grass are remarkable I did realize during post processing that little was needed in order to produce good images. With this I feel I have made improvements in the hobby.
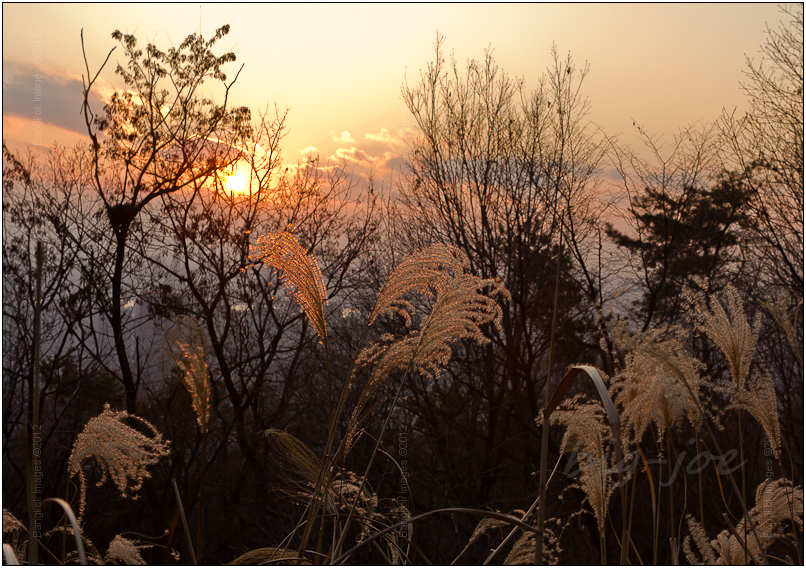
Canon EOS Rebel T2i 550D, EF 24-70 F/2.8L USM @ f/8 1/50th sec (on a monopod) 38mm (60.8 mm equivalent) ISO 100
As December marks the onset of winter it also marks the end of my first year living in South Korea. In the months prior to moving to Seoul I had unknowingly taken my first shots as an amateur photographer in Okinawa, New York City and Washington DC. The images from those outings marked a baseline for me in the hobby with the past year providing me with opportunities develop pixel by pixel. I found and built new skills and relationships around the hobby. My thanks goes out to Steve and others like him who make information available online. In my travels I have captured only a small portion of the “Land of the Morning Calm” all while enjoying an interesting culture full of stubborn tradition that could test the will of many an old mule. I welcome critiques, coments and advice on my writings, images and the hobby. I also have much more to share and will do so with future articles on the Namsan tower and cityscapes, Seoul City Streets and Rooftops, ROK Army Day, Getting out of Seoul without leaving (Seoul city parks and the National palace), and hopefully more on the Nightlife in Seoul. Until next time, take your shots where you can and I’ll take mine in the bar. Have a great holiday season and an even better new year.
Magic Jack Plus, In-Depth Review *menu
Introduction
I’ve been a Magic Jack user for almost five years. I’ve wanted to write a review on this product but I refrained because it was less than imperfect, it took a major commitment to use for a variety of reasons. If it didn’t provide a unique solution for use in Thailand I would have stopped using it immediately. Since the original Magic Jack is still being sold I’ll describe it first and then get into the much improved Magic Jack Plus review.
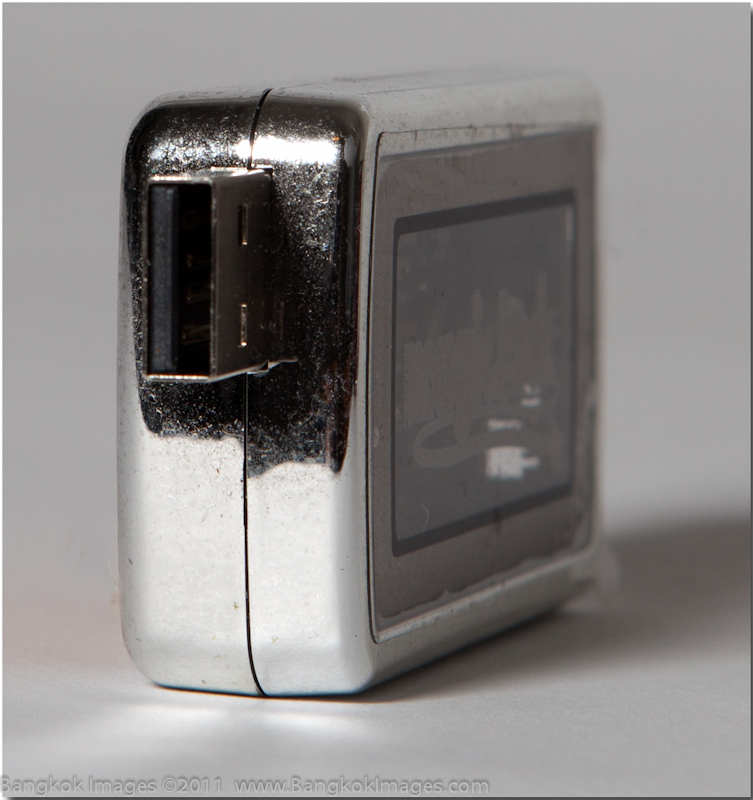
The original Magic Jack was a zippo lighter sized device where you would plug one end into your computers USB port and a regular/normal corded or cordless phone into the other end. It would self-install the necessary software and you were set.

I bought 5 years of service for $69.00 and I think I paid $39.00 for the Magic Jack itself. The service included a stateside number which I could pick from a list of available numbers in the state/city of my choice, all the long distance within the USA I could use, voicemail, call forwarding, call waiting, and directory assistance all included. Inexpensive international calling was extra. A bonus was that you could use it inside Thailand, a family member would dial your USA number and only pay for a USA call, and it would ring on your phone in Thailand. Wonderful!
The challenges with the original Magic Jack was that you needed a computer, turned on, to use it. And if your computer was busy doing something, especially if it required bandwidth, it would ‘clip’ your call making calls difficult. To seriously use the Magic Jack I’d have to wait until my bandwidth in my area was working really well which was usually late at night, fresh boot my system, and not load any other programs. Under such circumstances it worked at approximately 90% but it certainly wasn’t ready for prime time. So no review. It also wasn’t certified to be used with a fax machine and in fact it only worked with a select few models.
Last month I received a notification from Magic Jack http://magicjack.com/plus-v05/ advertising their “Magic Jack Plus” and reading the sales pitch I noticed it no longer required a computer! All the same great services, one low annual price of $29.99 per year (or five years for $99.99 for a 30% savings), but now it was a true VOIP phone. And while in the past I worried they’d eventually find a way to stop us from using the Magic Jack in other countries for free USA calls, now they listed it as a feature. It was also certified to work with fax machines. Oh, and it also now works with PC’s and Mac’s. I ordered mine and couldn’t wait for it to arrive.
A reader let me know you can get a Canadian number for an extra $10 and I confirmed this on the Magic Jack registration site. This is sure to be a boon for Canadian citizens.
Magic Jack Plus
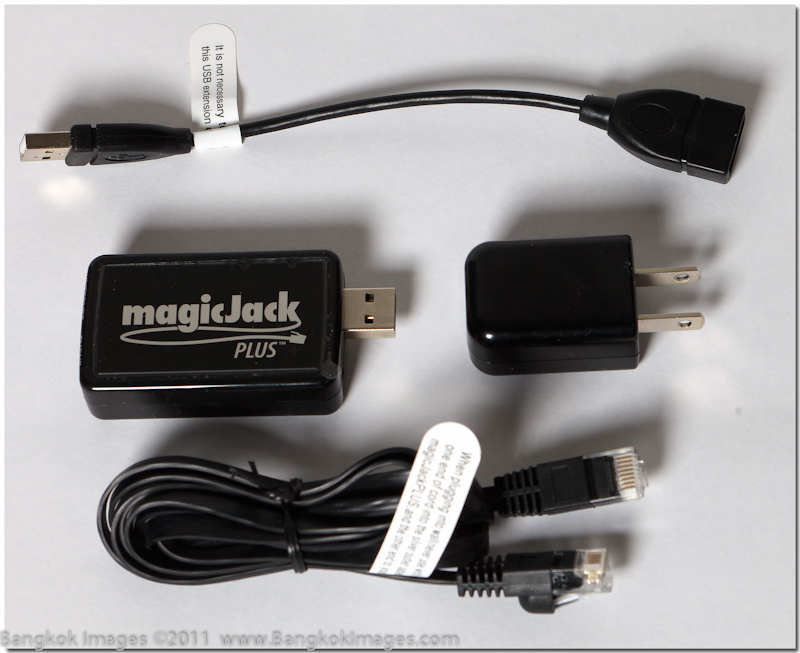
It comes packed in a soft plastic envelope holding a form fitting piece of foam with cut outs for the Magic Jack, a short USB extension (8 inches), a regular phone line (2 meters), and a wall adapter to power the Magic Jack if you don’t wish to power it with your computer. The box holding the phone had the instructions for activating your new Magic Jack, obtaining a new number, transferring your current Magic Jack number (free), or transferring your current phone number from any service ($20 fee).
Installation
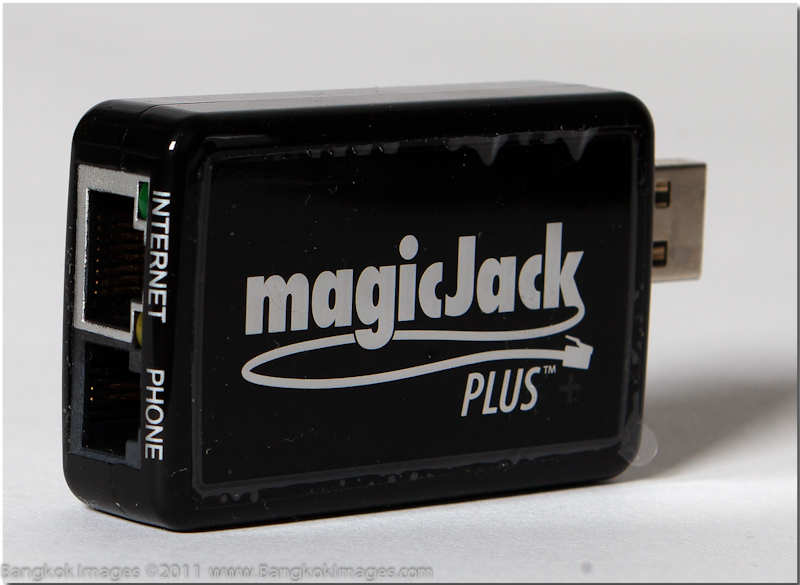
I wanted to see how fast I could bring this into service. I plugged the wall adapter into an outlet, the magic jack into the adapter, a phone into the Magic Jack http://magicjack.com/plus-v05/ and then ran a LAN cable from my router to the Magic Jack. Less than two minutes and I had a dial tone! And as advertised, no computer was necessary. You can use the Magic Jack without registering for only 48 hours, after that you’ll need to register it to keep using it. The normal price for the Magic Jack Hardware is $69.95 which includes one year of service. I was offered this for $34.95 as a current Magic Jack Customer.

For a more permanent installation I plugged the AC adapter into an available outlet on my APC UPS device, and then connected the Magic Jack Plus using the short USB extension so it wouldn’t be sticking out from the outlet so far. I then ran a LAN cable to my router (no router settings needed to be changed of added) and plugged the other end into the Magic Jack Plus, and then plugged my Panasonic DEC Cordless phone into the Magic Jack Plus.

I was set, no computer, and my Magic Jack Plus http://magicjack.com/plus-v05/, plus all my network equipment (modem, router, NAS drivers, gigaswitch) is powered through an APC UPS so in the event of a power outage my phone would still work as long as my UPS battery was charged. For reference I use server class UPS devices and the internal batteries are large. They will power my network equipment, Magic Jack Plus, and cordless phone for over 6 hours.

Registration
You have two choices. You can register via computer in just a few minutes, or through the phone. If you’re currently a Magic Jack customer and have an established account and their software is already on your computer, then I’d recommend making it easy on yourself and registering through your computer. It took me 2-3 minutes to register my new Magic Jack Plus and port my existing Magic Jack number over to my new Magic Jack Plus.
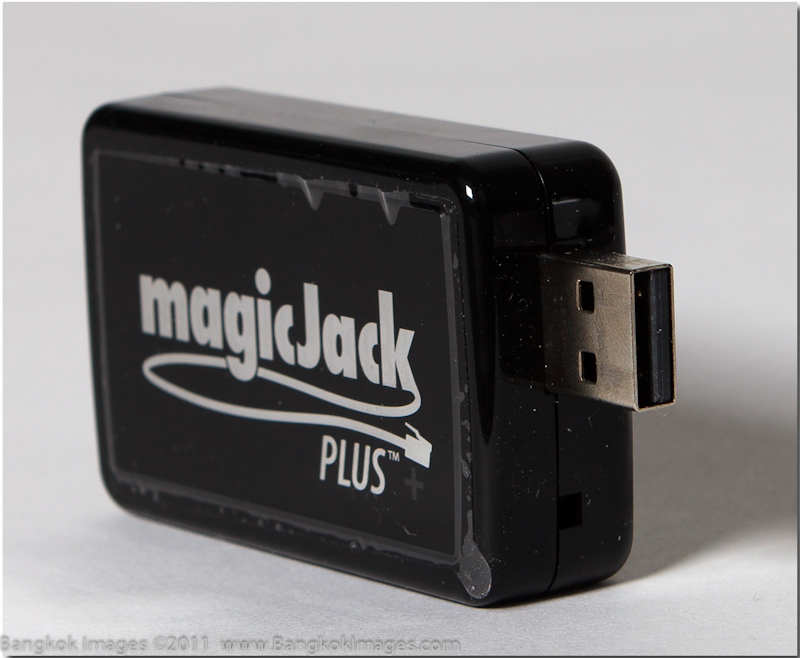
To register via your computer you simply plug the Magic Jack Plus into your computers USB port and it will self-install the necessary software and connect you to your Magic Jack account. Very easy.
I didn’t register by phone but I wanted to see how long it would take, so I dialed their registration number and waited on hold. It took about 7 minutes to get a representative who told me they could have me registered in 4-5 minutes.
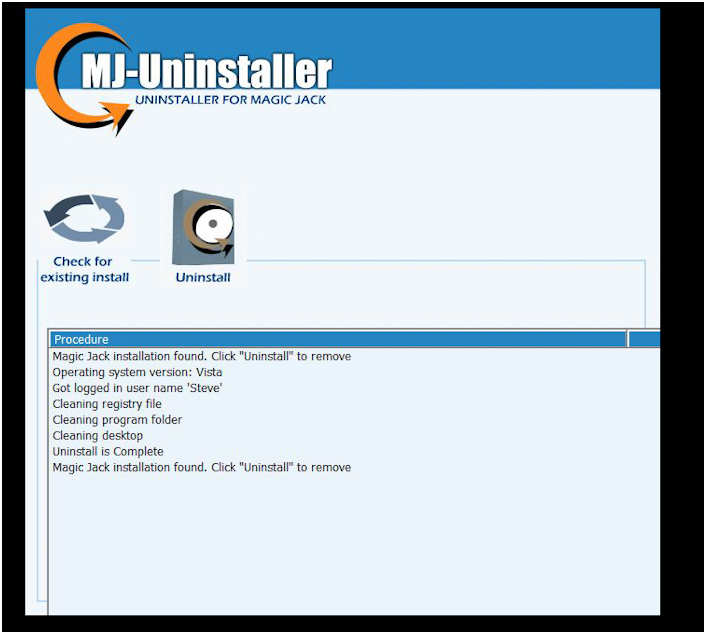
If you’re not currently a Magic Jack Customer I’d recommend you register by phone and NEVER plus the Magic Jack into your computer. Why? This is one of the areas I don’t like about the Magic Jack or the Plus version. The self-installed program is impossible to totally uninstall from your computer. If you Google the subject you’ll see a lot of unhappy customers. Magic Jack provides an uninstall program but it’s far from complete. You can follow instructions yourself if you’re used to editing your registry but because of potential risks/issues involved with editing registries I won’t recommend a procedure, but you can find plenty of them via Google.
OR you can buythe number one Magic Jack Uninstall program a creative programmer sells for $9.95 and your troubles are over. I did it both ways. By modifying my registry I had Magic Jack totally uninstalled in about 7-8 minutes. With the Uninstall program it did the same thing in about 10 seconds.
The Magic Jack/Plus software is actually very convenient. It holds all your contacts making dialing easy, and it keeps a call log of all your incoming and outgoing calls. It also interfaces your PC’s speakers, microphone, or a PC headset, or a
Bluetooth headset so when you’re traveling you won’t need to carry a regular phone around. I keep this software installed on my travel laptop for this reason. But I will no longer have this software installed on my main desktop workstation.
December 24th 1250 – An issue has been discovered via a comment by a user that the call logs accessible online at your MJ account are not showing your MJ+ calls UNLESS you’re running the MJ through the computer. And the
softphone familiar from the old MJ pictured below DOES NOT WORK with the MJ+ so no call logs there either. To me this isn’t satisfactory, it’s a huge discrepancy Magic Jack will need to fix soon. I’ll follow up on this and
update the review as I learn more.

Performance
This is where the rubber meets the road. The Magic Jack Plus has worked great, 100% in every way, since I installed it about ten days ago. Call quality is first rate, equal to a regular landline, and their services (call forwarding, directory assistance, 911, call waiting, etc, etc) all work as advertised. I have absolutely no complaints, no matter how hard I look.
There is one caveat. You have the choice of setting up your own answering machine to answer on 3 rings and using it, or using the voicemail provided by Magic Jack which answers on 4 rings. I like the voicemail, it forwards a .wav file of the message to my email address which means my workstation, laptop, and smartphone where I can see I have a message and listen to it there. However, when someone calls and it rings the 4 times, Magic Jack announces your caller has reached a Magic Jack number and advises them how to leave a message. Some might be put off advertising they’re using a Magic Jack service.
I have incredible bandwidth here so I wondered how well Magic Jack Plus works at their minimum advertised bandwidth of 128kb. This would be the equivalent of a dial up internet connection. To test this I ported the Magic Jack Plus in my router and only allowed it 128kb of bandwidth. It worked, but the call quality was ‘tinny’. I incrementally raised the bandwidth and at 512kb the call quality was much better. A standard 1mb connection should have no issues providing a high quality level of service.
International calls are reasonable. You can log into your account and ‘buy minutes’ which applies to any country you could wish to call. Rates are very reasonable. $10 provided 1000 minutes of calling to Thailand numbers.
Fax machines now work. I tried two and they worked without a hitch.
Service from within Thailand is equally good though I am going by my past 4-5 years of Magic Jack use. With a minimum internet connection you’ll get great call quality, though if the connection cuts in/out the call will suffer. But if you have a reliable connection you will be able to make all the calls you want to the states, and those in the states can call you without international charges and your USA number will ring on your phone in Thailand.
Summary
This summary will be short. The Magic Jack Plus has matured into a full fledged VOIP alternative and it’s very good. The rates are more than reasonable at 5 years of unlimited service for $99.99. Computer on or off, it doesn’t matter. Within days of installing my Magic Jack Plus I forgot I was using a VOIP service. You pick up the phone and get a dial tone, you dial like a regular land line, and people call like a regular land line. Call quality is excellent, as good as I can remember ever having.
If you’re an enterprising individual and handy with a screwdriver you can disconnect your homes phone lines from the outside service, connect a Magic Jack Plus to an phone outlet, and now any phone you connect anywhere in the house will work with the Magic Jack line. I’ve done this and it works great. We now have normal/regular phones scattered throughout the house where we want them and they all work with Magic Jack Plus as they’d work with a regular land line. All that was required was to go to my outside phone service box and to disconnect the wires coming from the outside service.
I’ll admit their Home Page looks cheesy and I hate their juvenile videos. It looks like the should be selling Ginzu knives and vegetable choppers. I do wish they’d change it to something more mature, but I suspect the American public has been conditioned to respond to this type of marketing. Sad.
If you’re in Thailand and make regular calls to the states you want a Magic Jack Plus. If you travel and want to carry a USA number with you, then you want a Magic Jack Plus. If you live in America and want an inexpensive great phone service then you want Magic Jack Plus. If you live in America and travel to Thailand and want to carry your USA number with you, then you want Magic Jack Plus. This is a great alternative to a normal land line and very competitive to the best VOIP services. You’ll enjoy owning a Magic Jack Plus and if you’re like me, you’ll buy them for family members. A great product.
Photography News of Interest *menu
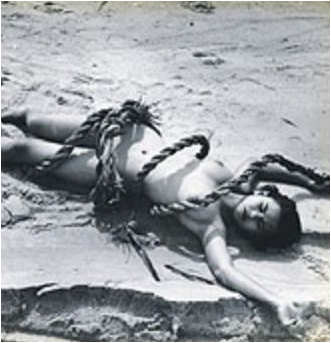
Famous Photo of Female Pearl Harbor Firefighters Debunked. Learn more behind the circumstances of this iconic photo.
Super Photoshop. Do we really want this? This ‘super’ new feature lets fakers add most anything to an image in a very believable manner in just seconds. But should we?
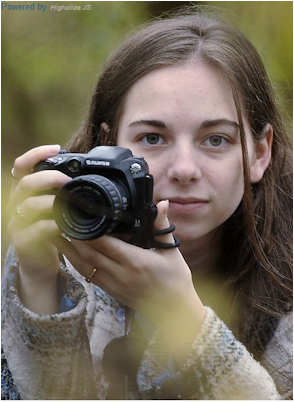
A Photographers Frame of Mind. Read about this accomplished 16 year old photographer and her many achievements. Inspiring!
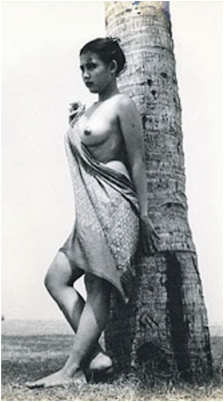
Naked Defiance from the Bangkok Post. Kathmandu Photo Gallery presents an exhibition of nude photography by Mom Luang Toy Xoomsai. Interesting considering the conservative nature of Thailand.
53 Scintillating Snow Shoots. A fun gallery you won’t want to miss. If you like models, snow, and fashion then this gallery might be of interest.


The Best Images for the week of December 23rd. A slideshow of some interesting and compelling images. Check it out!

Readers Submissions *menu
Steve
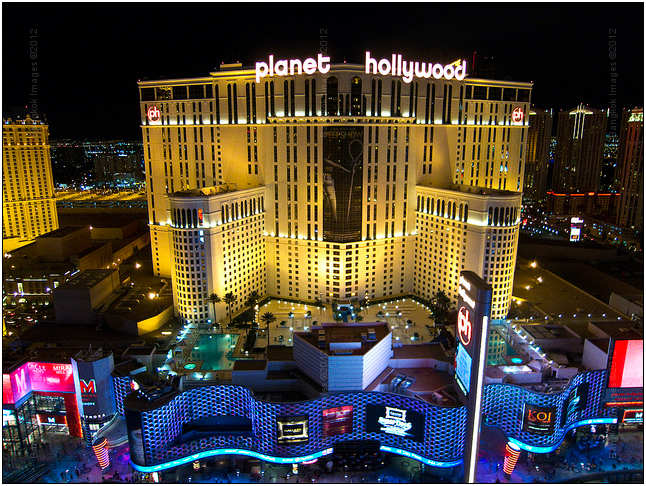
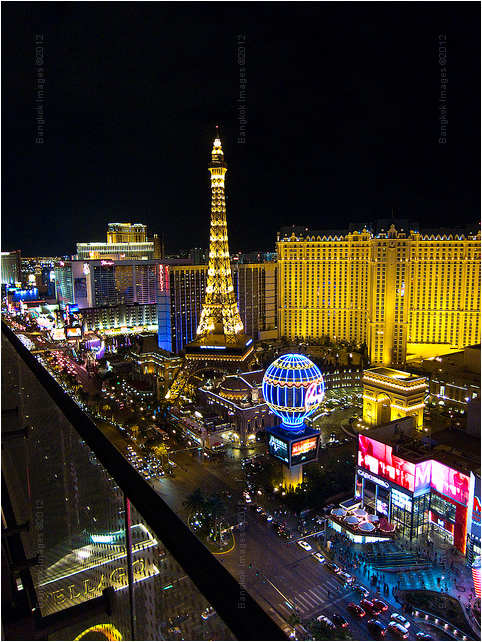
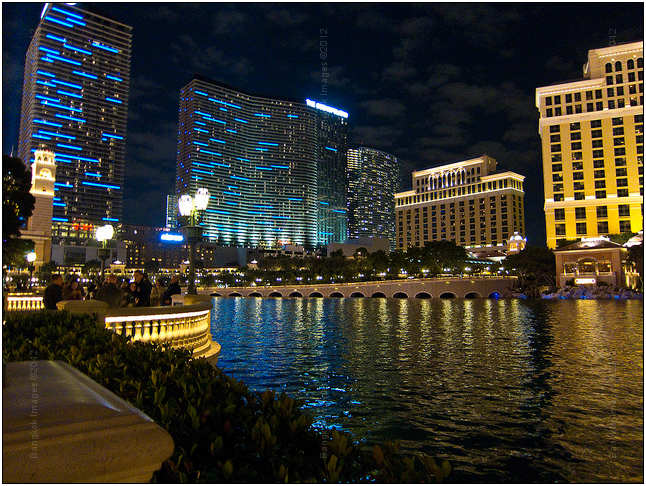
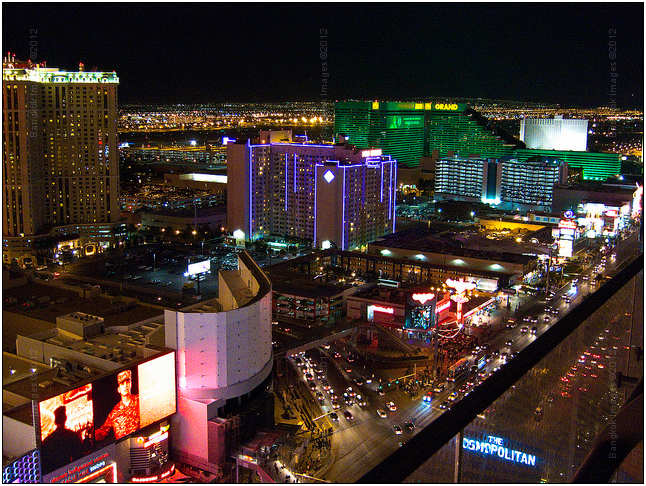
I recently purchased the new and hard to find Canon S100 12 Megapixel camera for those times when I want a pocket camera and don't want to carry around the DSLR. I took it on a recent trip to Las Vegas. The performance of such a small camera is truly amazing.I am eagerly awaiting the arrival of the much rumored Nikon D800.
Kevin


Kevin –
Thanks for the preview images from the Canon S100. I’m sure many readers will appreciate seeing images from this camera. It’s going to be popular for sure.
Steve
Steve
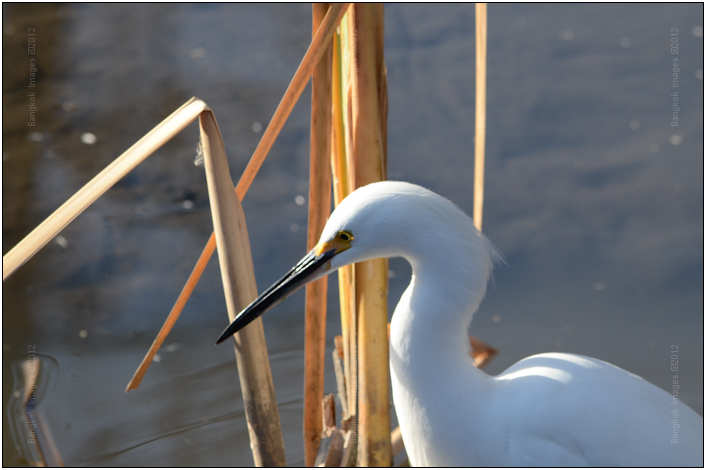
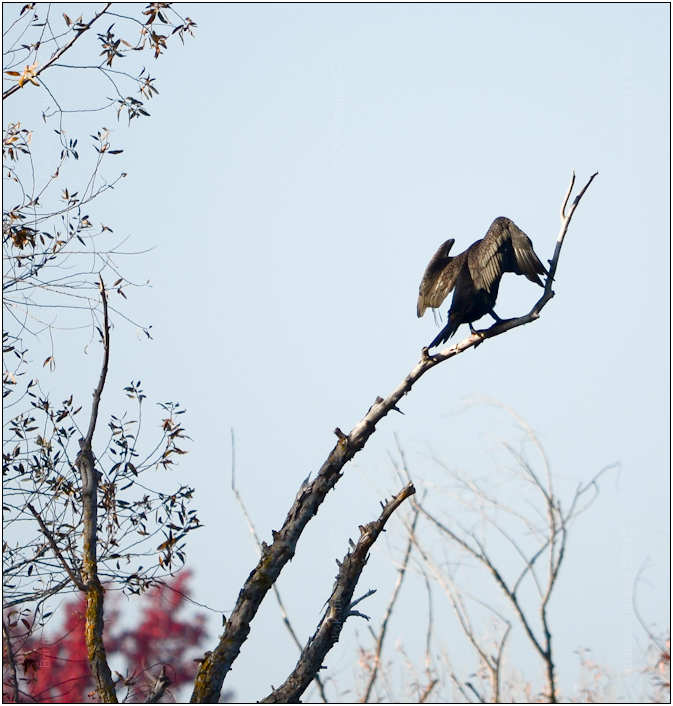
Attached find a few pictures in the park behind my house. It is a great spot for trying out the cameras and different settings. Very lucky to have 100 plus acres of open space within walking distance.
Using the wife's D5100 with the 300 mm lens has produced a number of pictures that I am very happy with.
In fact I may try to sell the NEX-5 with the 3 lenses and pick up a D5100 for myself. The Nikon is not that much bigger and seems to produce better pictures overall.
I have found that by using the Shutter setting on the camera with a 1000/sec and ISO held at between 100-200 on a sunny day the sharpness of the shots meets my expections.
Have a couple of question for you if OK.
Shooting with the Nikon using RAW/fine settings I am not able to open the RAW in Lightroom3. Is there something I am missing or does LR3 not handle .NEF files?
While using LR3 is there a way to see the camera setting details of a certain picture?
Are you heading back to BKK this month or early in 2012?
Steve

Hi Rick –
Nice pics!
Some observations. The D5100 isn’t taking better pictures than the NEX-5. You are. You can do this because the D5100 has a better AF system and it allows you to hold the camera better braced, where the NEX-5 makes you hold it out at arms-length which means it’s poorly braced which makes for softer pictures.
The solution? Consider the Sony NEX-7 with its 24mp sensor, integral EVF viewfinder, better AF system, and all of a sudden hands down it’s a better camera than the D5100. And you won’t take the loss on your lenses.
About your questions:
a. Lightroom supports NEF files. The D5100 is a newer model so you probably need to just upgrade to the latest version of LR.. That will solve that problem.
b. Yes, to see the settings make sure the “Loupe info” choice has “show info overlay” checked. Then, under the “View” menu choice choose “view options” and select what the loupe displays.
c. No. Unfortunately, or fortunately depending how you look at it, Parrot #2 will be coming to America during the Jan/Feb time frame and I need to be here to process her through all the difference agencies. I really wish I could e there, it’s currently 17f here and Bangkok would be so much fun compared to this..
I hope this helps
Steve
I’d like to mention that everyone, myself included, is really enjoying the current trend of readers submissions. Everyone loves them, but remember we can really use more. I have only another week’s worth in my queue, so please take the time to put together a few images and words if you can and send them in. Thank you. info@BangkokImages.com
Readers Questions *menu
Hi Steve,
I enjoyed your article about the day trading PC. It inspired me to build a similar machine. I made a few changes to your configuration by getting the ASUS Deluxe GEN3 motherboard and the Intel 2700K processor. As we know technology keeps improving and as soon as you build something the new stuff will come out. Previously I had two computers built for me based on my parts specification. This was my first attempt at a build myself. It wasn't that difficult, about 4 hours of work. I'm sure I could do it much faster next time.

A few things I didn't see in your article that I came across. After acquiring all the parts I found I only had one 3.5" to 5.25" drive bay adapter so I couldn't initially install both the media card reader and the 2 USB front ports. Also, I needed an 8-pin CPU power cable extension as the cable included with the power supply was a bit too short. I decided I didn't really need the two front USB ports anyway as I can use the top ports already a part of the Lian Li case. I noted that one of the two pin connectors from the Lian-Li case had the polarity reversed. Also, took me a while to figure out where the speaker was for the case 🙂 I didn't expect it to be so small and in the plastic bag of parts.
Also, I went for the low profile 16GB memory from Corsair as the G Skill was a little more difficult to obtain. I skipped the flash drive. I know you like these drives but I have my own concerns about the reliabiliy and longevity of these drives based on talking with people here in that industry. I went with the 2 TB Western Digital Caviar Black for the system drive. I had to pay a hefty premium for it due to the flooding in Thailand. Once drive prices fall back to earth I plan to setup a RAID 1 configuration with two additional drives like it for data and photo storage.
I went with the Sapphire Vapor Radeon 6850 graphics card as I wanted both DVI, DisplayPort, and HDMI output to be able to drive the full resolution of the Dell UltraSharp U3011 30" LCD monitor and my LCD tv. One thing I really like about the Dell monitors is that they have so many connection options and the setup is via the front panel buttons. So far I am very happy with the graphics output of that card. It's quite an improvement over what I got from using my laptop to drive the monitor.
Haven't gotten to the tuning and overclocking of the new machine. Hope to work on that soon. The software tools from ASUS and the BIOS setup are great compared to what I had seen previously.
I was originally shopping around for a laptop in the 14"-15" range but I could not find very many that supported DisplayPort or Mini-DisplayPort output to drive the Dell 30" monitor at full resolution. The HP Envy and the new Dell 14z and 15z are capable but those laptops have other drawbacks. I know the latest HDMI spec supports higher resolutions but haven't seen any graphics cards that spec the higher resolutions for output to HDMI. I decided to go with a smaller lighter laptop or possibly an iPad for travel and use the new desktop at home.
Kevin
Hi Kevin –
It’s great that you built your own, that’s exactly why I try to make the articles so detailed and to explain the reasoning behind the parts selection.. in the event someone has different requirements they can see the reasoning and then decide
on their own.
You’re right, I missed a few parts. With Lian-li you’ll have a tough time finding the smaller options/parts at the bigger stores, they just don’t carry them. There is a shop on the ground floor in Pantip who sells all the Lian-li
cases and parts, but in the states you’ll need to use Amazon. If you used the excellent 1020 case you’ll for sure want the BS-06 video card cooling fan.
This reduced your video card temps 30-40%, well worth the money. search for it in silver if you need silver.

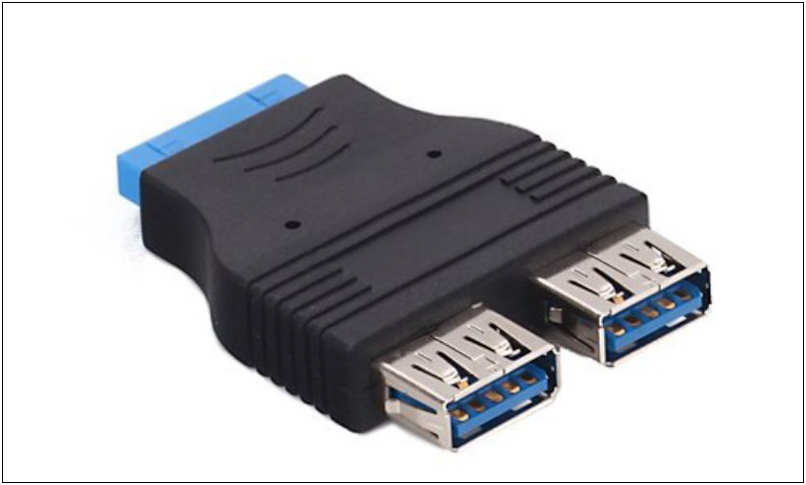
Also, to take advantage of that 20 pin USB 3.0 header on your motherboard one of these comes in handy: And here are the excellent matching 5 – 3.5 adapters that match the brushed aluminum look of the case:

Because I deal with Lian-li all the time I keep their small parts in stock and I forgot to show in my review where to get them.
The power supply cable I’m a bit confused about, you used the Seasonic? I remember it being tight, but routed properly it should have fit without an extension. I try not to use extensions because I appreciate the cleanest power and extensions ‘can’ be problematic. It was a hard fit though, you need to get that cable in at the right time or you’ll find your fingers just won’t fit in there and you’ll be pushing it on with a really long screwdriver and a lot of patience.
Did you use the white pin block Asus supplied with their motherboard to help with the pinouts? You’ll find all the print on the connectors will face the same way and the pin block, even if you don’t use it (I don’t, I like the connections without it),
will help you know where the pins go. Ya, that small piezoelectric speaker is a bit deceiving..
The WD Black drives are a good choice for data storage. For imaging professionals they’re the standard. I use a ton of them. I’m also taken with the new Seagate I reviewed in this article:
I’m currently running 2 of the 3tb’s in a RAID1 and I’m happy with the speed (much faster than any other mechanical drives out there), but of course the RAID1 slows them down a bit.
I’m currently running my 4 Crucial C300 256gb SSD’s going on their third year. One is in a workstation that I never power off and by that I mean never.. another in a small Lenovo x201s laptop that I use daily but it’s not left on
all the time, but it does get bumped around a lot.. and 2 more in student workstations. I put a PCEe Revo in my sons workstation going on a year. In any case, I’ve not had trouble from any of them. I’ve probably installed 100 more
in customers computers. No trouble with those either. With mine I run benchmarks every few months because as you say, it is new technology so I like to make sure degradation isn’t an issue. It isn’t. They run just as fast today as
the day I put them in use.
Keep in mind any decent SSD comes with a 3 year warranty, some 5 years. This is long than I’d use a mechanical hard drive for any serious purpose. You’re familiar with running SMART tests on mechanical hard drives? As they get some hours
on them the SMART tests start revealing weaknesses. By the time you get to the 3 year point even the best ones are showing enough small issues where you wouldn’t want them as a system drive nor as a primary data drive.
So ya, I’m a big fan of SSD’s, once you experience the performance difference you won’t go back. Especially in a laptop you carry for business where you’re opening/closing out of hibernation or booting it fresh several times
a day and a customer is waiting on your boot. Sometime next year I’ll replace my Crucials at the 3 year point and I’ll probably replace the desktop workstations with Revodrives 3 x2’s and the laptops I’m not sure yet,
now there are a ton of really high performance SATA II and III SSD’s out there.
That Dell U3011 is a nice monitor for sure. If you were into imaging on a more frequent or serious basis you might want to spend the extra for the NEC PA301w..
If you’re looking at a laptop for travel take the time to read this article and pay attention to the weight, durability, power,
and battery life: Also, any of the new Ultrabooks coming out by Asus, Lenovo, and others are right in that same weight/performance/battery life window but for a lot cheaper.. new tech is almost always better and cheaper..
Thanks for the feedback Kevin. If you don’t mind I’ll run your feedback and my response in the next column so the information is out there for the next guy?
Steve
Hi Steve
Well I owe you a big thanks for the tips you gave me on the lessons I took with you in Thailand. One point you pushed several times in our meetings was to always apply the lens hood and at the weekend it really paid off.
I was in Koh Chang and had been taking some photos of the endless pool against the backdrop of the sunset over the sea. On the way home and in the dark I was not looking properly and didn't see the steps in front. As a result I went for a tumble.
Tried to save the camera in my hands (also had an ipad) but the camera took a huge bounce on the concrete path. It landed on the lens hood and then a second harder bump on the body.
End outcome was a small scratch on the lens hood and a perfectly working camera.
The cost of my lessons was recouped in a few split seconds…… but my skins still under repair LOL.
Thanks Peter
Hello Peter –
I'm sorry you fell, are you okay? I've noticed the older I get the longer the skin takes to grow back.. 🙂
I'm happy your camera and lens was okay, those hoods sure can take a lot of abuse. I tend to bump mine on door frames as I pass through and they can take quite a wallop without damage.
Do you mind if I use this in the column this Saturday? It might prompt others to be more diligent..
If you get a chance to share some images we could sure use them.
Steve
Steve:
How do you feel about this statement?
If you're not so flush with cash, buy Lightroom 3. It’s designed to handle everything a photographer needs to do on a daily basis. Photoshop, on the other hand was designed for visual artists of all kinds. That’s why it has so many tools that photographers never use: animation, 3D, typography tools and the like.
I am using the trial version of CS 5 and do not see any real need to spend the extra cash at this time. The only feature of CS 5 I really enjoy using is the "selective saturation" feature which seems to a real improvement over the similar tool in LR 3.
I have also read the "sharping" tools in CS 5 are an improvement over the ones used in LR 3. What is your call on that?
We are up here in Truckee all set to catch the fall colors. Well, major wind for 2 days and 2' of snow today has gotten rid of all the leaves. Oh well I guess am stuck looking at yours. LOL
Thanks
Rick
Hi Rick –
I think the guy generalizes way too much, but mostly he’s accurate.
Lightroom in part, is a subset of tools from Photoshop which photographers use the most. Certainly not all the tools photographers use, especially pros. Lightroom is also a great database/organizer/filer of photos, has a great print manager, a web manager, and more that Photoshop doesn’t do.
There is no doubt that from version 1 through 3.. more and more is being added, and with every version more photographers are finding Lightroom to be enough. But I don’t think LR was ever designed to replace Photoshop.. in fact I know for sure the guy who wrote it never intended it that way.
Keep in mind there is no single image processor which will fit all photographers, and most photographers require several. I personally used 4-5 different raw processors and over 25 different Photoshop plug-ins.. but I do a lot more with images than most people do.
You’ll have to show me some of those fall colors. I did a few here.. not real happy with them, but there’s always next year.
Take care
Steve
Steve
As a follow up to my questions about LR3 v CS5 I have a question .
The only feature I have found in CS5 that is really useful to me is Selective Desaturation.
Do you know of a stand alone program that would offer the same type Selective Desaturation as found in CS5. Something that goes from color to B&W then allows selective color replacement.
Anything to save a few baht…
We received about 3' of snow over the weekend in Truckee. I had to shovel the deck twice.
Thanks
Rickster
Hi Rick –
In this tutorial: I show how to do this in both Lightroom and CS5.. other programs do it too, but LR and CS5 are better.
Steve
Steve,
I’ve been looking over the pre-release stuff for the new Sony NEX-5N and NEX-7. I like the OLED EVF and the bracket shooting. Maybe you could give us your take on them in your next article. Hope you are enjoying your part of the USA.
Bryan
Hello Bryan –
I’ll try to remember to mention these cameras..
I bought one of the first batch of NEX-5’s in Thailand, and then the first 16mm.. and I enjoyed it a lot until I received my Fuji x100 and was reminded of what I’d been missing.
What was missing was a photographers interface, optical viewfinder, exceptional lens, and low light capability.
Sony’s NEX-5n and NEX-7 have improved their interface, but it’s still what I call a point and shoot interface. Sony knows most of the buyers of this camera will just put it in Auto and forget it has other modes, but they still need to support advanced users. Before they did this poorly, the new cameras do it much better. But the Fuji x100 provides an interface not unlike old style SLR’s which were probably the apex of user interfaces for real photographers.. especially when you consider back then all cameras were manual focus and manual exposure. If you’re the sort of person who mostly uses Auto modes you’ll love the NEX series. If you often use aperture priority or manual modes.. not so much.
EVF’s have greatly improved, and I had a chance to do a hands on with a NEX-7.. and they’ve improved even more. The x100 has an excellent EVF mode as well. I suppose you can get used to an EVF, many do, but I’ll always find an optical superior in speed (no lag) and more comfortable with its natural view. Though, I do enjoy EVF’s that basically ‘preview’ your exposure settings as you change them but before you shoot. Very handy at times. And Sony’s articulating LCD for live view allows perspectives you won’t get with a optical viewfinder (from the hip, up close where you normally can’t get your head but your hands fit, low to the ground without having to lay on it). Still, if I could choose.. I’d choose an optical viewfinder despite the benefits of both the EVF and articulating LCD.
Lenses.. Sony’s 16mm and 18-55mm.. are both good lenses. Yet, I didn’t feel they were up to the sensor in the original NEX-5, so they’ll certainly be limited in the NEX-7. But.. if you want to spend the money.. Sony will be offering Zeiss lenses in several focal lengths. I’d consider these a must have.
Low light.. This remains to be seen and will become known in the first reviews. The Fuji x100 surprised me greatly by being better in low light than my Canon 5d Mark II. DxO scores show the 5d Mark II’s sensor ‘slightly’ superior, but not by as much as you’d think a full frame sensor should be better. Meanwhile the original NEX-5 wasn’t in the same league. Soon, we’ll see how the NEX-5n/7 compares with low light..
Many people want a zoom lens, so the NEX is a no-brainer over the Fuji x100. The problem is, Sony’s zooms aren’t nearly as good as the x100’s 35mm equiv prime.. Others will be convinced the need the 24mp sensor of the NEX-7, that it will allow for things the x100’s 12mp sensor can’t give them. My guess is they’d be wrong in 95% of their instances.
What it comes down to is your personal style. I really recommend borrowing or renting the NEX-7 and its closest competition.. and living with them for at least a few days. At the same time we live in great times and we have a lot of great choices.. the NEX-5n/7 are certainly two of them.
I hope this verbosity is somehow helpful..
Steve
Thanks for the answer, so is there a way to embed the dng profile i made into the file itself ? When i load the raw's from my camera into Lightroom i get Adobe Standard and Embedded in the list (this is a pentax 645D). I'm assuming the embedded profile is something the camera writes into the file, can that be replaced with my custom one so I can then throw it out from the profile list and the custom profile I made turns into the Embedded one ?
Adobe says this about the profiles:
"What's the difference between an embedded profile and an external profile?
An embedded profile is a camera profile that has been embedded in a DNG file (i.e., the profile data is stored in the DNG along with the image data). An external profile is a camera profile whose data is stored in a separate file on disk; this file has a .dcp extension. Otherwise there is no difference between embedded and external profiles."
So i guess to clarify, how can I turn the external profiles into embedded ones so I don't have to deal with a bunch of those external files a few months from now ?
I'm going to tread carefully here and I'm sure I'll be corrected. "Profiles" are a function of the raw processor. C1pro will have a different profile from ACR or LR through ACR and LR probably share the same because of their close relationship with Adobe. As a file recognized by that raw processor it seen by the raw processing software, it assigns a profile from it's database of profiles supplied by either the raw processor or any profile you add and assign.
Even years ago we were using non-OEM (for lack of a better term) profiles suppled from guys who knew how to make them and who had an eye for color. Magne Nilsen for instance used to make some awesome profiles
for the Canon 1ds Mark II which were compatible with C1pro and I still use them today. Actually I've recently dug out my Canon 1ds Mark II and am rekindling my love affair with that body.. I'm absolutely convinced that from ISO 100-800
it makes better files than my Canon 5d Mark II. Anyway.. this profile is flagged in C1pro so any time I process a 1ds Mark II image that profile is applied.
Keep in mind the standard profiles provided by Adobe and C1pro and other raw processors are "general" profiles meant to 'work' in most circumstances so they're not tuned to just one type of light. The Magne Nilsen profiles were a bit more specialized in that they're geared for higher or lower saturation.
The x-rite color checker profiles are specific profiles built to balance the colors using the specific light of that shoot. You would not want to apply these to every image you import.. or embed them to take the place of the standard profiles provided by Adobe or C1pro.. You might create a set of profiles taken in specific light conditions, shade, sun, indoors with incandescent, etc, etc.. and use them as starting points.. but what x-rite was really designed for was to be used in place of a grey card to make a more accurate profile you can easily apply to a batch of images from a specific shoot.
These profiles are different from the Camera/Calibration area in ACR and LR. This is where you'd enter corrections to compensate for the variance in sensors used in the same model camera. For instance, your 645 'might' make slightly different color than a 645 that came off the line 200 units ago. But both are supported by the same ACR/LR profile. Camera/Calibration is where you'd compensate for the difference between sensors.
What you want to remember, is that all of the above examples are 'external' profiles. The internal profile is a camera manufacturer starting point used by your cameras in-camera jpeg converter and LCD display, and as a reference starting point for the raw processor software to build their external profile from.
So.. you wouldn't want to change it. It is what it is. If you feel your color isn't right what you would want to do is determine is if it isn't right all the time or just under different lighting conditions. If you feel, for example, that the blue channel is too saturated in general.. then you'd adjust that in the Camera/Calibration settings area. If you feel the color is off for a for a specific lighting condition.. then this is where you'd use X-rite color checker.
And finally.. if you think you'd like to be able to embed profiles that will see all and do all under any lighting conditions.. well, that would be the holy grail of color and if you could figure that one out you could set your own price.
I hope this helps.
Please submit your questions to info@BangkokImages.com All questions will be answered and most will show up in the weekly column.
A Snapshot of Bangkok Images Week in Review *menu
![]()
An unusually warm winter has gripped the midwest and no one but me seems to mind at all! The way I see it, is if you’re going to live here a white Christmas is one of the few bonuses. Oh well. We remain hopeful we’ll get some real winter weather before the next column is published.
Don’t forget to send in your questions, readers submissions, and if you need help forming a feature piece please contact me and I’ll help you through it.
As we enter 2012 our site Bangkok Images is going stronger than ever with viewers from all over the globe. We’re firmly entrenched in the main search engines and hopefully will soon become a household name. Okay, I’ll admit that last one was a bit of wishful thinking.. J But that’s what you’re supposed to be doing on a New Years Eve.. wishful thinking about the year to come.
To our contributors, Stickman himself, Bangkok Images members, and our readers here on Stickmanweekly.com we wish you a Happy New Year and hope your next year is even better than your last. Enjoy your holidays and we’ll see you next year!
Infocus Blog, Impossible Without You! *menu
This is my favorite part of the column, the place where I can talk about whatever is on my mind whether it’s about photography, politics, or even sources of irritation. This week there is only one thing on my mind. You.
Without you I could never complete this column. Without you, I wouldn’t want to. Since our first column in August of 2008 you’ve been asked to send in your questions, share your images, and for the last few years to contribute Features.

The response has been great. You’ll have noticed some contributors are heavily involved in providing material for this column, Eyal with stories of his unique travels in South East Asia, Bart with his never ending supply of biker photos, Tom Tweedel with his excellent coverage of China , and Akulka withthe most unusual coverage of the DPRK, Philippines , and Cuba!

Several contributors have started stretching their legs with the occasional articles, BigJoe with his great pieces in Thailand and Korea , Dr. P with fun coverage of an African Safari and Antarctica, Kvwielink with a two part East African Photography tour coverage , and coverage of the floods in Thailand , Khunklit with his coverage of Ko Samet , MSTinternational’s Hot Air Balloon article, JTG covered the cremation of the Late Princess Galyani Vadhana, Rob with a two part special to Kruger Park in Africa and a look atthe Great Wall of China. And let’s not forget about Rod C and his whale watching trip with his fiancée.
And that’s just feature destinations. Forgive me for not listing contributions of Feature Photographs, Questions, Readers Submissions, Interviews , and some fantastic tutorials by Craig Lamson and Tom Tweedel. And even moreEquipment articles.
And this list wouldn’t be complete without a huge thank you to all the users of the site who have posted User Photo Galleries, and some of Dana’s best work ever in the Thailand Photo Story section.
Can you believe we still haven’t said thank you to all the contributors? There are too many to list, so if you don’t see your name please know you’re contributions haven’t gone unnoticed and your work is greatly appreciated. This site, Bangkok Images http://www.bangkokimages.com/Home.aspx , has truly realized it’s potential in becoming YOUR THAILAND PHOTOGRAPHY WEBSITE! Without you none of this would be possible.

New additions to the site for 2011 include the Beginners Easy Online Image Editing, Advanced Users Online Image Editing, several new site Photo Galleries, and a new page detailing what I offer in the way of custom workstation builds.
I’ve updated our image galleries several times throughout the year bringing more features and better looking presentations. Our blogs have been updated, we’ve added Exchange Rate and Weather information panels so you’re always up to date on the Thai Baht exchange rate and the most current weather, and unfortunately while we have great forum software installed it’s greatly under utilized.
There is just so much to list, so many contributors to thank, and a large number of new users for 2011. But you’re wondering, what about our numbers? I’m pleased to say our site traffic has increased 300% in just 2011 alone! I think that’s really good. And we can do better next year! More and more Thailand centric photographers are discovering Bangkok Images making the site better with each new member.
Still, there’s no way I could do it without you. As we bring in this New Year I congratulation you on a great year here at Bangkok Images and I hope we can do more together in 2012. Congratulations on 2011, and here’s looking forward to 2012!!!
Until Next Time..
![]()
