Interview, Kees Sprenger/Dorothy Cullioty, Food From Northen Laos/Lightroom 3.2, Processing A Landscape
![]()
|
• Anantara Resort & Spa Koh Samui • Bandara Resort & Spa • Bo Phut Resort & Spa • Lawana Resort |
I have some unfortunate news to report on this project and total 100% transparency is how I feel this should be handled. My planned beneficiaries of this project, innocent very much in need children at a certain orphanage, have fallen victim to their local manager who we have found cannot currently be trusted and I doubt this is likely to change. Decisions need to be made if we're going to carry this project forward and if so who the new beneficiaries will be. I do expect this project to generate significant revenue so I take it very seriously. As you read this I'll be back in the Mae Sot area investigating further. I'll keep you informed. For now I'll still collect images with the intention of making the best most meaningful mosaics possible and as always, I'm asking for and will greatly appreciate your help with the images.
We are still accepting (and pleading for) images of children from SEA. No matter how terrible you think
they are, please send them in anyway. These images will be used to complete a set of 3 high quality mosaics which will be sold to benefit the Karen and Burmese Orphans living in the orphanages and refugee camps. The more images the better, I can
use all you have. Please take the time to go through your images for anything you think might help. If you missed the "No Place to Call Home" special, you can
click on the link and read more about this. Thank you! info@BangkokImages.com

Quick Click Links
Feature Photograph
Interview, Kees Sprengers and Dorothy Culloty Lightroom 3.2, Processing A Landscape

Photography News of Interest
Readers Submissions
Readers Questions A Snapshot of Bangkok Images Week in Review
Infocus Blog, It's In The Eyes!T

Feature Photograph *menu
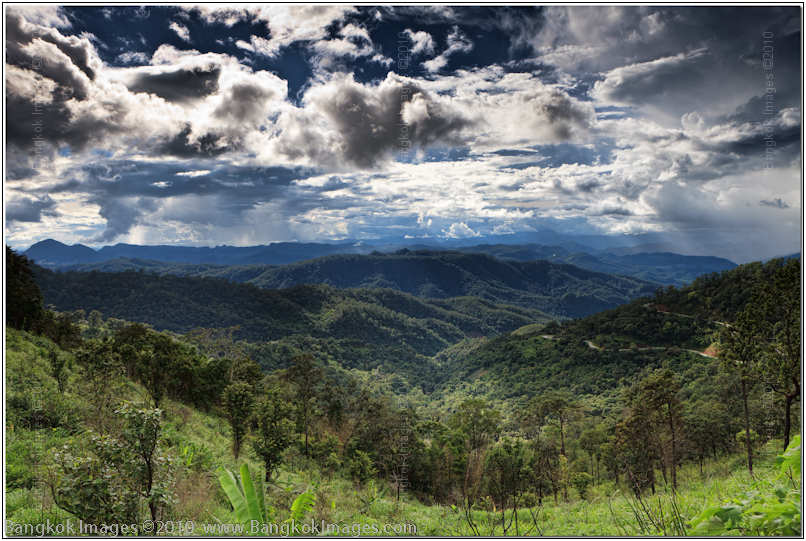
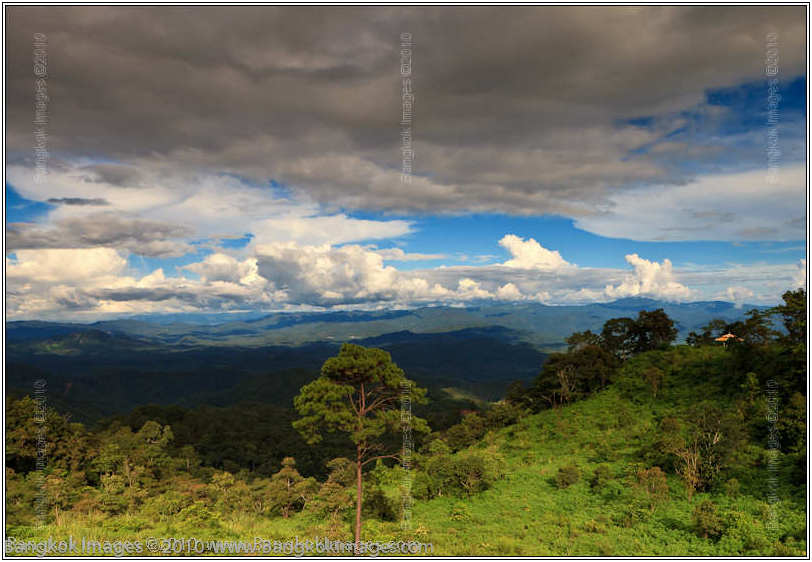
Canon 5d Mark II, 24-70mm F2.8L USM @F8 1/500th 24mm ISO 100
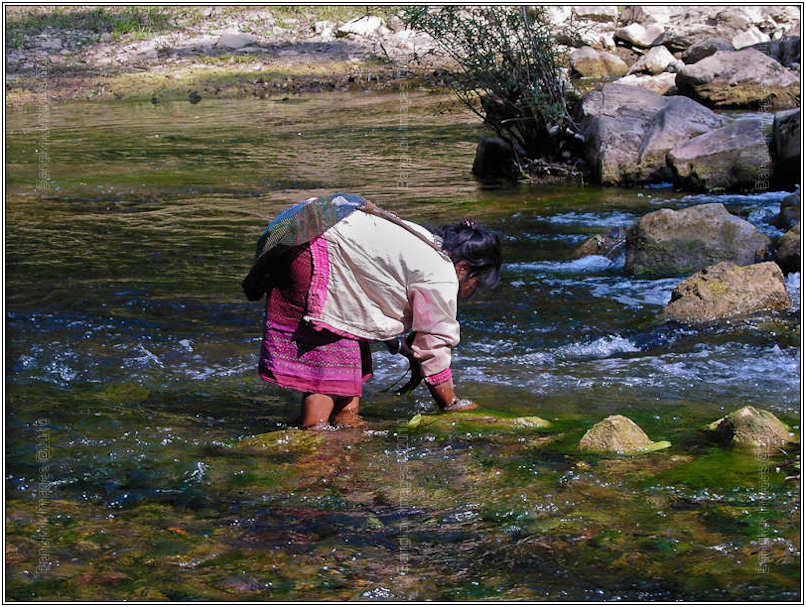
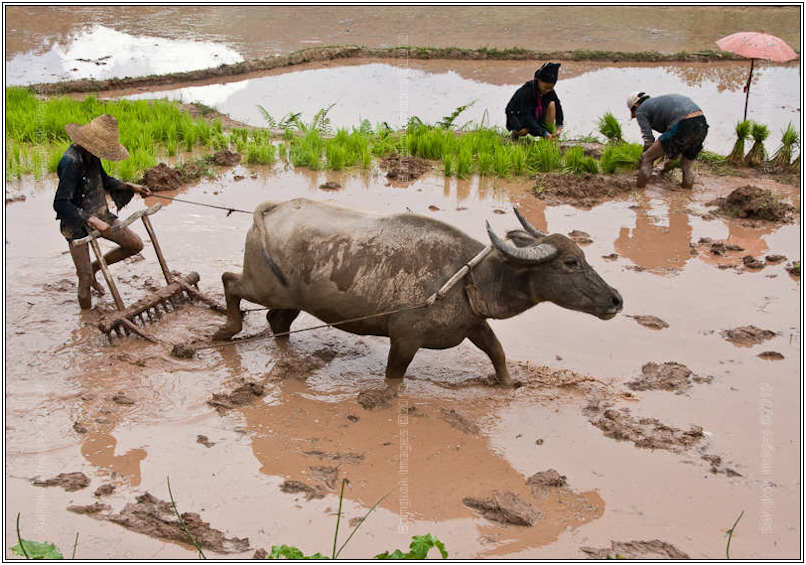
Recently I spent a week up north in the Mae Hong Son province in Pai and was captivated by the beautiful scenery, blue skies, and the cleanest air you can imagine. The weather was cool and the vistas breathtaking. The experience was so different I had to remind myself I was still in Thailand.
While I was mentally taking in the differences I was suddenly artistically transported to the great northwest of the United States and like terrain and landscapes. Everything I had learned there, now applied in Thailand.
This image is significant because it was a type of artistic portal taking me to the other side of the world with my art, yet remaining in Thailand with my camera. Have you had a similar experience? Even the roads reminded me of the Umpqua or Crater Lake National Forests.
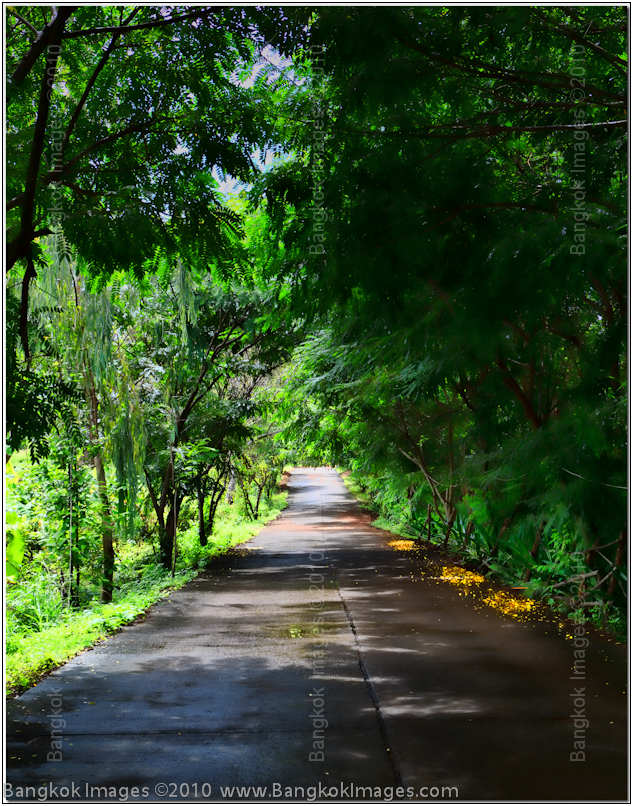
Canon 5d Mark II, 24-70mm F2.8L USM @F8 1/80th 48mm ISO 100
For a week it was like being in another country. A good friend took the time to show me around and it was and still is greatly appreciated. Thank you Eyal! Almost from the moment I left Chiang Mai I could notice huge differences in scenery, but as I climbed in altitude up road 1095 the air became more fresh, and the scenery more beautiful. It’s a tough road, especially as it was raining. I took it slow and careful, and 5-6 hours later I arrived in Pai. The return trip made when it was dry took a 1/3rd of the time. This is probably a good time to note that on the way up I passed accident after accident where people were in a hurry. Some of the wrecks were being winched up 50-100 meters or more.
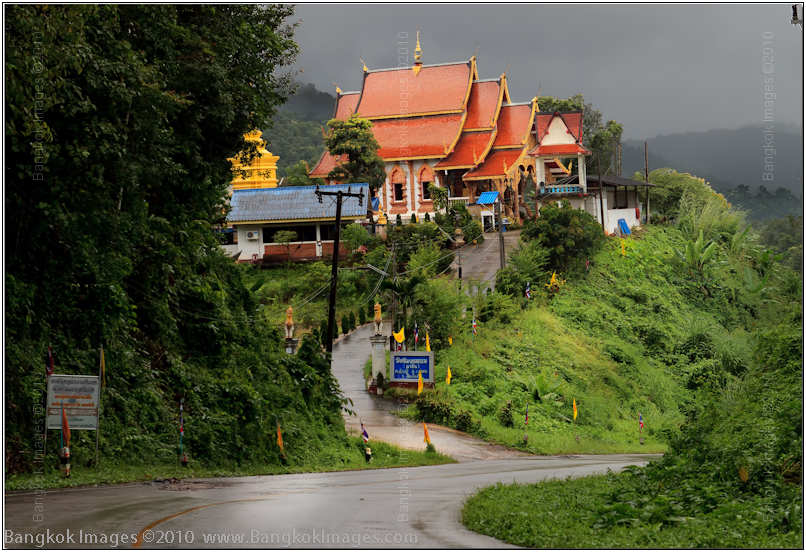
Canon 5d Mark II, 24-70mm F2.8L USM @F5.6 1/200th 70mm ISO 200
Every third or fourth bend in the road revealed a surprise such as this beautiful wat perched on the edge of the cliff overlooking the valley below. Sure, it was raining and I got soaked to the skin running around in outside taking these pictures, and then froze as my air conditioner kept my windshield clear, but it was worth it! Maybe if I’d brought Stick along with me I could have talked him into taking the pictures for me while I remained dry behind the wheel.. ;o)
Overall I had a very positive experience in Mae Hong Son and I look forward to preparing more significant articles for the coming weeks column(s). Because the weather was often such a challenge, a lot of processing needs to be done so it takes some time. Still, I think the results are well worth the time. What do you think?
Interview, Kees Sprengers and Dorothy Culloty, Food From Northern Laos *menu
Introduction
Last week I brought you a book review on “Food From Northern Laos.” The book aside, I immediately realized the couple who wrote the book lived a very interesting life and in fact upon publication of their book completed a dream many of us have. I can’t count how many people have told me they’d like to write a book on some aspect of Thailand, yet very few every get written much less published. This couple did both and they did a great job.
Usually my interviews are a verbatim exchange of questions and answers. Topics I think would be of interest to the readers. When I invited Kees and Dorothy over for the interview I had every intention of following the same format, but it quickly because clear this format wouldn’t work in their case. They were excited, enthused, very proactive in telling me about their feelings and experiences. Minutes into the interview I flipped on my voice recorder resigning myself to the tedious task of transcribing the file. Two hours later when the interview ended I instinctively knew the interview, as recorded, was way too long for this column and while I personally found it very interesting I didn’t think the piece in its entirety would keep the readers interest.
In the interest of brevity and readability I’ve chosen to ‘paraphrase’ the most salient points of the interview and put it in a story format, keeping the most important points and providing the most important information. Kees was generous enough to provide a handful of images I’ll disperse between each exchange which I’m sure you’ll really enjoy. This interview is about the authors of the book “Food From Northern Laos” and their journey to publication. Please forgive any small errors or omissions, we covered a great deal of information and I’m sure to have made some errors.

Kees Sprengers and Dorothy Culloty hail from New Zealand. They started work on this book almost seven years ago, and I might add quite by accident. Kees had a strong background in photography and Dorothy a talent for writing. A perfect combination to be sure! I was also curious what would bring a middle-aged couple from New Zealand to rural Laos.

When I asked Kees about his photography experience he took me through a very interesting career path. He started with a temporary position at a museum in New Zealand. Initially when reading the job description he didn’t feel he was qualified, so to prepare he purchased a few books on the camera systems the museum used and studied before the interview. During the interview he was asked if he had experience with the systems, and now he could honestly answer yes. He smiles when saying it was a good thing they didn’t ask how much experience.

This part time job turned into a 14-year career at the museum during which he gained a vast amount of experience with both photography, and museum affairs. He learned many different cameras, lenses, and techniques and photographed everything a museum offers. You’d have to have keen people skills.
Dorothy and Kees came to South East Asia nearly seven years ago with uncertain plans. They tell me it was almost by accident that they came across The Boat Landing and Guest House in the Luang Namtha province. The boat landing is where the boats must be ‘landed’ because the river shallows out and they can go no further by boat. It’s from this point that all travel is done by foot.

They describe the Boat Landing having a profound impact on their lives, live changing would be accurate. It was here they met the family who owns the boat landing and it’s a large family. One member was an engineer who helped build local projects, the others ran the boating landing which provided food and lodging for travelers and which eventually became a sort of ecotourist destination. While there they took a keen interest in the local foods and preparation.
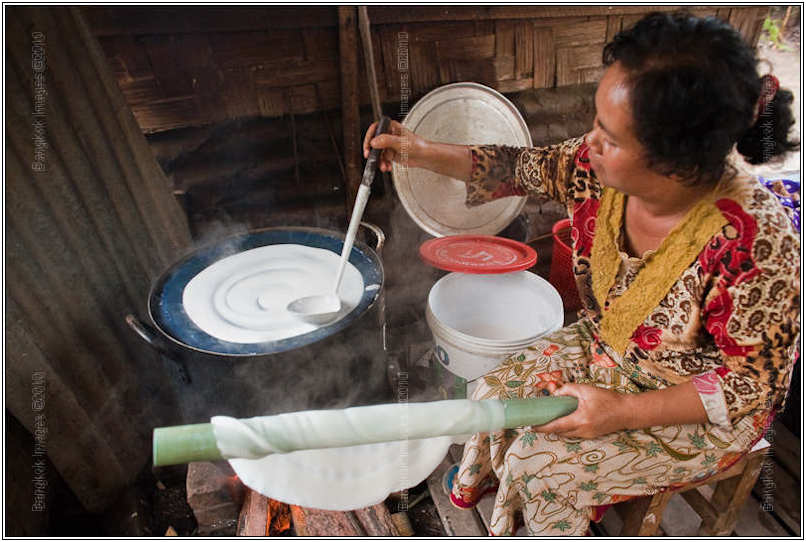
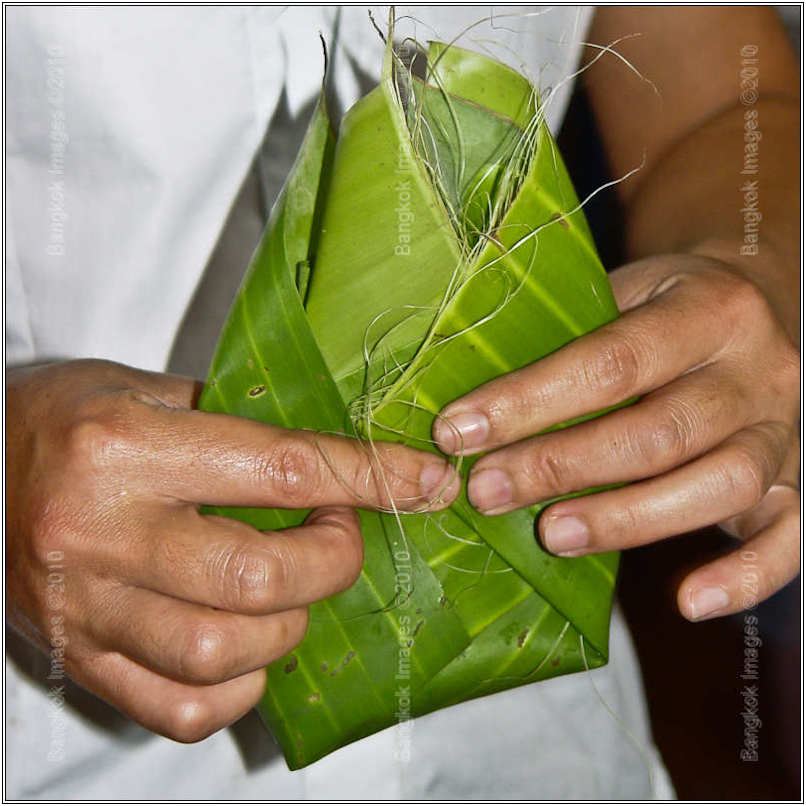
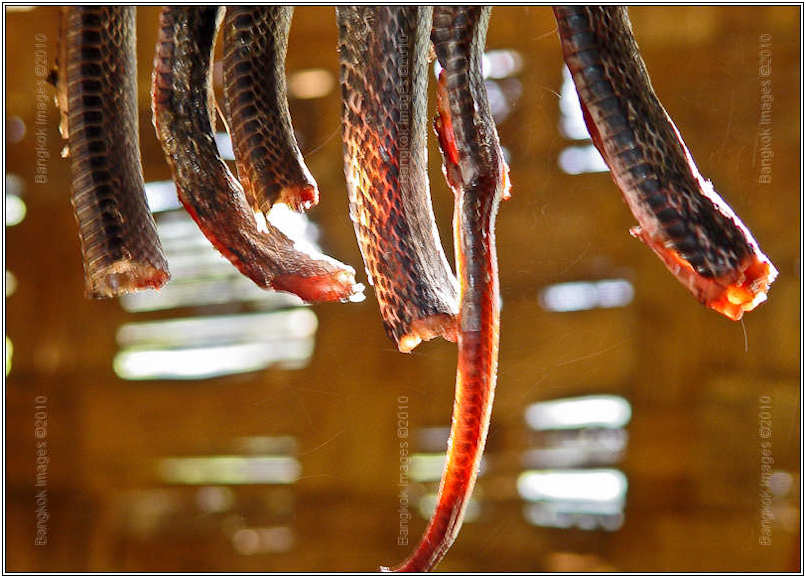
Soon they started documenting what they saw and keeping records. Ingredients, portions, cooking techniques, they were all different and exotic and quickly caught their fascination. There was much to learn. Foods were seasonal as were the ingredients. It wasn’t long before their idea for a cookbook came about and work began in earnest.

Many trips back and forth between Laos and their home in Thailand took place over the years and friendships grew. As we talked about the people of the boat landing you could see and feel genuine affection and even pride for their accomplishments. Kees and Dorothy both were getting far more involved with the local Laos people than they ever anticipated.

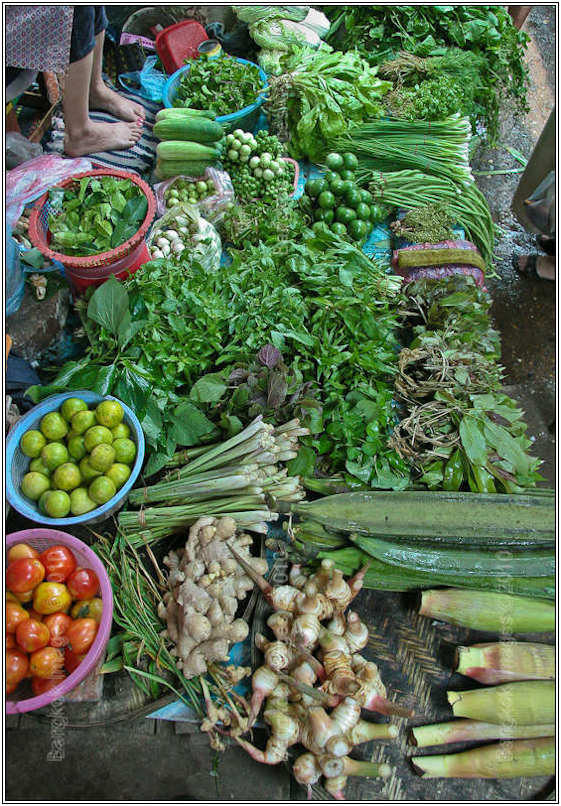
Listing the ingredients was the first major obstacle to overcome, after learning the language of course. Ingredients are seasonal and Kees and Dorothy described how they ingredients would be found either wild, or grown in gardens which were quite different from the neat labeled rows of a western garden. Lao gardens appeared to be haphazard and unorganized, but in fact the growers know where everything is.

A primary goal of this book was for the reader to be able to duplicate the recipes in a western kitchen. This means not only must the ingredients be identified, photographed and logged, but that also suitable substitutes needed to be identified as well. Seasonal ingredients require this. Much work went into this part, detailed photographs, careful descriptions, and suitable substitutes are all listed.
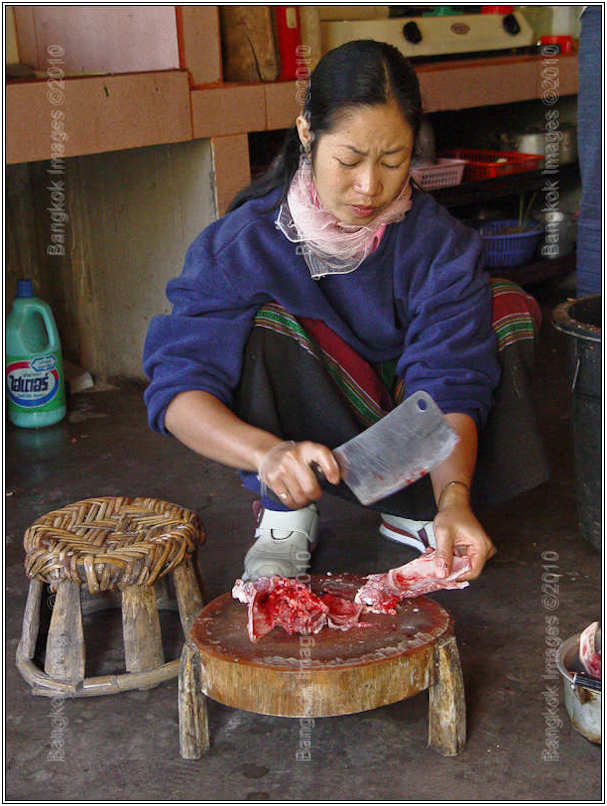
The next challenge as explained to me were portions. Ever done any Asian cooking with the in-laws? I have. There are no measuring cups and teaspoons. Instead there are pinches and dashes and palm fulls and Dorothy explained to me the issues in making the conversions. The conversions had to be identified, tested, and then documented. If substitutes were identified they also had to be tested and documented.

Then there were the cooking implements. Different ways to cook rice, roast insects, and different cooking sources like open fires, grills, and pits. How to transfer the recipes into a modern western kitchen was a major challenge. A Lao family I know who has lived in the states for over 30 years and who have a wonderfully big western home and kitchen looked over their book and told me it was amazing how accurate the conversions of ingredients, techniques, and implements were done.

After we’d talked about how they came to write the book, what went into the research, it was time to talk about the book itself. What goes into the writing of a book and the publication? A few years ago Kees had come to me for help color profiling his monitor, getting the colors right with such a project were essential. He also asked to be introduced to Lightroom. At the time it was still version 1. Much has changed since then. I can attest to the hard work and dedication an old film guy must go through to learn digital well enough to publish. It certainly isn’t easy.
Kees has started with an older Sony P&S nearly 7 years ago, progressed to a crop frame Canon DSLR, and is now finally shooting a Canon 5d Mark II like the rest of us. He’s also using a fairly recent Imac with a nice Eizo external monitor. Unfortunately because of these equipment choices only one monitor at a time in his system can be color managed and he tells me he uses the Eizo for all his important work. I would too!
I asked and it was confirmed that using files that spanned 3-4 cameras over a 7 year period, a time of rapid technology advancement, for the same book, was a challenge in itself. Looking at the book you can tell the best low light pictures were done with the Canon 5d and 5d Mark II, but the others are so well processed it’s not immediately apparent which camera was used. Well done!
Dorothy describes the writing and fact checking as a labor of love. Frankly I’m impressed with her writing. It’s enjoyable to read, refined, and shows much skill. She’s very good at this part.
Yet, there was a collaboration and they described it with smiles and good cheer. I don’t know about you guys, but I can’t work with my wife for five minutes on a project without pulling my hair out, yet they worked together for years putting this book together. Let’s hold out hope their next book will be a marriage self-help!
Finally it came down to the daunting task of putting it all together into its current form and then choosing a publisher. Usually such books are done in PDF format using PSD files or JPEGS for the images, but theirs were done in the more professional and time honored CYMK. They selected a local publisher and you can now find the book for sale on Amazon.com
I’ll admit to not pressing too far about the cost per unit and other private financial details because frankly that’s their business. I can tell you from experience this is not an insignificant investment. You have to respect not only their hard work and dedication to the project, but their entrepreneurial spirit as well!
This was a long interview. And again I apologize for not exerting more control during the interview process and making a verbatim question and answer format possible. In my defense I admit to being both charmed and fascinated at the same time This is a very interesting couple and the time went by very quickly. They were eager to tell their story, and I was more than eager to listen. A superb afternoon!
If what you’ve got out of this exchange is that this book took a tremendous amount of work, then you would be right. I’ve lived in Asia 23+ years, yet I’ve had no desire to live in the rural areas they’ve lived or spend so much time on one subject. But that’s what it takes. And the results are wonderful. I encourage you to check out their book at any of the English speaking book stores in Bangkok, on Amazon.com , or on their own website.
Kees and Dorothy, Thank you!
Lightroom 3.2, Processing A Landscape *menu
Introduction
Last week I took you throughprocessing a glamor portrait using Lightroom. You saw how to process the entire portrait inside Lightroom including skin softing, eye enhancement, blemish removal, and more. The results I think were stunning.

This week we’re going to do much the same, but with a landscape. Like portraits, there is a lot to processing a landscape, no single process will fit all landscapes. What processes we use depends heavily on the image we captured and the subject matter within. Still, most of what we learn today can be carried over and I encourage you to open your own landscape and follow along.
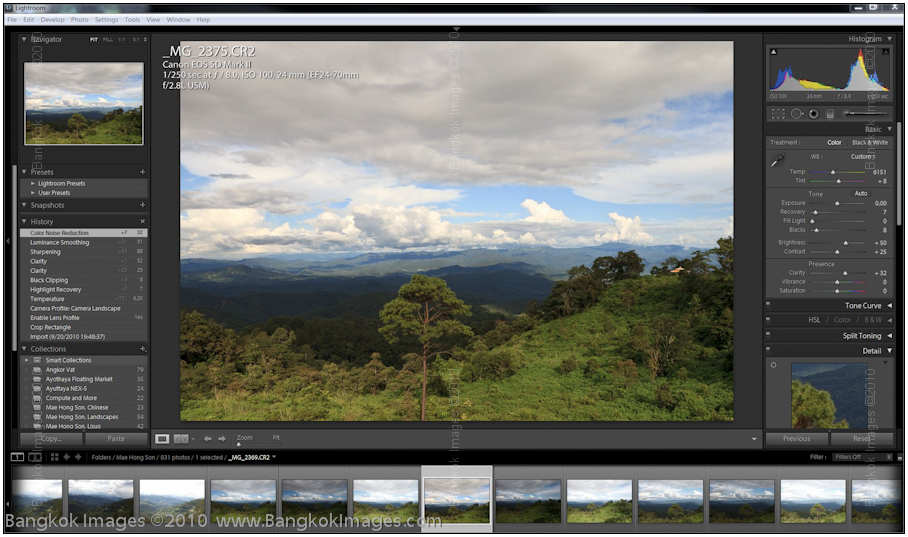
Cropping The Image
You should notice that Lightroom is set up in such a way that working logically from top to bottom is almost always the best way to complete the steps. Not all steps or functions of Lightroom will be necessary. White balance is where we start. Let’s look at the image right out of the camera.
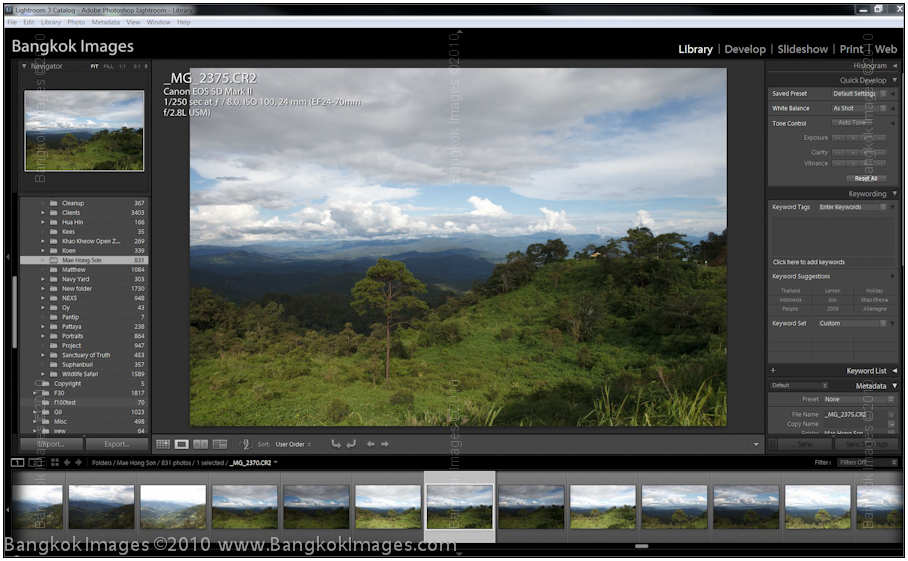
Looking, it appears I did my job and framed it near perfectly during capture. But on second take I’d like to bring the right side closer in to the small pagoda we can see on the right and to crop out the weeds right in front of my lens in the lower right.
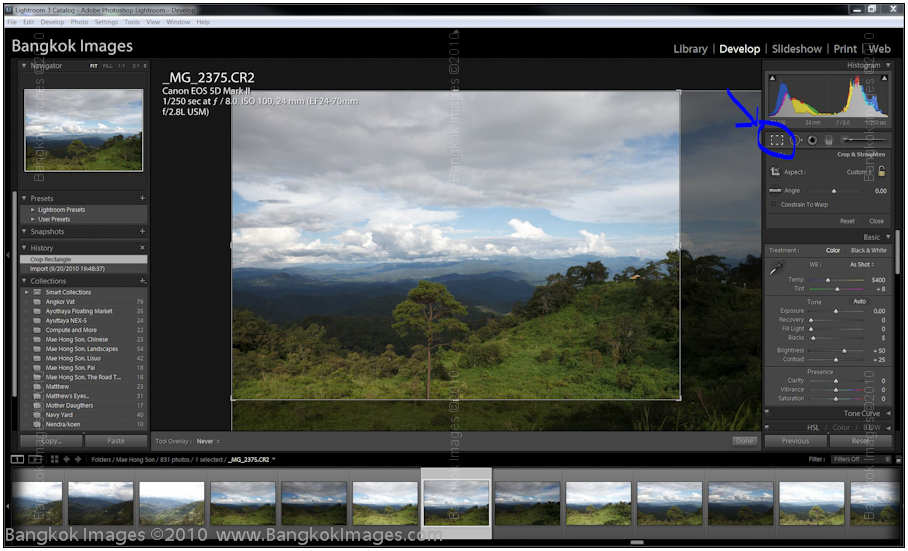
See how I cut out the weeds and brought the pagoda more to the right? This would also be the time to straighten your horizon with the cropping tool if needed.
Camera Profile and Lens Correction
Lightroom 3.2 brought several new features and I like using this at this point in the work flow. First the lens correction to remove any lens distortion.
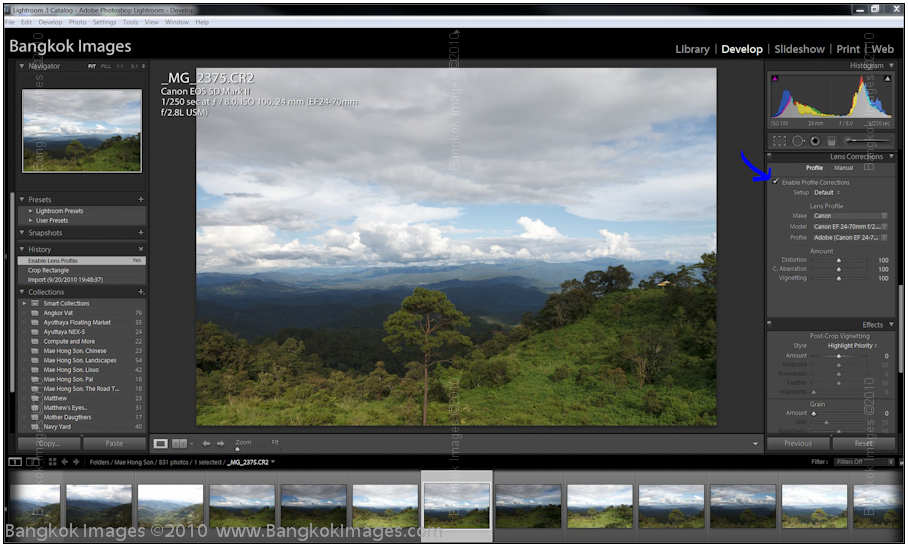
Notice the 24-70mm has a bit of inherent barrel distortion at 24mm? This tool easily corrects it.
Now we’re going to choose the profile. Each camera manufacturer has several color profiles embedded in their raw files. The drop down menu will show Adobe98, Camera Faithful, Camera Landscape, Camera Portrait, Camera Neutral, and others. Usually I use Adobe98 and any changes I do manually. But because many of you are just beginning a good hint is if processing a landscape, try “Camera Landscape.”
Notice how it added much needed contrast and color saturation? A nice and welcome change to a landscape.
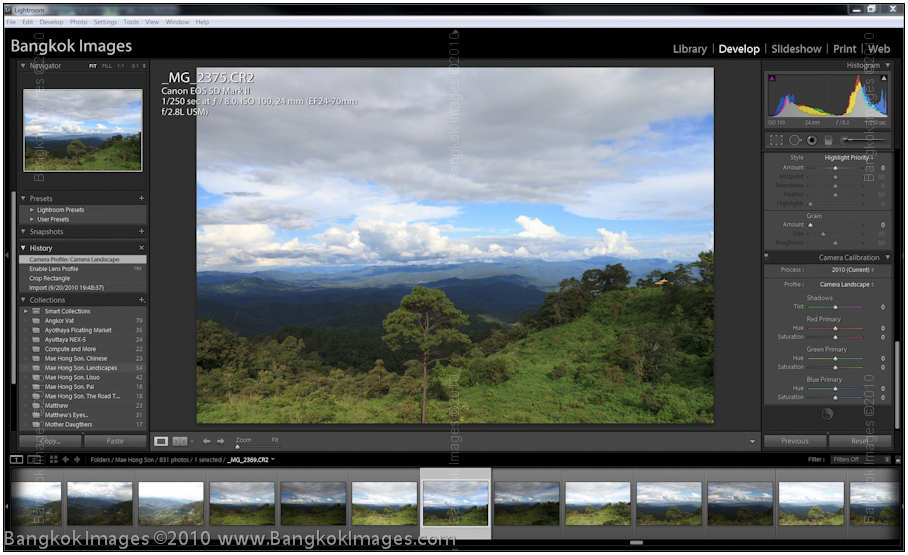
White Balance
Now we have to look at the colors and see if the white balance is as desired. To me, it’s a bit cold so lets warm it up a bit.
I raised the temp from 5400 and the tint from +8 to a temp of 6151 and left the tint at +8. This warmed it up a bit to compensate for the cloud cover. It helps it look like the sun is a bit more involved.
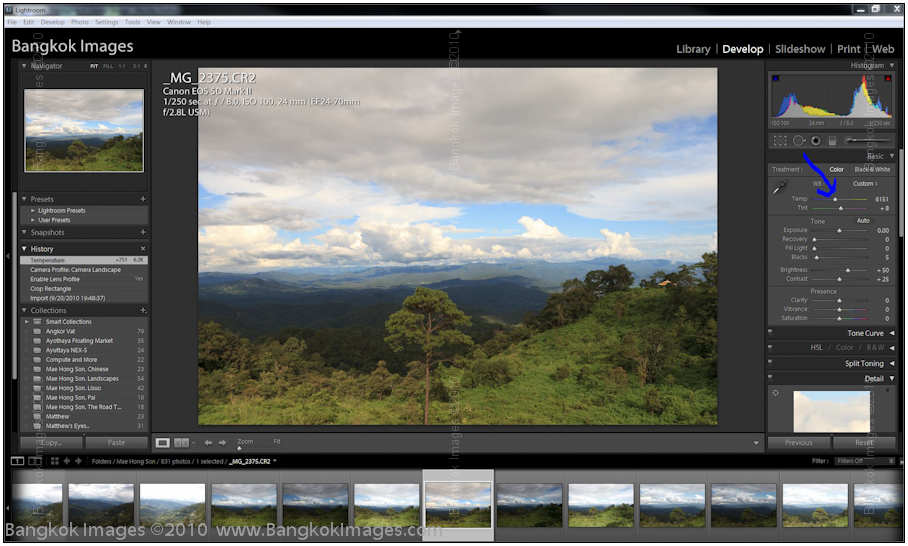
Exposure, Recover, Fill Light, and Blacks
I enabled the highlight indicator which makes RED any area which is blown out.
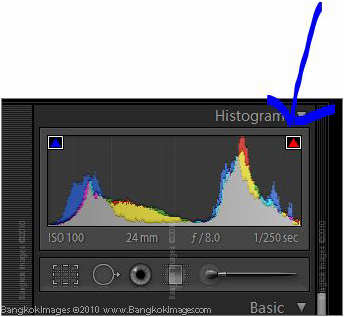
Notice the histogram and general image shows the exposure to be very good, but look at the red highlight warnings I have since I enabled the control above?
What you want to do is to slowly move the Recovery slider to the left until the red ‘just’ disappears. No further.
The “Blacks” is more of a contract control and I’d like to increase the contrast just a bit. The default starts at 5, so let’s move it to 8.
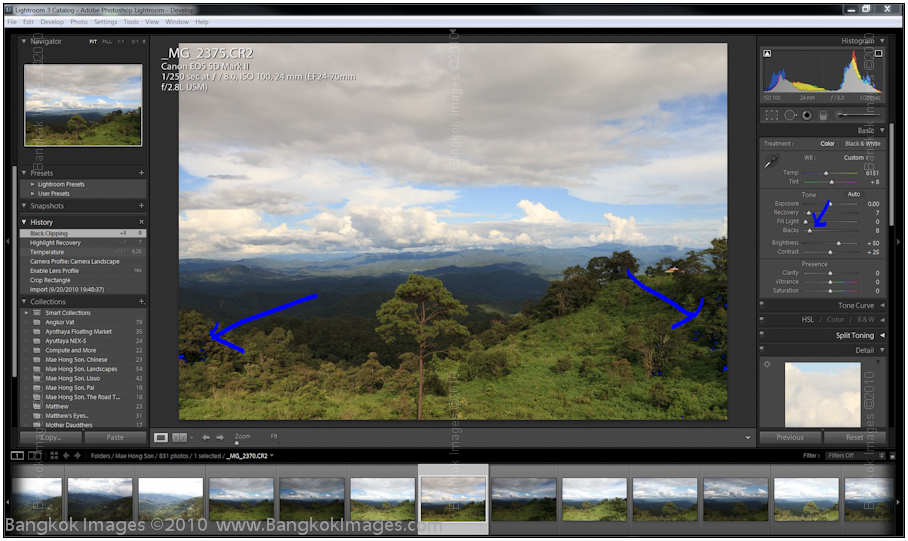
Notice a more pleasing contrast, but also we’ve got a bit of black clipping warnings going on over on the right and left sides? Black clipping a bit is totally okay, most imagers will have some. Highlight clipping is another story and must be avoided.
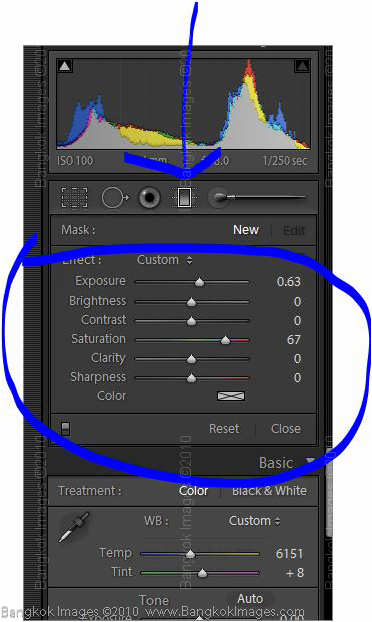
Presence
Next are three controls, Clarity, Vibrance and Saturation. I find that if your image is correctly exposed vibrance and saturation will take care of themselves and be fine. Still, if you want more saturated colors now is the time to change them. “Clarity” however is essential. Clarity is a sort of micro-contrast which shapes around the edges of objects in the composition. Strengthening the clarity helps these edges, or the objects with the edges, stand out. I find in a landscape a clarity strength of 30 works well. You don’t want to go too far though or you’ll get halos. Let’s move the clarity to 30.
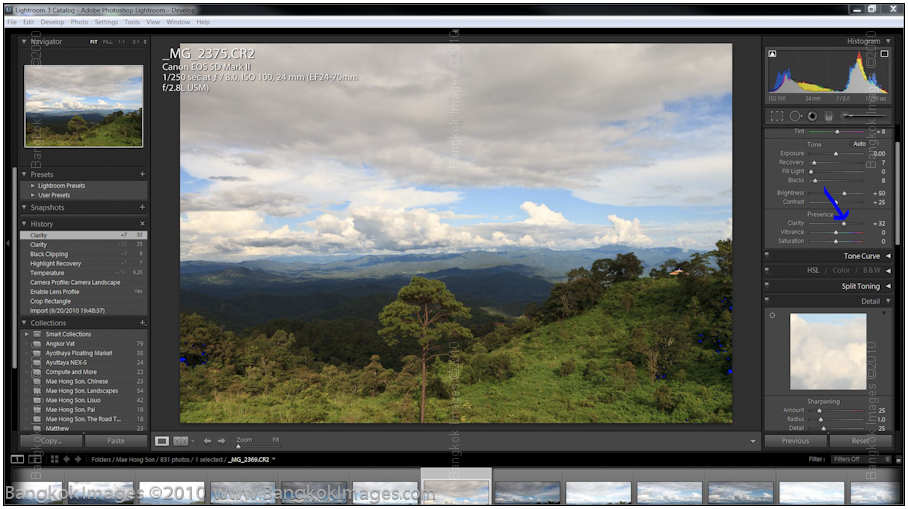
Notice how the trees and shrubs now stand out a bit more? Every change should be subtle, remember, the enemy of good is better.
Detail
Next is sharpening. Sharpening should almost always be last, especially if not processing a raw file. I find with the Canon 5d Mark II a value of 85-95, a radius of 1, and detail of 25 works best for most images. You can vary it from there. You’ll need to experiment if you use a different camera, but these settings will make a good starting point. Pick a point of the image so it’s in the magnified viewing window, and slowly increase your sharpening level to taste, while making sure no halos or artifacts appear.
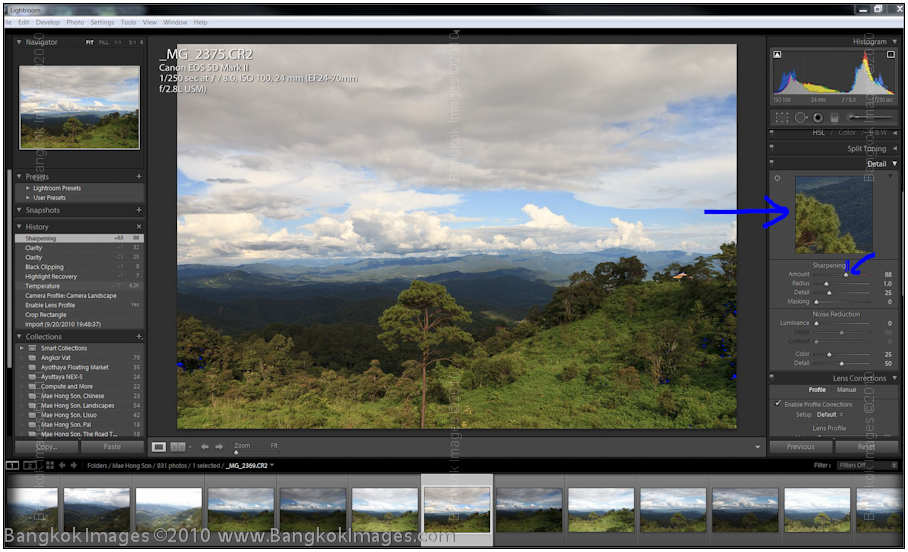
Notice how now the trees and shrubs are showing real definition as the sharpening and clarity help overcome the softening brought on by your anti-aliasing filter? Notice the edges of the clouds?
Noise Reduction
Lightroom 3.2 brought with it several new features, and one of the really nice ones is a great noise reduction routine. You want to be very careful with this control and not negate the nice effects of your sharpening. I know, at this view you’re thinking you can’t see any noise and it was shot at ISO 100 so there shouldn’t be any noise. Not so fast. If the image is perfectly exposed and shot at a low ISO, noise will be ‘minimal’, but not nonexistent. HOWEVER, every change we make to a file including clarity, sharpening, exposure, recovery, and more, ADD NOISE. It’s a fact of life. We try to take the best picture we can in camera so we need less post processing, so we create a higher image quality (less noise). Lets zoom in on this image and see just how much noise is there.

This is a very good image so even at 3:1 (a large zoom) the noise is well controlled, but present. If we were going to print this at 8×10 or even 11×14 I’d leave it alone. You could never tell. But a 20×24 you could tell. So let’s apply some noise reduction, just enough to make it go away.

See how effective these controls are? I didn’t move them that much. There are two controls, luminance noise and color noise. Moving each one will quickly show you which type of noise you have. Here, we had a bit of each. It’s not all the way gone, but this would print very well at 24×30 so I won’t go any further and soften the image more than I need to.
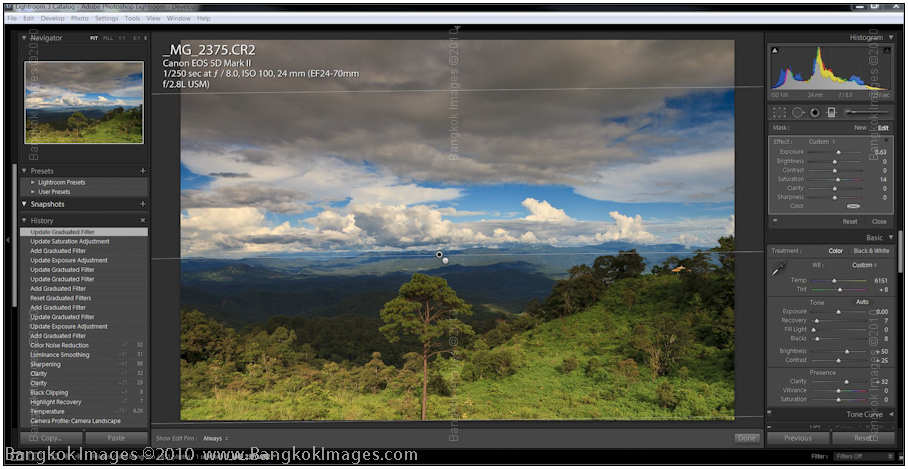
Is It Done Yet?
I know, you’re thinking “nice picture Steve, but it’s not jumping out at me like your landscapes normally do!” True, guilty as charged. The above steps are my ‘first’
steps in landscape processing and sometimes I’ll stop here, or sometimes I’ll go further.
But what if we want more. What more could we want? How about darkening the clouds a bit? There are several ways we could do this, and while I’d probably pick CS5 to do the job we can show you how to do a decent job in LR3.
See the ND filter tool right next to the localized editing brush? Let’s click it. See the controls that come up under it?
Okay, now I’ll bring the filter down over the sky and to the top of the mountains in the rear.
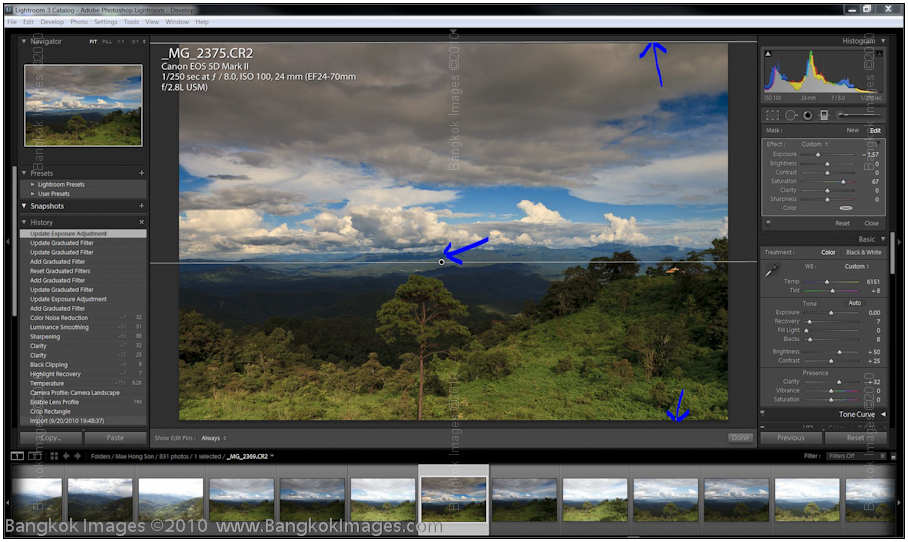
I hear you, now you’re saying “that’s more like it Steve. I love that dark sky. Foreboding and cool!” Yes, it is.. Much more dramatic IMO. But how could we easily make it better? Yep, flip the tool around and bring some light to the bottom!
See how it looks like the sun is peeking out from under a cloud and lighting the foreground? Now you have a darker and more blue sky, a more visible foreground, and a contrast of light and colors that work very well together.
There are more finer touches, but practice with these steps for a while. If you have questions email me and I’ll answer your questions. PLEASE send in some of you work and share with everyone. I know you guys like seeing each others work and this is a great way to share. Or go to the forums and post a picture and ask for a critique. You can even put a selection of images in a user gallery here.
You’ve gotta admit that was a lot of fun and not nearly as hard as you thought it was eh? Practice on some of your images and send them in. It will be a lot of fun.
Photography News of Interest *menu
Intel announces their new Westmere-EX CPU’s, 10 cores 20 threads, 32nm
tech. These will fit in your 1366 socket motherboard so if your motherboard manufacturer sees fit to put outa firmware upgrade you’ll be set.

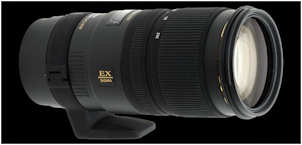
Over atDigital Photography Review they recently reviewed the new Sigma 70-200mm F2.8 EX DG OS HSM lens. To summarize this is Sigma’s best 70-200 yet. It has image stabilization, silent focus motors, and a great price. Is it the 70-200mm for you?
It was only a matter of time before the major manufacturers took advantage of the relatively large sensors capable of HD video recording. Sony did it recently with their NEX VG-20, and now Panasonic announces their new AG-AF100 series movie camera taking advantage of their micro 4/3’s sensors and compatible lenses being used on still cameras.

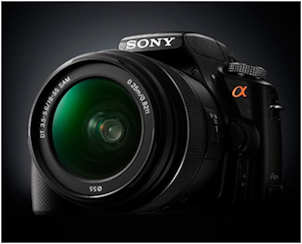
If you’ve been wondering how the new focusing system of the inexpensive Sony A55 is working out,then follow this link
over to the Luminance Landscape and read what Michael Reichmann has to say about this new camera. Michael’s hands-on articles are some of my favorite reads. He’s knowledgeable with cameras and a fine writer as well.
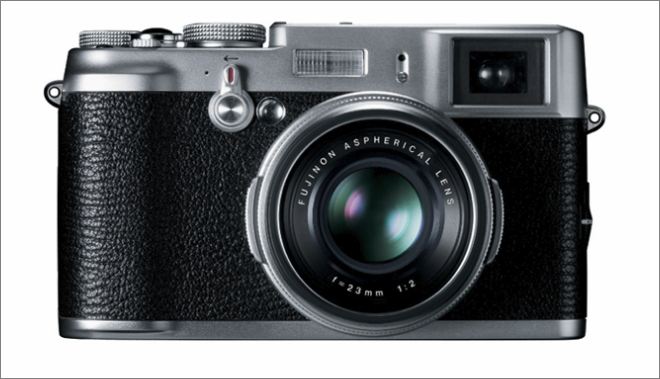
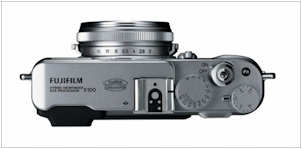
Woo-hoo! On paper this looks to be the best compromise yet between physical size and image quality while
keeping most of the features considered vital by pro users. Fuji announces their X100 with it’s pocket size, APC-S sized sensor, and really fine 35mm F2 equiv lens! We live in good times. Let’s hope this one lives up to its hype.
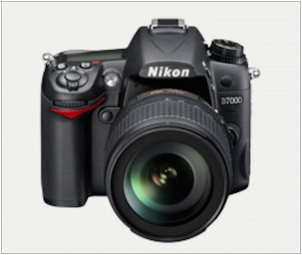
Nikon announces the D7000, a direct replacement for the popular D90. There are many things
to like about this camera with its 16.2mp sensor including its build quality, HD movie capability, great AF and exposure systems, and its ability to take ALL Nikkor lenses ever. Not many models other than the top of the line pro cameras can say
this anymore.
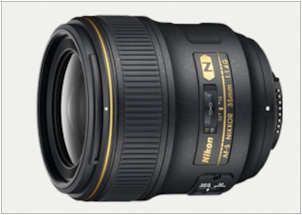
Finally! Nikon has been missing a 35mm F1.4/G AF-S lens from it’s lineup for quite some time. Now we have one!
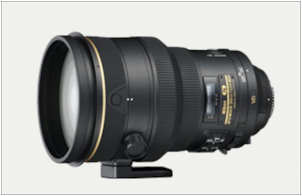
Nikon releases their updated AF-S Nikkor 200mm F/2G ED VR II lens. This is the lens for indoor sports such as gymnastics, volleyball, karate, wrestling and more. It also excels at low light wedding photography and portraits.
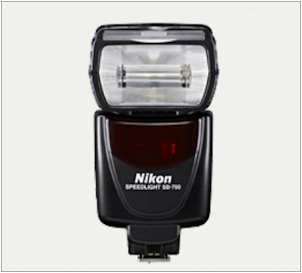
This is a strange one. Nikon apparently felt there was a hole in their speedlight lineup and today announces the SB-700
.
It sits right between the SB-600 and SB-800 and lets not forget the SB-900 and SB-400 making Nikon the undisputed leader of speedlights!
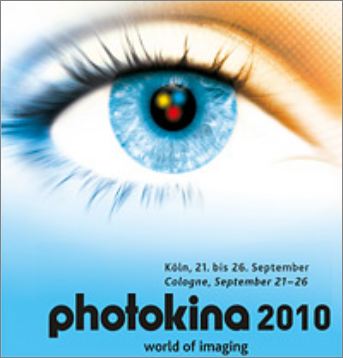
Photokina is happening this week, the largest camera show on earth. There is way too much to list each item with its own paragraph, so I’m just going to list them all here in one big giant run-on paragraph and then link you over to DPR’s excellent Photokina’s coverage for more detailed information. Ready? Here we go.
Sigma DP1x, Schneider-Kreuznach tilt-shifts, Nikon Coolpix P7000, Fuji X100, Samyang 25m F1.4, Corel Coreldraw Suite X5, Olympus compact with a Zuiko?, Leaf’s Aptus-II 12 80mp’s!!!, Casio EX-Z15, Casio EX-Z2300, Casio EX-ZR10, Casio EX-H20G,
Pentax K-5, Pentax SMC DA 18-135 F3.5-5.6, Sony PlayMemories, Sigma EF-610 DG ST Flash, Sigma EF-610 DG Super Flash, Leica X1 in black, Leica M9 Titanium, Sigma 120-300mm F2.8, Sigma 150mm F2.8 Macro with OS!, Panasonic updates firmware for the
DMC-G2 and 14-140mm, Sony due to release firmware 3.0 for the NEX-3 and NEX-5, Panasonic announces a 100-300mm F4-5.6 mega OIS, 12.5mm 3d lens, 14mm F2.5, Adobe announces Photoshop Elements 9, Leica releases V-Lux 2 Superzoom, Leica D-Lux 5 premium
compact, Richo A12 28mm equiv GXR module, Sigma releases SD1 46mp DSLR!!!, Panasonic Lumix DMC-GH2, Lensbaby tilt-transformer, Samyang 14mm F2.8 for Nikon, Samyang 8mm F3.5 fisheye, Aptina CMOS 16mp sensor, Pentax 645D, Hasselblank HD4-31 and
CFV-50 Back, Olympus M Zuiko 40-150mm F4-5.6, Hasselblad HC Macro 120mm-II and HC 50mm-II, Datacolor Spyderchekr Camera Calibrator, Lowepro S&F Modular Carry system,
For more details visit Digital Photography’s Review excellent Photokina 2010 Show Report here.
Readers Submissions *menu
I’m sorry, but there were no readers submissions for this week. As much as I enjoy Biker Bart’s contributions I’m going to cut way back on how many of them I run. The reason for this is I consider the Readers Submissions one of the biggest indicators of how successful this column is.
I put a lot of work into this each week and I love doing it, but if no one is participating then frankly it becomes not worth my time. Sharing is perhaps the most fun and most important attribute a photographer can have, sharing what you see through your viewfinder with a larger audience should have rapt appeal. I encourage you to share and help make this column successful so it will be around a long time.
I suspect the readers submissions will be a highly anticipated section of this column and I encourage anyone with photographs and travel accounts they’d like to share to please send them to me at: info@BangkokImages.com
Readers Questions *menu
Steve:
You recently discussed the Scandisk 30MB/s card in your column and the specifications looked good. It shows on line as having a Class 10 rating. Does that mean it records at 30MB/s?
Rick – I’m going to answer your questions paragraph by paragraph. Class ratings have always been somewhat ambiguous and in some cases misleading. If you look at Wiki they define Class 6 as 6mbps, Class 10 at 10mbps, and so on. Obviously this can’t be very accurate when you have a class 10 card rated at 30mbps. So let’s go to SDcard.org and see what they say. Oh my, they’re even more ambiguous! They’re saying that Class 2 is good for SD video recording, Class 6 for full HD video recording, and so on. I can give you scores of examples why both aren’t accurate.
And guess what? The manufacturers, especially the smaller less ethical manufacturers, really take advantage of this ambiguity to profit from their customers. That would be you and me.
This is why for professional uses when speed matters I’ll only use two brands of memory cards. Lexar and SanDisk. Both have shown a strong record for quality products and total transparency over the years. You can count on the specs they provide. For less than professional uses I might take the time to read reviews from a trusted source on other brands to learn their true speeds, but usually even then I’ll go with someone I can trust.
Another area of ambiguity is if the speed ratings apply to both read and write (record) capabilities. Ideally the speed should apply to both as in the case of SanDisk and Lexar, but often they’ll only apply to ‘reads’ which doesn’t do much for you when your device is trying to record.
Now to answer your questions: The ‘class’ of a SD card is simply a classification which helps consumers easily match a memory card to a device (camera, video recorder, etc) and the speed ratings should be looked at separately. 30mbps from SanDisk, means a read AND write speed of 30mbps.
I use the SD Memory Cards (Secure Digital) in all of my cameras and I am not sure what “class/speed” each of them has.
The key here is to match the capabilities of the device (the ability of the camera to record at its maximum speed) with the capabilities of the SD memory card.
Are they class two, four, six, or eight, at what speed do they record? How would you check the spec’s on these SD’s?
You can’t depend on these classes to determine speed. Go directly to your manufacturers website to look up the individual speed of each card. If your manufacturer makes this information easy to find you’re probably dealing with a good company. Many companies either bury their small numbers under pages and pages, or don’t provide them at all. You can find your SanDisk card speeds at www.sandisk.com
You mentioned the Olympus E-P2 in last week’s column and I reviewed the available information. It looks very similar to the Sony NEX-5 and I would welcome your opinion on which looks to be the superior camera.
This is a topic on debate between professionals in forums all across the internet. I’ll give you my take on this. In general, the bigger the sensor the more image quality the sensor can provide. In general, the later the generation of sensor, the better its image quality. So, a Sony NEX-5 with its large APS-C sensor ‘should’ provide better image quality than the smaller micro 4/3’s sensors in the Olympus E-P2. The difference is significant.
However, there is more to a camera than sensor size. Availability of lenses, placement of controls, build quality, design, firmware for writing jpegs and raw files, and more. Here, the micro-4/3’s genre shows its maturity with many more choices and offerings. I wouldn’t say it shows its “superior”, only that it affords more choices.
However.. you know I’ve recentlymade the Sony NEX-5 my personal small camera. So you know my choice.
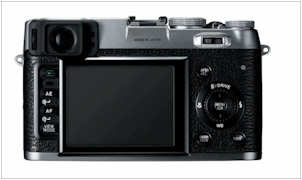
However, however, a recent announcement from Fuji has my mouth watering and fingers itching. They’ve announced (read down in the news section for more) their new Finepix X100, a small camera with an APC-S sensor, a 35mm F2 equiv lens, AND an optical viewfinder in addition to the LCD live view, HD movie mode, and more. It appears to be of a very high quality. The 35mm F2 lens is a very good ‘normal’ lens for such a camera and it promises to be of a very high quality. It’s months away from the store shelves, but it’s enough of a difference to warrant holding off on any purchases to see how it reviews.
I continue the hunt for the best camera that will give me the “pocket fit”. I am beginning to feel I just need bigger pockets for anything other than a camera with 16 or 17 mm lens.
There is a definite size issue with lenses. Lenses that cover a larger sensor need to be larger in size. Small prime lenses (non-zooms) offer smaller sizes, small enough to make them ‘pocketable’ to a degree, fast speeds, and better quality. Zooms tend to be large. There will always be trade-off’s, but if your goal is size then a trade-off that gives you a smaller size and higher quality at the expense of convenience (zoom) seems like a good one to me.
When I send you pictures for the column, I was concerned about only sending those that had not been adjusted using one of the photo editing programs. I felt that perhaps I was cheating by sending pictures that had not come straight from the camera. Then it dawned on me that by using the camera’s various functions to change what I saw in the viewfinder was doing the same thing. If all we wanted, was a picture as the eye saw it why not use an $8 disposal camera.
Your comments on this deep philosophical question please……
This isn’t as deep as you might think. First, most cameras cannot and will not capture the scene as your eyes see it. There is always the difference between the amount of dynamic range your eye can see, and the camera. Huge profound differences.
So, as a photographer we’re usually trying to change the settings on the camera to ‘get as close as possible’ to what the eye sees. And then we process the image to make it even
more close.
Wait, hold the phone, there’s another possibility. Photography is an art. So we also use the settings on the camera and process the image to match what’s in our mind.
These are the two most common possibilities. And there is more. I wouldn’t limit yourself. If you feel like sending in unprocessed images then please do. They’ll represent what you wanted us to see. If you want to work on them and then send them in, great. They’ll also represent what you wanted us to see. You’re the artist, you’re in the drivers seat. Take us for the best ride possible.
Thanks again for making my Friday evenings exciting as I await the new column. (Not the same as when I was single on Fridays in BKK.)
Trickster
Thank you Rick. My privilege. I very much enjoy making the column each week and trying to find what I think will be of interest. And it’s a real boost to me when I get such thought out questions as yours. I also greatly enjoy when a reader sends in images to share. Take care and let me know if you have more questions.
Steve
Please submit your questions to info@BangkokImages.com All questions will be answered and most will show up in the weekly column.
A Snapshot of Bangkok Images Week in Review *menu
![]()
This week there were no workshops because I was on the road the entire week. And what a great week it was! We’ve continued fine tuning our website Bangkok Images and solving a myriad of issues left over from the initial build. We’ve updated our blog and gallery software and will soon be implementing new features and much more.
Mae Hong Son was really great and you’ll see some articles and images appearing in this column over the next few weeks. Really, I can’t say enough how much I enjoyed this trip. It’s a place that should be on everyone’s travel list.
The “What’s New” area of our site continues to grow in popularity and the numbers are growing. The forums could use more activity, so if you want to meet more like minded photographers or just ask a question check them out. We try to update the What’s New page several times a week and provide either an interesting new image or something of interest. Check it out to keep track of Bangkok Images exploits and commentary throughout the week.
Still a ton of hardware and software reviews being formed Please be patient, we have a lot coming and only so much space in the column each week to post it.
BREAKING NEWS.. Today I went to Pantip Plaza to pick up the best “reasonably priced (under baht 10,000)” “locally available” monitor I could find. I know you guys don’t want to spend a fortune on monitors like the pros do, you want a good every day monitor at a reasonable price, a monitor which can be properly profiled and be great for hobbyist purposes. Looking over what was available very carefully, referring to my laptop and reviews online during breaks, I finally went home with a new monitor. It’s still sitting here in the box, I’ve been too busy completing this column in time for tomorrow to even open the box. Next week I’ll let you know if I keep it, or return it, and what monitor it is!g, It’s In The Eyes
Infocus Blog, It's In The Eyes *menu
I spent some time recently with someone who had been reading this column and watching my work for some time. I’m always surprised (and delighted) when I learn someone likes my work because for the most part its very ordinary. Yet,
this person told me there was something in my images which consistently captured his attention so I asked him what images, and asked questions to learn what it was that compelled him to look.

Canon 5d Mark II, 85mm F1.2L USM, @F1.2 1/250th ISO 400, Captured by Workshop Student
After some thought I determined he felt “engaged” with my images. Every image he showed me had eyes.. and the eyes were IMO engaging. Was it all in the eyes? Looking back at my workshop curriculum and articles here in this
column I certainly teach to capture the eyes. I work hard to ensure they achieve critical focus on the closet eye, and as much as possible the eyes are conveying a feeling.
Canon 5d Mark II, 300mm F2.8L IS USM @F4 1/250th ISO 100
And ‘eyes’ aren’t limited to humans. Eyes make or break an animal shot as well. Animal eyes can show dominance, happiness, irritation, or any emotion a human eye can show. The trick is to match the pose, the look
in the eyes, and the image together.

Canon 5d Mark II, 300mm F2.8L IS USM @F4 1/800th ISO 100
How about concentration? Sure, eyes, even animal eyes, can show intense concentration and feeling. Even rutting behaviors become apparent in the eyes.

Canon 5d Mark II, 300mm F2.8L IS USM @F5.6 1/250th ISO 320
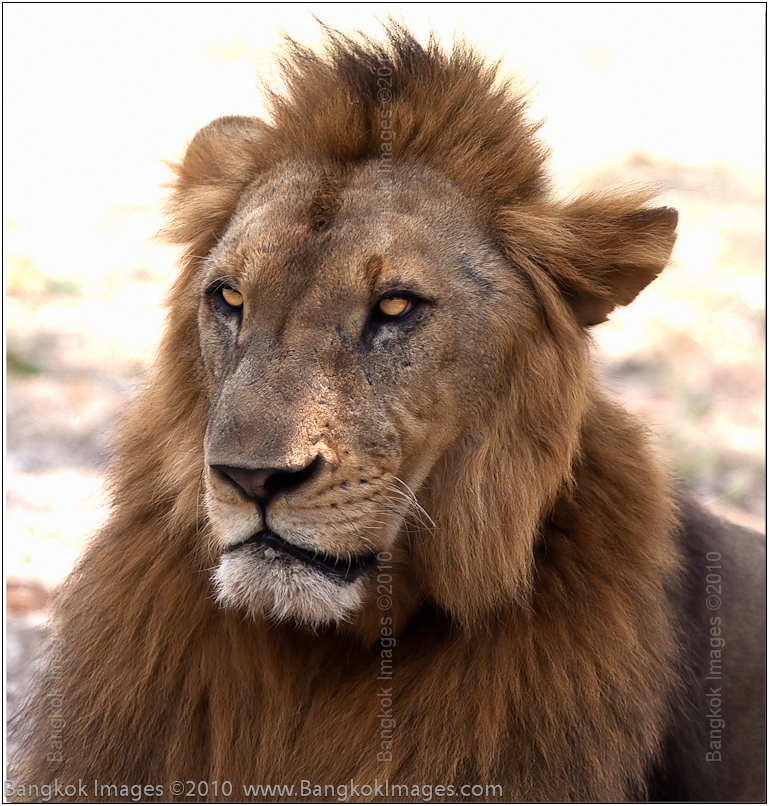
Eyes can also show a feeling of superiority. You get the “I can eat you if I want” look from some animals as clearly as if they sent you a telegram!

Canon 5d Mark II, 24-70mm F2.8L USM @F8 1/100th 70mm ISO 100
Laughter or mirth is another emotion you’ll see in the eyes. A feel good emotion easily identified. And it helps that you’ll see facial signs at the same time.

Canon 1ds Mark II, 85mm F1.2L USM @F2 1/250th ISO400
Happiness? Sure. The innocent happiness of a young child is easily identified and captured and will engage the viewer in a huge way. Some images relay this feeling so well you can actually feel good inside just viewing the image of a happy child.

Canon 1ds Mark II, 24-70mm F2.8L USM @F11 1/80th ISO 100
Sultry? Sexy? Of course. It’s possible to capture eyes that reach out and pull you right in. Eyes that you’ll remember long after you’ve drifted off to sleep.
There are many small details and settings you need to pay mind to when making a compelling photograph, but no detail is more important than the eyes. Capture the eyes well and the image will make itself. It’s said that most communication happens
through the eyes, so it should come as no surprise you can capture that communication with your camera. What are your eyes telling us?
Until next time..
![]()
