Wat Pho (Reclining Buddha)/Photographing Temples WIDE
![]()
|
• Golden Tulip Hotel Bahrain • Gulf Gate Hotel • Metropolitan Hotel Bahrain • Regency InterContinental Hotel Bahrain |
Feature Photograph
One of the most popular types of photography readers show an interest in is a genre called “street photography.” Or maybe it’s better classified for our readers as “people photography.” If you consider that most of the readers are coming to Thailand to see a new and interesting country and its people this makes a lot of sense. The “exotic” part of Thailand is most often its people, and to a lesser extent its temples and other location attractions. We’ve hit on portraits lightly, but just enough to transfer the most germane techniques to street or people photography. In the coming weeks I’ll be covering Thai weddings, real street photography, and photographing Thailand’s people in general. Stay tuned..

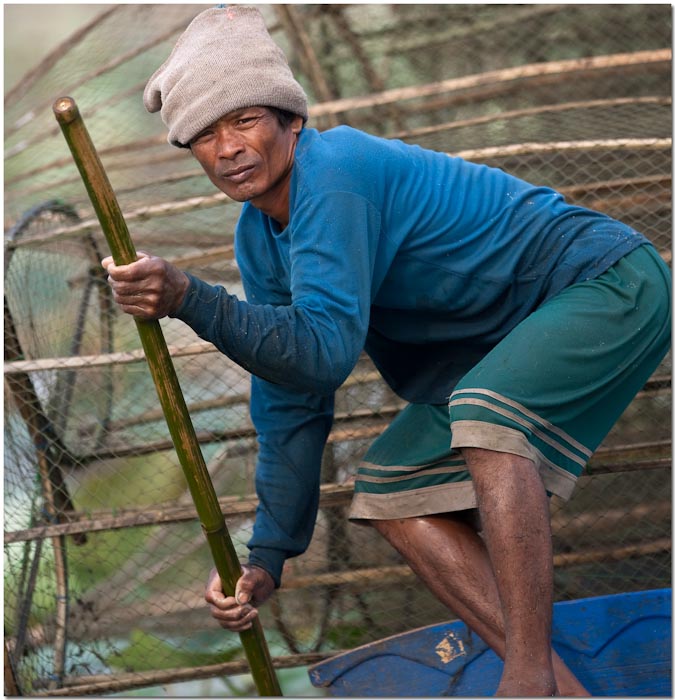
This image is significant because it’s a good representation of photographing Thailand’s people. Taken from afar with a long telephoto lens the fisherman was totally unaware his picture was being captured. For all he knew the farangs floating in the boat several hundred meters away were shooting the birds around him as they’d been doing all day. Yet, one look through the viewfinder instantly showed me the concentration and determination on this man's face as he used a push pole to push his 8 meter long boat filled with fish traps among the floating plants. He worked at this for a long time pushing his boat past hundreds of meters of plants so as to not harm them or foul his propeller before coming clear and motoring home as the sun set behind him.
When photographing people you need to decide if you want to just show the person, or show the person and their story at the same time. Far too many very good photographers I know show the faces, or heads and shoulders, and they let the face stand on its own with no story. Good street photography shows the person and the story behind the person. It’s not good enough to just show a person unless she’s a stunning beauty or an very unusual character of some sort.. and lets face it, to most farangs most Thai people are unusual. So the pictures all start to look the same.
Show enough around the person to tell their story, what they do, how they do it, and how they fit in their environment and NOW you have a good people picture. In the image above you get the man, the determination, the effort, him doing his job, and some trappings of his job. You get the man.. and the story. The essence of people and street photography.

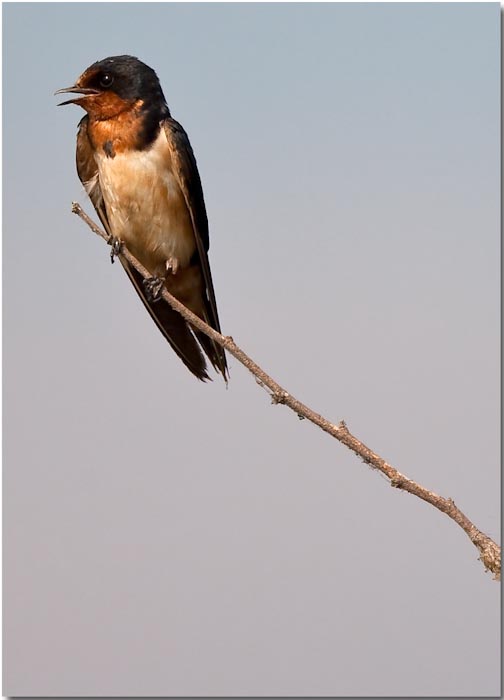
What were the other photographers in the boat shooting? This little character is very nicely presented in this image for people interested in birds. I look at it, shrug my shoulders and think “okay, nice shot of a bird”, and immediately want to move on. Actually it’s a very good shot of a bird if you realize how far away he was (25 meters) and how small (2-3 inches) he was. But no matter how good, for my tastes, it just isn’t in the same league as the fisherman above.
Wat Pho (the reclining Buddha)
Wat Pho is perhaps best known as being the recognized learning center for traditional Thai massage. Students come from all over the world to earn certification in Thai massage and carry the knowledge and techniques back to their own country. Wat Pho is directly adjacent to Wat Phra Kaew where the Emerald Buddha and Grand Palace are located in their own compound. Wat Pho also features the largest stand alone Buddha figure in the Kingdom, The Reclining Buddha.
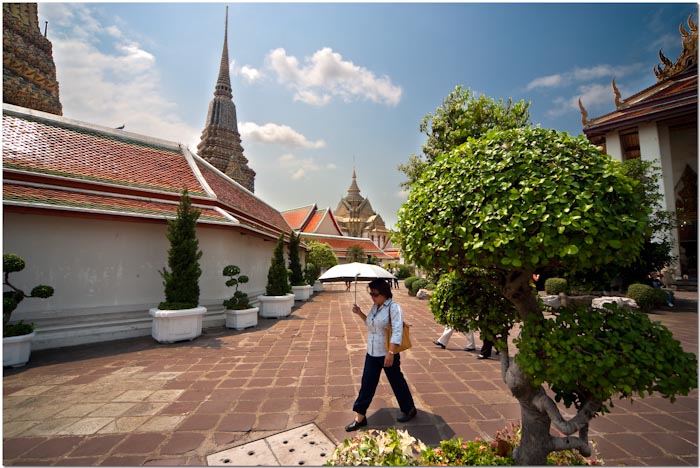
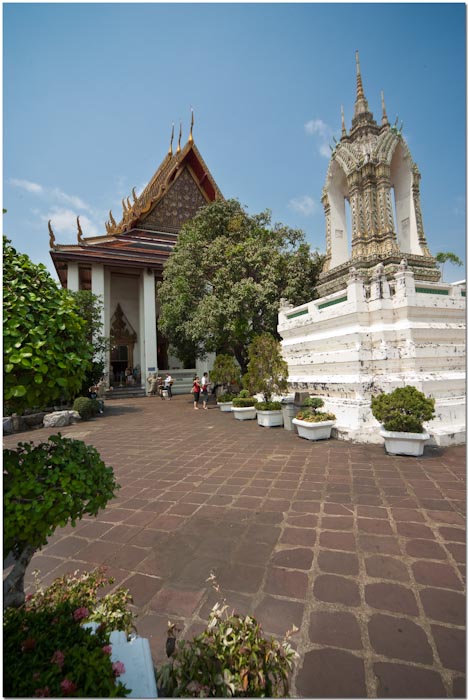
As you enter the gates from the parking area you’re greeted with a beautiful compound filled with temples and structures. Sculptured trees and bushes are everywhere. Vivid colors and complex designs abound.


From the perspective of a photographer you’ll want to carefully note every structure, color, texture, and pattern as you make your way through the complex. Great photographic opportunities are everywhere. The more time you take to study the area, the better the chance you’ll find an uncommon and interesting perspective which hasn’t already been captured a million times before.
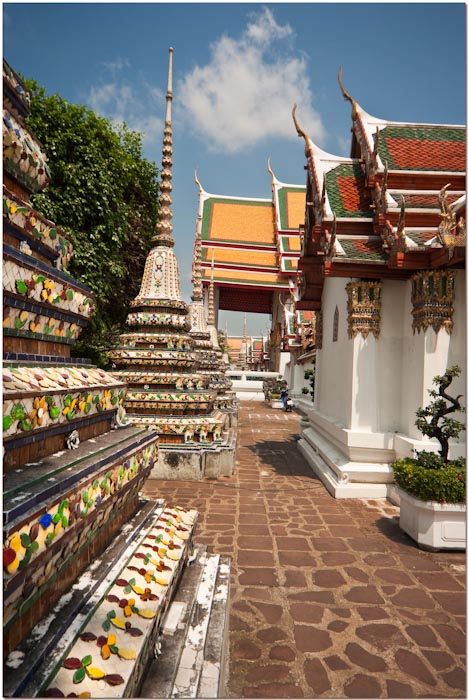
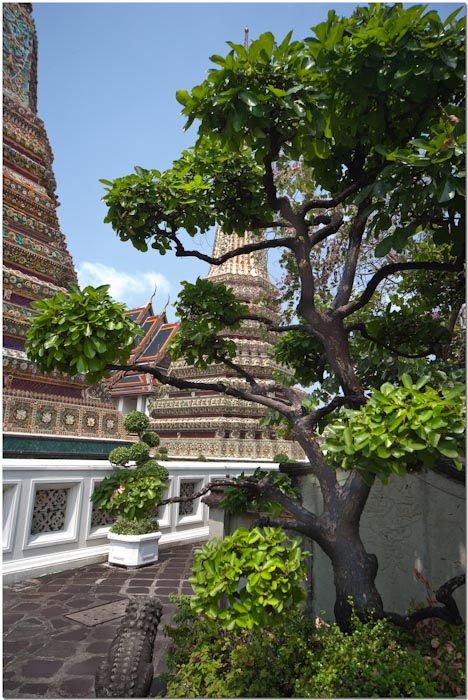
I especially enjoy the sculpted trees and bushes.
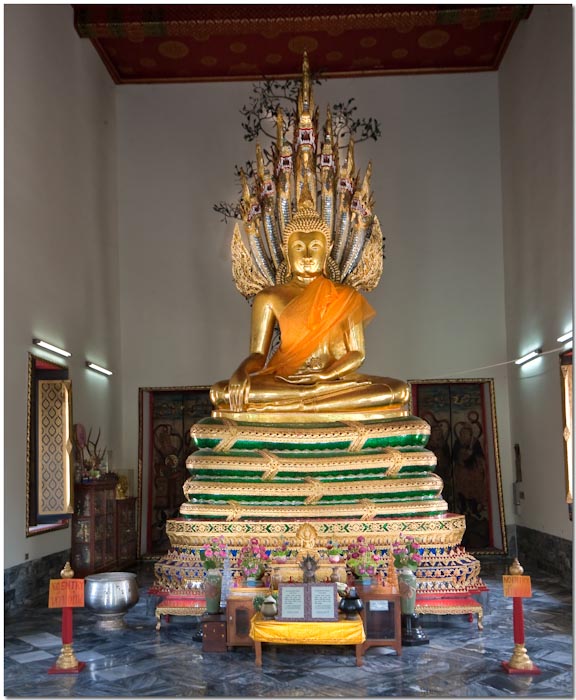
It’s often not even necessary to enter a structure in order to effect a good capture of the main attraction. This Buddha shrine is situated in a small room and if you actually go inside the structure and approach the shrine you’ll find yourself needing a very wide angle lens. From the door way an actual 24mm (35mm equiv) lens was needed and it must be a good one to avoid distortion. If you step inside the structure you’ll find yourself needing from a 12-18mm (35mm equiv).
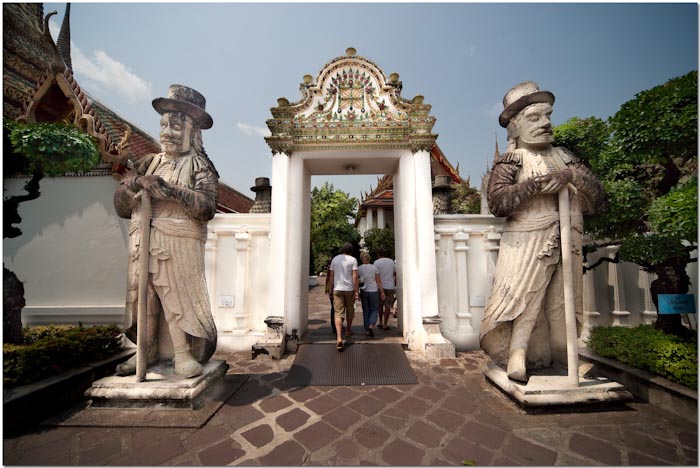
These two extra-large leprechaun looking statues are not of Thai origin. Centuries ago ships from China required heavy items to act as ballast and keep their boats from tipping and wisely they also wanted the ballast to be able to trade as commerce or have some function. They loaded a couple of these characters aboard as ballast and then used them as gifts to their Thai hosts.
Last week I mentioned that it was hot. How hot was it? My hand held kestrel showed 44c! 48c if you take into account the humidity. This was hot enough to bake the clay tiles and bring out umbrellas to shield the locals from the sun.
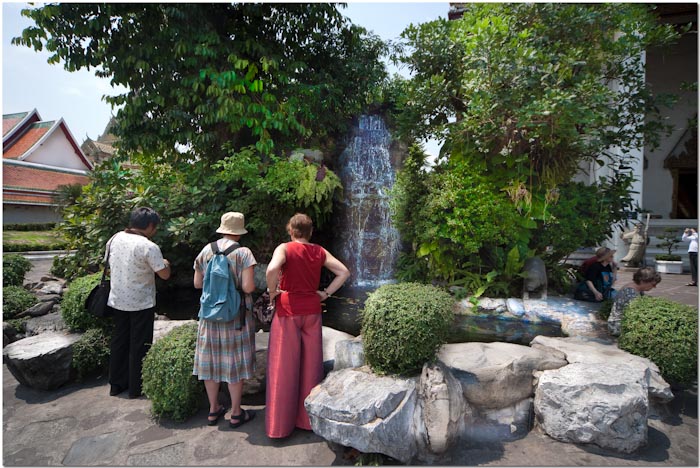
I didn’t understand the full story concerning this fountain, but I did make out enough to know it has magical properties.
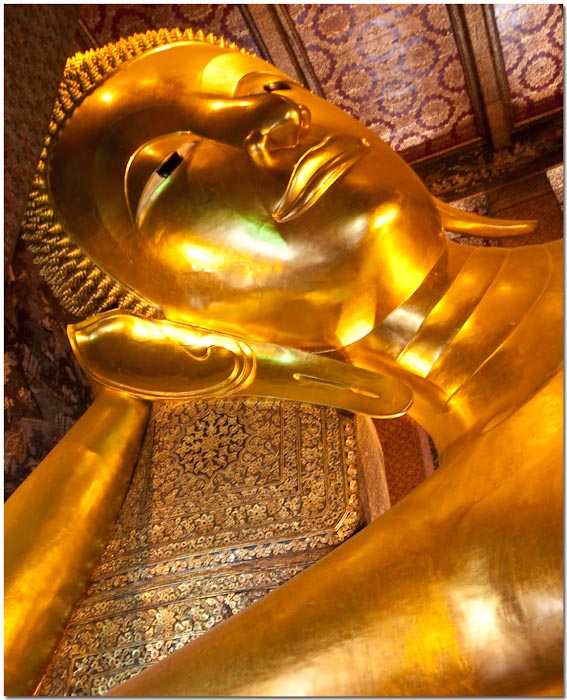
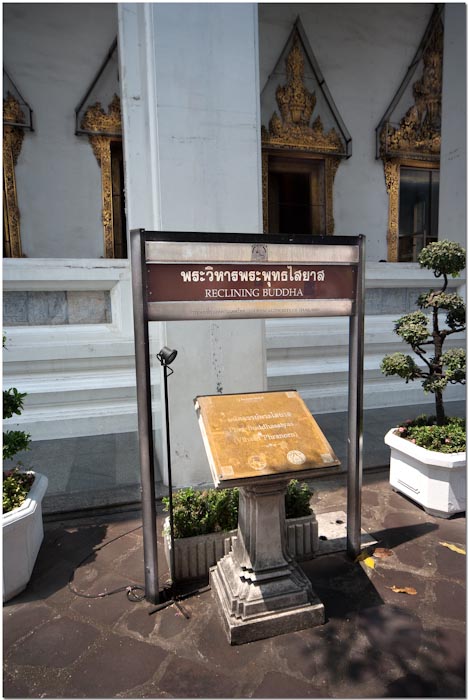
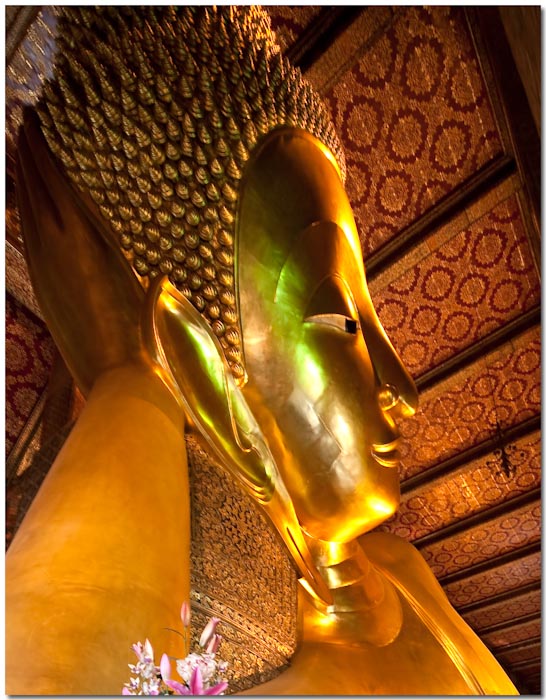
And finally we make it outside the temple that houses the Reclining Buddha, deposit our shoes, and enter the structure along with hundreds of others.
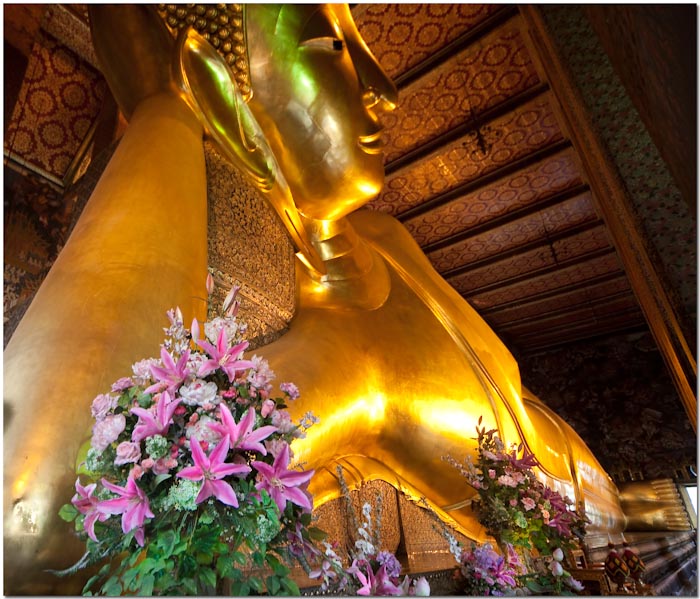
The first view you’ll see is from the head. Flowers are placed on the shrine near the face, and the feet are quite a ways down. Everyone had some sort of camera. Most had the common point and shoot compact which I’m sure captured some quality of image, but a surprising number of local Thais were there with the small Canon 450tsi (Rebel) DSLRs. Using their pop-up flash and 18-55mm (29-88 35mm effective) kit lenses they seemed very keen to capture as many shots of the big guy as they could.
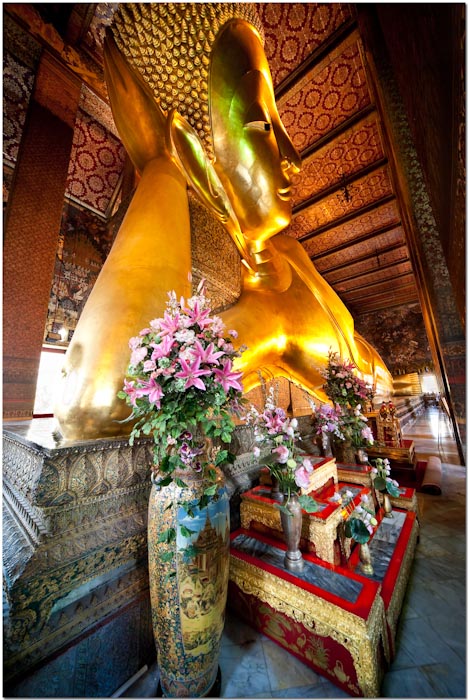
Notice how the sunlight filters in through the many windows and gleams off the gold patina? This beautiful natural light provides exactly the look the original designers of the temple/Buddha intended the viewer to experience and I wouldn’t think of violating this beauty with any sort of “pop-up flash” or any artificial light whatsoever.
I had brought along a tripod in order to get the best natural light captures possible, but it turns out it wasn’t needed. Shooting at 12mm through 24mm I was able to handhold the shots at ISO 200 through 400 by simply bracing my elbows on the wooden barrier which was conveniently at the perfect height for a six foot tall man to use for such purposes. I had to smile as the ever friendly and helpful Thais (and several Japanese) approached me and told me I was sure to get terrible pictures because I wasn’t using a flash.
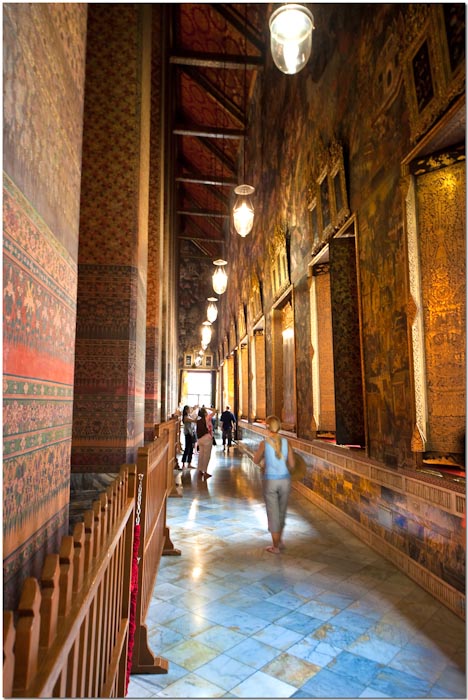
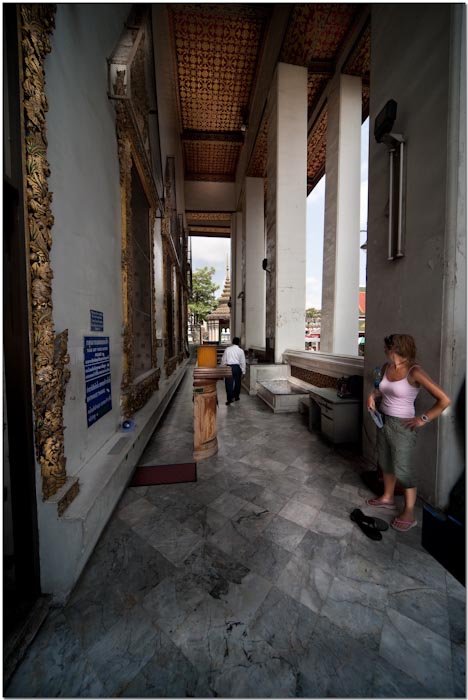
In this image you can see the wooden barrier I braced on, and the long walk down to the end of the temple where the Reclining Buddha’s feet are located. Notice the colorful patterns on the walls? Also notice the perfectly balanced exposure that let me capture the bare light bulbs so you could see the filaments inside, vs. a bright blown out ball? Details count. It also helps in such shots to use people for scale. Try not to let any get too close, but by having a person 10-20 meters away, and then more 30-40 meters away, it shows scale and the depth of the temple.
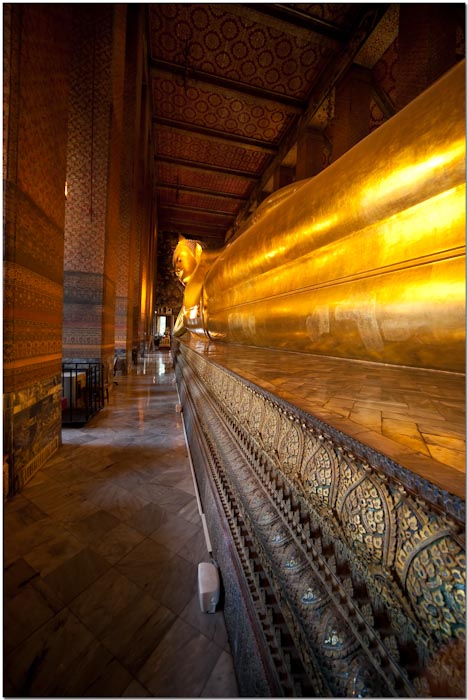
The feet/toes are directly behind me at this point. I’m once again bracing on the wooden barrier looking down the full length of the Reclining Buddha. I angled for the best reflection of light along the base possible, which shows the intricate patterns and scroll work.
A few meters from the feet is the exit door and the hot sun awaits. Here you can collect your shoes and wait for the others in your party to finish up.
I really enjoyed photographing Wat Pho. Even though I ended up overheated and passed out, it was a remarkable experience. I’m not thrilled with most Thai temples and find them boring. Wat Pho was different. It is very nicely done, well maintained, and items of interest are everywhere. More, there are many unique photographic opportunities sure to keep you busy and smiling at the same time. You’ll certainly want to add Wat Pho to your list of attractions to see in the Bangkok area.
Photographing Temples WIDE
In this learning topic I’m going to lightly cover what to look for when photographing temples and a couple of the most common errors.
Lets be honest, everyone and their dog has photographed Thai temples. If our intention is to share our images with others then we’ll want them to be interesting. If the images look like the millions of others then interest levels will wane quickly. We need to present perspectives and views that are not only not common, but executed in such a way as to bring interest to the image. One way to help accomplish this is to use a “ultra-wide” angle lens. All of the images captured of Wat Pho above, and in this learning topic were captured with a 12-24mm full frame lens. A full 12mm which is the widest rectangular lens available for DSLRs period.
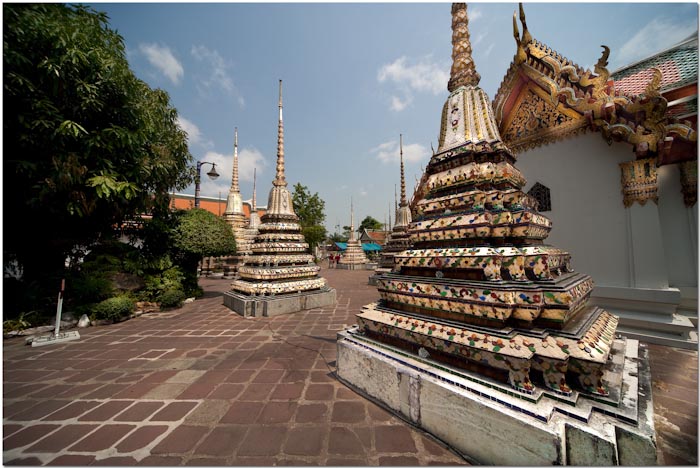
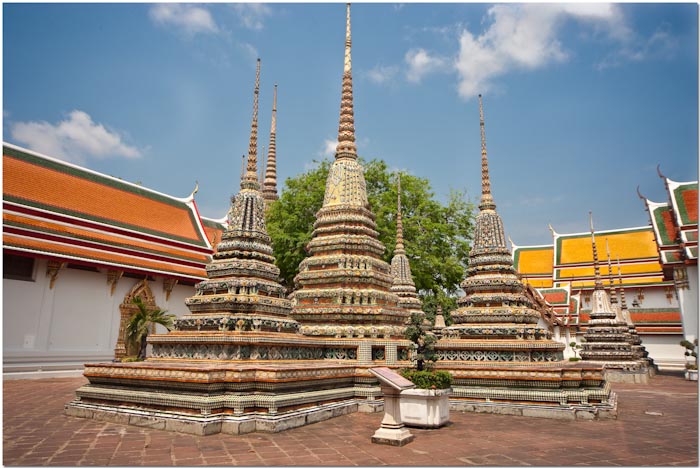
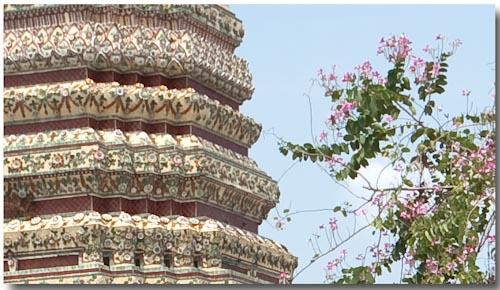
Above is an example of what we should be looking for. The nearest spire is much closer than it looks in this image due to the 12mm focal length. My foot is actually resting on the white base border! The lens is about two feet from the corner. This is the fore ground. The next spire is the mid ground, and the rest is back ground. We have all three planes covered and much between. At the same time we have plenty of colors, textures, and patterns and we can even see the pathway we’ll be walking straight down the middle of the frame.
This image is critically sharp from the nearest to the farthest element. If we print this image at 20×24 or even 24×30 every element will be in focus and interesting across the frame. Let’s look at a few 100% crops to see what we’d see on a very large print.
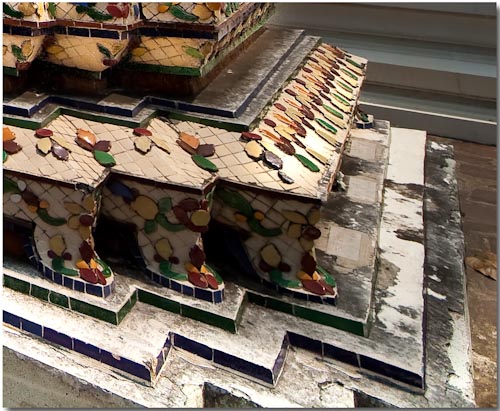
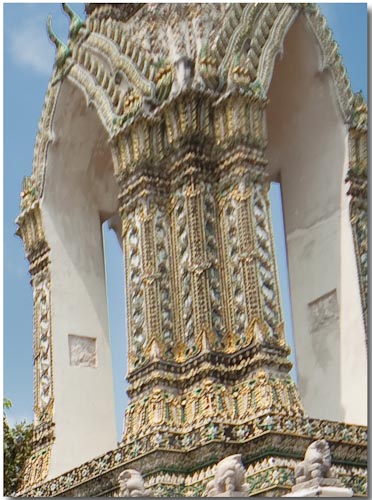
See how sharp each piece of decoration is? You can clearly see the texture, colors, and detail right up to the very right front corner of the print.
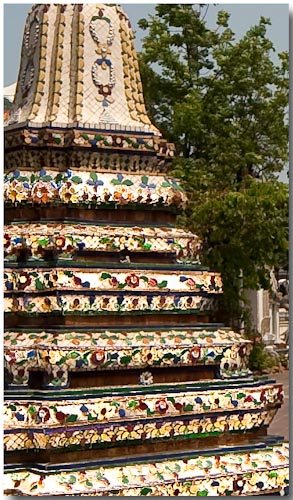
This is from the mid ground and exhibits the critical sharpness necessary for a large gallery print. We would see this much detail even if the print was close to 2 meters wide!
The above image is hiding a very common error. At first glance you can see we have our three planes of interest, a properly exposed sky, and all contents of the frame are also perfectly exposed. At first glance it’s a very strong and interesting image. At this size and even at sized of up to 8×10 most people would be very satisfied with this image. But..
Can you see the blur at this magnification? This is the blur you’d start to see at 11×14 and it would be very noticeable well before 20×24. You see tons of images with this type of “camera shake” induced blur in galleries everywhere. Critically sharp images are much more rare and much more useful for publication, the making of large prints, and further cropping.
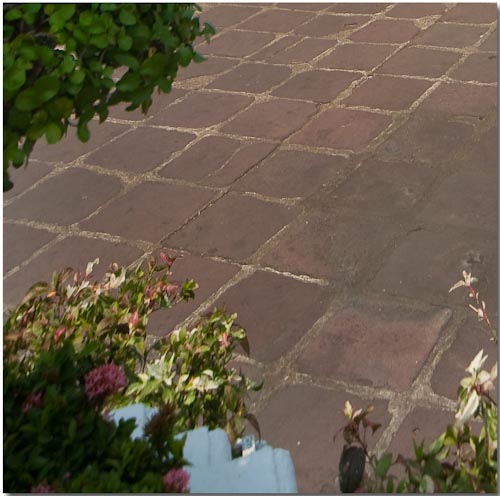
This is from the lower left corner and exhibits the same camera shake induced blur. There really was no excuse for this blur, at 18mm and 1/200th the image should have been critically sharp. However, this is what you’d get from the great majority of photographers because they haven’t yet learned the proper technique for making critically sharp images, and frankly they’d be happy with this shot. It doesn’t take that much more effort to do it right. You use the same equipment, same shooting location, and even the same settings. It’s purely a matter of technique and practicing this technique.

At first glance I loved this shot! I was thrilled with the figure in the fore ground (8 inches from the lens) and the perfect light on the figure, and the balanced exposure throughout the frame. There really was no ‘defined’ mid ground but the single tree and corner of the building does nicely. The pathway we’d walk is defined and your eyes follow the path right up behind the people walking.
However, this image illustrates another common error. Lets look at the first crop of the figure.
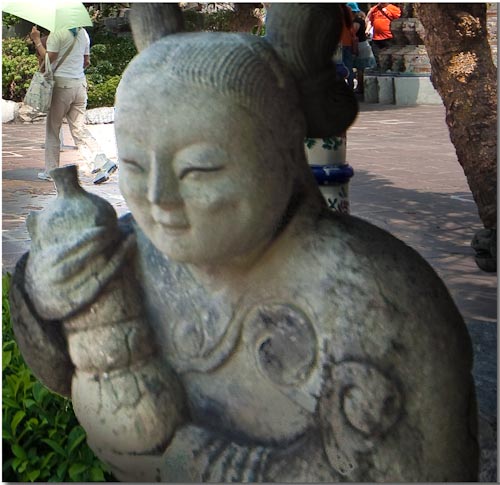
Can you see how the figure is not critically sharp? Printed to a large size this image would not be acceptable.
This crop reveals that the entire frame, except for the figure, was critically sharp as intended. It’s just that the figure was slightly out of focus!
How did this happen? My 12-24mm lens has a minimum focusing distance very close to the eight inches I was holding my camera away from the figure. What I do for such a shot is to first decide my composition, set the aperture for enough DOF from the fore ground to the background, and then lean into the fore ground element as close as I can get and still have it in perfect focus. Often you’re right on the edge of your minimum focusing distance. In this instance I must have shifted forward just a bit as I pressed the shutter release. The image was ruined!
Fortunately I employ other techniques just in case something like this happens. One of these techniques is to take a burst of shots with each press of the shutter release. 3-4 shots are captured instead of one, in well under a second. Usually, one of these 3-4 shots will be sharper than the others for a number of reasons. In this case, one of 3-4 shots was perfect, the rest looked like this.
Photography News of Interest
This is one you won’t want to miss! PIX 2009 is said to be the biggest photographic equipment display in Asia and this year it will take place at the Siam Paragon from April 1st through April 5th. They’re estimating over 500,000 people and 1 billion baht spent. There will also be some exhibits like “The Early Photographic History of Siam”
and even some workshops where you can learn new techniques. If you read Thai you can read more about it here.
I’ll see you there!
There will be a much smaller event from March 27th through April 6th at the Central World Powerbuy. Perhaps you can find some good sales?
This is an interesting site. (Here you can compare the available and prices of all types of camera gear sold in Thailand.Canon’s unexpected announcement of a new EOS 500D/Rebel T1i DSLR will be much appreciated. This new entry level DSLR will feature a 15.1 megapixel sensor and full 1080p video in addition to many other great features including a top ISO of 12,800 and the ability to shoot 170 large JPEGS without overrunning the buffer. You can check out their press release here or the preview here.
Canon also announced a new mini-speedlight that I’m sure will thrill many. It’s very small and portable, pocket size for certain. Much smaller and easier to carry around as a matter of course than their larger 580EXII’s. This is exactly what many professionals have been asking for, a small powerful and very useful speedlight which you’ll actually carry with you because it’s so small! I know I’ll be getting one the minute it’s available. You can read the press release on the Canon Compact Speedlight 270ex here.
Readers Submissions
Hi Steve
Hope you're feeling better.
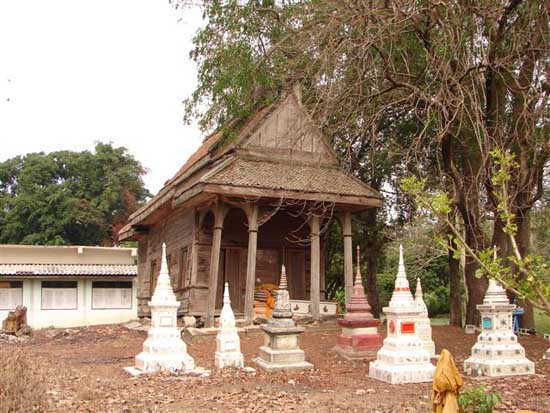
This is a photo I've been meaning to take for ages; I haven't come this way for some time. It's of the old temple chapel that has been replaced with a new cement one. Towards the right you can see part of the old crematorium as well. The 'chimney' and walls have been removed.
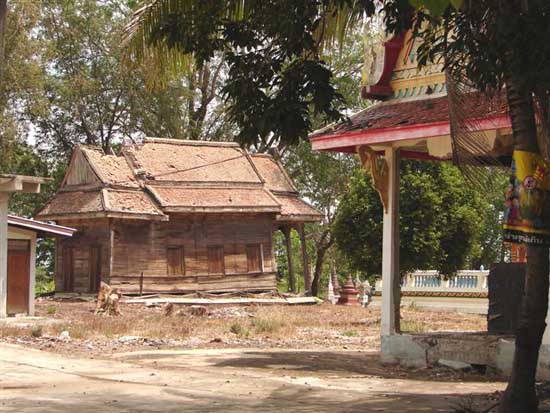
The temple is off the beaten track in the middle of rice fields on the way to Baan Mi. Sadly I missed a picture of a cat quite happily ensconced in the lap of one of the monks during prayers. The camera was in the car as I didn't expect to use it.
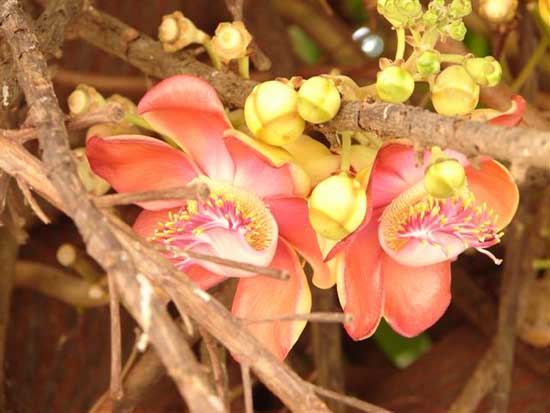
The flower is from a large tree on the temple grounds, and is dried and used as a cure for high blood pressure.
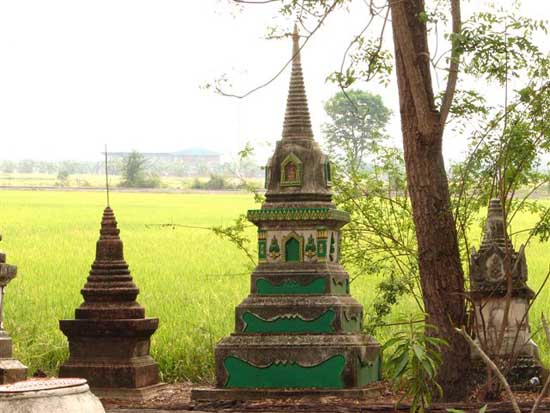
The other pictures show a view from the back of the temple overlooking the rice fields, and the last is another view of the chapel. This was a rush shot as prayers were just beginning in the main temple hall.
The photos were taken with a Sony DSC H1.
Cheers
Sick Water Buffalo
Sick Water Buffalo –
Thank you! Very nice photos!
Steve
I suspect the readers' submissions will be a highly anticipated section of this column and I encourage anyone with photographs and travel accounts they'd like to share to please send them to me at: QandA@Bkkimages.com
Readers' Questions
Hi Steve,
I am in Taipei now. It’s okay here, but nothing special. The Chinese are unexpectedly friendly here though. Almost restores my faith in them. Anyway, today I did something extremely dumb and managed to get two little specks of spit on the sensor of my camera. At large apertures they fortunately don’t show at all, but at small ones they obviously do and really look nasty. I’m thinking removing dust is already a hassle but doable with the proper equipment, and the G1 does have a pretty good dust buster installed already. But how about liquid? Do you have any idea what I could do about that? I guess the only choice I have is try to find a good photography shop that also services cameras here on Monday and ask if they can help me real quick with this, as I’m leaving on Tuesday. This sucks! How freaking stupid of me. Check out the attached picture to see what I am talking about. Any idea…?
Have a good night there!
Akulka

Hi Akulka –
To make it short, there are two options.
- 1. Learn to do a “wet clean” and go buy all the supplies to do it.. (not recommended, I can do it for you but if you’re in Bangkok then you might as well do option 2)
- 2. Take it to a service center.. and I mean a factory service center and not some camera shop. This needs to be done exactly in the right way with exactly the right chemicals. Taiwan I’m sure will have one if you care to look it up.. probably a walk-in service like Canon has here. I’m not sure if Panasonic has a camera repair center on the same scale as Canon or Nikon.. but I could find out.
- 3. Spots are something DSLR users live with ALL the time.. period.. we always haves spots.
- 4. Try this.. At more open apertures (F1.8-F5.6) take some pics.. you probably won’t see the spots. Now, stop it down to F8-F16 and watch the spots appear. DOF is a factor even with spots.. ;o) Maybe you can use this information to avoid some spots..
You could also FedEx/DHL/UPS it back to me here.. and I’ll get it done and send it back to you.
Also.. these spots are VERY easy to fix in Lightroom and Photoshop. Because the spots are in the same location (as spots tend to be) you can do one fix and then cut & paste the fix to all like images in Lightroom. In other words, don’t worry about it and just live with it until you get to a repair center.
Steve
Hi Steve,
Thanks for the information and tips. Playing around with the camera yesterday night I already found out that despite the size of the spots it wouldn’t be an issue at lower apertures. Still it bothers me a lot! A full size jpeg with the spots is attached.
I don’t think there is a dedicated Panasonic service center anywhere here in Taipei. I found out about an area that has lots and lots of camera stores and supposedly some that are exclusive Panasonic dealers. I’ll head there tomorrow morning and talk to them about this. I have read some online manuals on wet cleaning by now and am also considering to give that a (very careful) try. Not sure…
Akulka
Akulka –
YIKES!!!!!
I thought the original pic you sent me was a full size crop of regular spots.. these are monster spots and basically make the camera unusable from F8 and beyond..
RUN don’t walk.. to your nearest camera repair center and have them wet clean your sensor.. and please, no more spit..
The fluid they should be using is Eclipse2 and they should be using a tool called “sensor swabs” from here.
And no.. it’s not nearly as easy as it looks.. it’s damn hard to get it right..
I’ve never seen anything like this.. never..
Steve
Hi Steve,
Fortunately I managed to resolve the problem for good today. I went to that area of which I was told has all those photo shops. A friendly shopkeeper guided me to a little hole-in-the-wall camera repair shop next door who dealt with it right away, very professionally, and totally free of charge. Very nice! I am happy! Thanks for offering to put me in touch with Fanny. I am leaving Taiwan tomorrow morning though. I could have easily spent more time here, as I quite enjoyed my stay. Sure seems you are keeping very busy too!
I will probably not have internet access for a week or so now as I am off to quite remote areas. Again, many thanks for all your help with this!
Akulka
Akulka –
I’m glad you got it fixed. If you don’t mind I’m going to use your emails in the Readers Questions area.. or at least parts of them..
Enjoy your time exploring!
Steve
Please submit your questions to QandA@Bkkimages.com All questions will be answered and most will show up in the weekly column.
A Snapshot of Bangkok Images Week in Review
Photographically a slow week. I continue to design and plan for a new updated website. I hope to have this project completed and the new site on-line by the middle of April. Maybe sooner.
This week was spent upgrading my IT infrastructure. New anti-virus and security software needed to be installed on six PCs, repaired monitors profiled and placed back on the workstations, one laptop repair, and one NAS server storage drive repair. This sort of thing is very time consuming, but the sort of thing you want to keep up on so in the event of a major equipment failure or even a virus, you’re well prepared.
Infocus Blog
Welcome Home Old Friends!
Some things you just don’t know how much you’ll miss until their gone. Such was the case with my professional imaging monitors that went bad several months ago. I blogged about them then when the rest of my system was crashing around me.
I took both monitors into a Viewsonic Service Center hoping for a quick and inexpensive repair. This wasn’t to be.
One monitor was turning itself off after a few hours use due to heat problems. This was eventually repaired but it took over two months to order in the parts because it was an discontinued model. The other monitor had a display which had dimmed with age and I couldn’t achieve the desired luminance. This turned out to be the biggest problem.
To summarize, LCD monitors dim with age. The common repair is to replace the LCD panel and in this case the estimate was baht 22,000. Below the original cost of these monitors, but almost what a replacement would cost today. A less common repair is to replace the CFLs, which are like very thin and short fluorescent light tubes and the rectifiers which run them. This would run about baht 6,000 per monitor for the parts, the labor I’m not sure.
I decided to bring both monitors home, the repaired one and the one which had gone dim. Both run side by side and I spend many hours per week processing images on these monitors. They must be profiled correctly or what I see on my monitor probably won’t be what other people see on theirs.
When profiling the monitors you have choices of luminance values, gamma values, and white point values. After much research and experimentation I discovered that the dim monitor was dim with a white point of 6500, but would meet my luminance level needs at a white point of 5500. This is totally workable, but it would take some adjusting for my eyes. Most people would never see the difference, but when you work with this stuff every day you notice.
I could have also just replaced the monitors with new ones. Unfortunately there are no monitors I like more than these for under $2500 USD’s each. And, there is some new monitor technology not yet on the market that promises to offer huge advantages over what’s available now, but it will be another 10-18 months before they’re readily available.
Considering all of the above I decided to get used to the new 5500 white point.
I spent several hours carefully profiling the two monitors which I use side by side on a special dual monitor VESA compatible stand. Two 21.5” 1600×1200 monitors mounted in such a stand are extremely useful.
By the end of the evening I had both monitors back and line and the workstation at 100%. I couldn’t believe the difference over the standard type LCD monitors I had been using as substitutes.
The difference is so huge, that I actually spent until the wee hours of the morning looking at many of my favorite images. On professional graphics monitors they look many times better, show much more of the true color gamut, and are much better balanced.
What Is a Color Gamut???
I get this question from time to time because most people don’t understand what a gamut is and how it applied to their LCD and photography.
I use this analogy:
Look at a gamut as you would a box of crayons. Some boxes have 256 crayons, some 128, some 64, and some 24 or 16.
The standard gamut used on the World Wide Web is SRGB. This is the standard gamut most people set their monitors to, their cameras to, and see on the WWW. SRGB is like a box of 128 crayons.
There are other gamuts much closer to a box of 256 crayons. More crayons, more shades of color, more of a larger gamut of possible colors. I use ProPhoto RGB which is a larger gamut than Adobe98. I capture images in RAW where a gamut has yet to be assigned and the color range the most possible, process the raw files into TIFF files for Photoshop using the ProPhoto RGB gamut, do all my adjusting and saving, and then convert to SRGB for web and email purposes.. and also for local print purposes.
What this means, is there is a lot more color and depth in your images than you can see using SRGB. The problem is, most LCD monitors and laptops still only show about 90% of SRGB and only the very expensive monitors can show Adobe98 which isn’t as large a gamut as ProPhoto RGB. Most home inkjet printers can only print SRGB.
So.. to take advantage of the large gamuts, you need a monitor and printer to do so. New monitors and printers are on their way, and we’ve known this for years, so most professionals process their pictures in either Adobe98 or ProPhoto RGB (and convert to SRGB from there for web and local printing purposes) so when the monitors and printers do become available.. they’ll have a large amount of images ready to take advantage of the larger gamuts.
How close are we? Well, the Dell XPS Studio 16 laptop with it’s LED backlit RGB monitor covers 124% of the Adobe98 color gamut! This is better than all but a very few and very expensive desktop monitors. And on an inexpensive laptop! Folks, the technology is here, it’s in the hands of the manufacturers, and they’re planning the release date of the products. Expect them soon!
For now, I have my old friends back, and I think they’re usable for another 12-24 months. By then I expect to replace all my imaging monitors (7) with newer ProPhoto RGB compatible high resolution graphics monitors.. I can’t wait!
Until next time…
