Panoramics II, Siracha Tiger Zoo II
![]()
|
• Country Comfort Hotel Bathurst • Brampton Island Resort • Peppers Craigieburn Resort • Sundowner Ovens Valley Motor Inn |
Feature Photograph
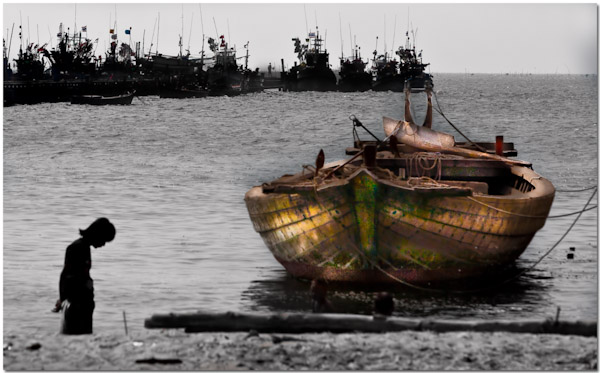
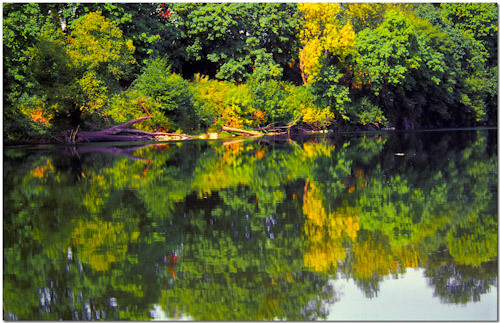
This image was captured near Bang Saen. Do you like it? This image is significant because technically it’s a terrible image and perhaps it doesn’t get the intended message across to the viewer.. yet I like I anyway! Do I sound defiant? I know it’s terrible, I know many things are wrong with the post processing, and I know the composition is weak. But I like it. Most hate it. So what!

My idea for this image was to show the tradition of praying/blessing the boat when it comes in for the day and before leaves the next. Often the women or children do the blessing, maybe because they want their husbands and fathers to return safely. By making everything in the image but the boat in black and white, and then enhancing the details of the boat, I tried to make the boat stand out as special and perhaps a bit menacing. In a moment of silliness I even contemplated putting the front grill of Christine on the front of the boat. ;o)
I’ve spent a lot of time taking photographs to please others. Weddings, portraits, fashion, landscapes. There is a limited set of ‘acceptable’ looks that paying customers expect and if you don’t provide that look (and quality) then you’ll be a poor photographer with lots of time on your hands.
But sometimes, perhaps much more often than I allow myself, we should just take and process a photograph to please ourselves. Because its fun and satisfying. Because it matters to no one but yourself and sometimes it’s good to be selfish. But most of all, because doing new, weird, different, and terrible images takes you outside the box and allows you to develop in areas you probably wouldn’t develop in otherwise.

The image above is another example of BkkSteve gone wild. Technically terrible. Yet I look at it over and over again. Maybe it reminds me of something.
This next week, go take some images that only you will look at. Images that please you personally and that you have no desire to share with anyone else. Images that will help you think outside of the box in as many ways as possible. Fun images. Photography should be fun..
Siracha Tiger Zoo II
This week we once again visit the Siracha Tiger Zoo.


I’m covering the Siracha Tiger Zoo again so soon because things have changed. In the entire Tiger Zoo there used to be a single location where you could freely photograph running and playing tigers without a glass partition of fence of some kind between you and the tiger. This was the only location I’ve ever heard this was possible. During a workshop a few weeks ago I discovered the management had installed thick steel bars I assume to keep the tigers from jumping out and eating people. Maybe the incident last year in San Francisco where some stoned teenagers teased the tigers so much they jumped out and attacked them prompted the new bars. I’m not sure. All I know is now this one special location is much more limited than before. It’s still possible to take some nice images, but not nearly the same as before.
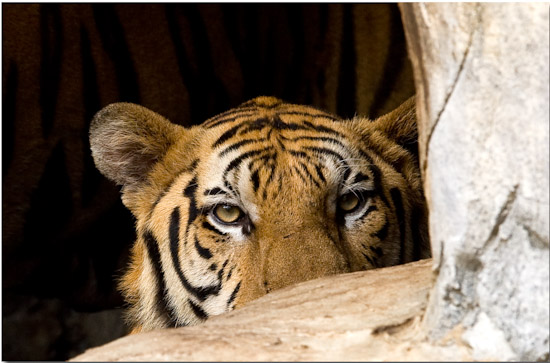
Looking straight across the pen you can capture the tigers in their man made cave structure as they sleep and play and keep an eye on you.
Tigers are curious if not drugged up which they tend to be in such places. They can be very curious and watch your every move.
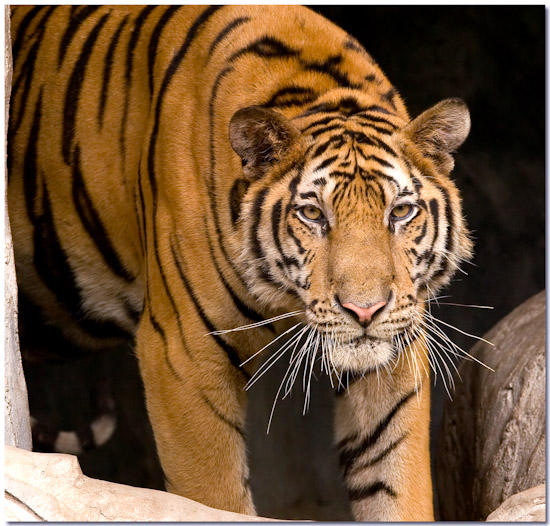
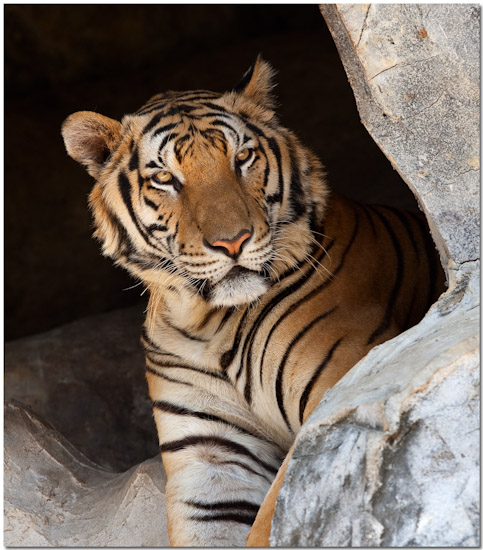
Sometimes they even get to their feet and check you out really well and make you think about how far tigers can really jump.
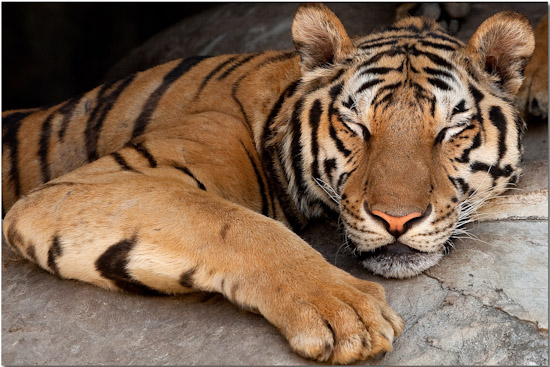
Other times they could care less and snooze the afternoon way.
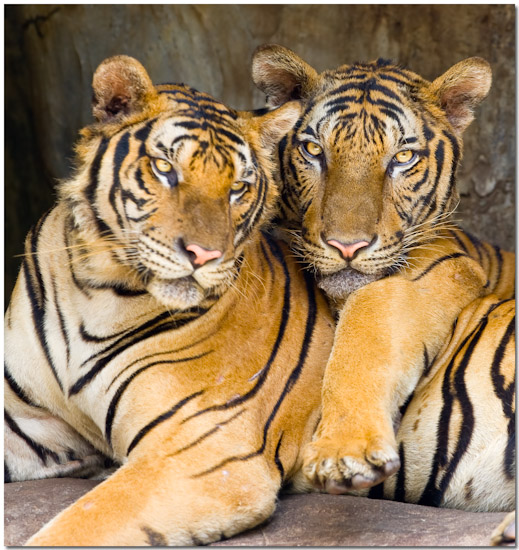
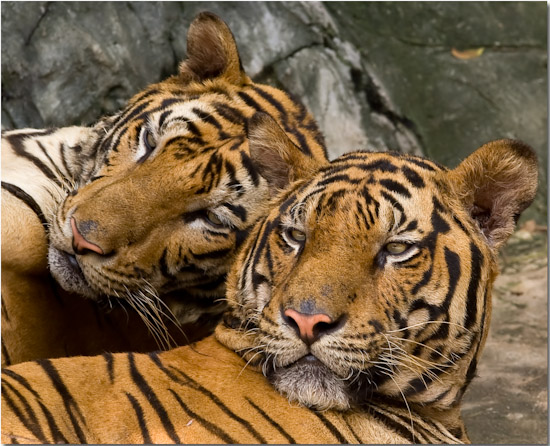
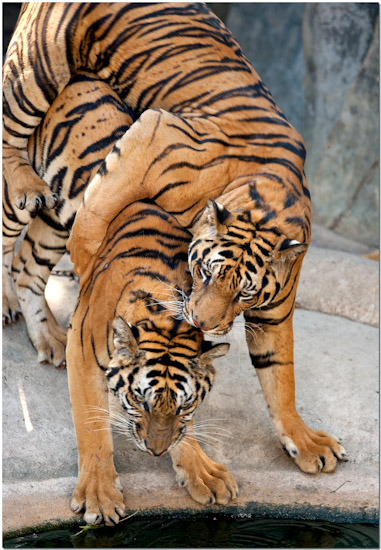
Tigers sleep together like domestic cats.
You can still achieve a decent angle right up to the edge of the big pond, but not any further.
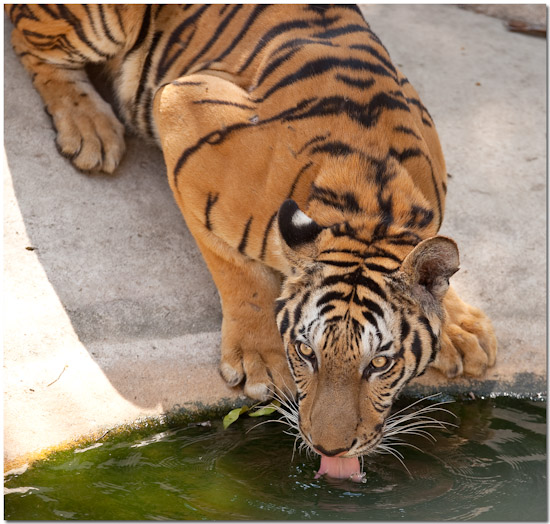
Tigers will.. well.. ummm.. errrr… Tigers will be tigers..
This is a fun place with lots of different shows and attractions. If you’re even in the Pattaya area and want to spend a fun afternoon with tigers give the Siracha Tiger Zoo a visit.
Panorama’s on the Go, Part II
I’m always happy to run outings or learning sections by other accomplished photographers who wish to share their experiences with photography or traveling in the Asian theatre. Tom Tweedel is a good friend with significant experience in China and has self-published several interesting volumes of his travels in China complete with many great images and informative narrative. A few months ago he visited Thailand for the first time and I had a great time showing him around the area. When Tom told me he’d like to share some of his work in this weekly I was both excited and grateful. I hope you enjoy China through his lens as much as I have. For those whose plans include extended travel in China I’d recommend contacting Tom and inquiring into obtaining copies of his books. Tom Tweedel is an Austin, TX based photographer and can be reached at tomsds@austin.rr.com
Panoramas on the Go Part II
Putting it All Together
After shooting the pano you’re ready for the next step which is stitching it all together. If you do any processing of the files make sure that the adjustments to exposure, white balance, contrast etc is uniform across all the images. If you want to do any spot processing you should do that on the finished file after stitching rather than the source files. It’s difficult to predict what is going to happen in the stitching.
To stitch the files you will need some type of stitching software. There are a number of products out there (including functionality built into later versions of Photoshop). I use software called PTGUI. It’s got a decent interface and gives you all the control you want if you choose to get serious about your adjustments. It has both Mac and PC versions.
Most modern stitching software is very easy to use. If you did your shooting well most of the time you just import the files, hit go and it stitches them together without any further effort required.
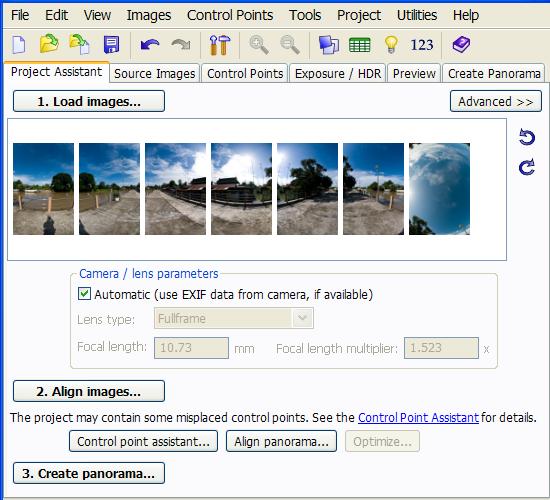
A screen shot of the main screen of PTGUI, its often as simple as 1-2-3.
If you have some more difficult shots (lots of identical patterns, misalignment or a low detail overhead shot) you may need to match things up manually. This usually takes the form of adding control points and telling the software what two points on the pictures match up.
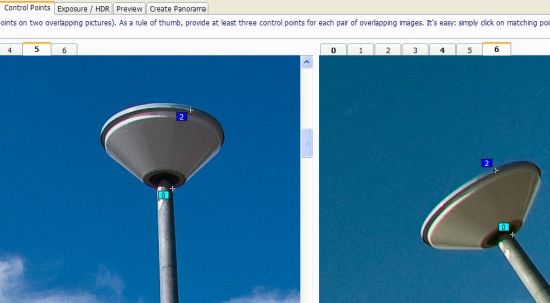
The overhead shot didn’t line up automatically so I had to look for common objects in both pictures. I used items like this lamp post to establish control points for proper alignment.
Once you got everything lined up your might have to make some choices about what kind of blending to do. Generally it’s a choice about speed vs. quality in the rendering process. After that you need to decide the resolution of the output file. This depends on how much detail you want. More detail = Larger files = Longer rendering time.

Standard settings I use for web quality VR Movies.
If you’re doing it for print you can calculate how much resolution you need based on your desired print size (average of 225 pixels per inch of printout is a safe rule).
I get my panos printed at EZPrints but there are plenty of other services out there.
Turning it into a VR Movie
After the file is built you will need software to take that image and wrap and warp and turn it into a VR file. The nice thing about PTGUI is it actually has that functionality built in if you used the advanced options. You can create QuickTime VR movies with no further software to buy or learn.
While QuickTime pioneered the VR process you can also use Adobe Flash as your engine. A lot more people have Flash installed than QuickTime. For my VR file creation I used software called Pano2VR with the flash pack. It’s fast and flexible and like PTGUI it has cross platform (Mac/PC) support. If you use the flash format it lets you add a few bells and whistles like autorotation and navigation bars.
When I created these flash movies
You’ll need to figure out what settings work best for your uses but I usually use these to produce good web sized files.
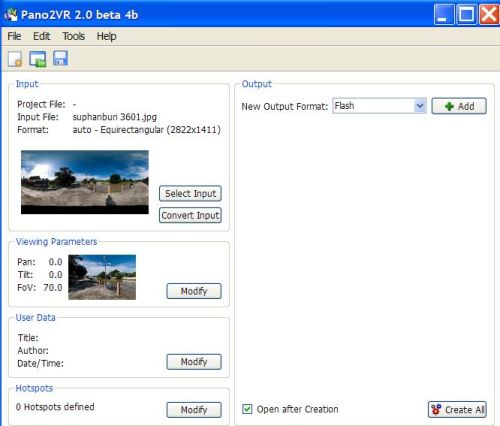
The initial screen is more of a summary and the upper left lets you select a QuickTime or Flash output.
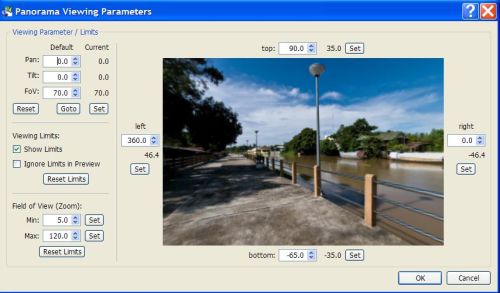
By modifying the viewing parameters you can select where the pano starts and any constraints on its field of view. I use a bottom limit of -65 degrees to avoid the black hole in the base.
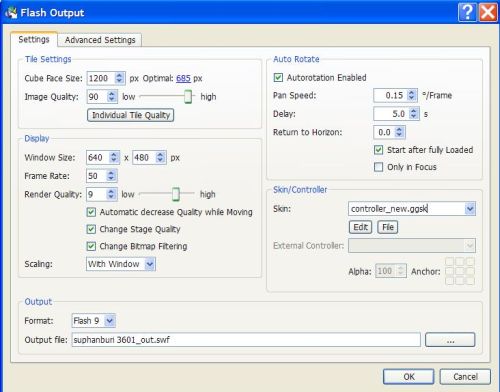
The real magic is after you click the add button. This is where you select the resolution and other special effects of your output.
After you’ve got all your settings you create and enjoy the file. After you do it a few times it becomes very easy and enjoyable.
Pano4Suphan360
If your interested in learning more about all things panoramic check out http://www.panoramas.dk/. They have a lot of information regarding panoramas as well as many examples and tutorials.
Happy Shooting!
Photography News of Interest

The unethical use of cameras, in this case camera phones, is resulting in new laws to protect peoples privacy which is a good thing. Soon your cell phone will make a loud clicking noise when taking pictures. You can read about this more here.
The Canon Powershot G series have long enamored serious enthusiasts and pros alike who wanted a serious compact point and shoot. The Canon G10 is their latest. You can read a review of the Canon G10 Powershot here.
I very much enjoyed this essay titled “When Enough is Enough” which relates to how much camera you really need, considering your needs. The answer is different for everyone. This is a great read for those contemplating a new camera purchase. Read it here.
Another excellent read is Mike Chaney’s Tech Corner on Steve’s Digicams. This months article is titled “Seeing the (Natural) Light” and should be very interesting for many. I certainly enjoyed it. You can read it here.
Nikon’s latest entry into the SuperZoom Compact race is their new P90 with a 24x zoom. Folks, that’s 26mm to 624mm (35mm equiv)! This camera deserves a close look. You can read about it here.
Lenovo designed perhaps the best mobile graphics workstation on the market. It’s big, it’s powerful, dual hard drives, loads of RAM, and TWO SCREENS in a laptop! If you’ve got about $5000 USD and want the best mobile graphics workstation, take a look at this review of the Lenovo ThinkPad W700ds here.
Readers' Submissions
There were no readers' submissions this week.
I suspect the readers' submissions will be a highly anticipated section of this column and I encourage anyone with photographs and travel accounts they d like to share to please send them to me at: QandA@Bkkimages.com
Readers' Questions
Khun Steve –
Could you recommend a digital compact? There are hundreds of them available and it boggles the mind trying to sort through them and choose one. I want one that can go in my pocket or my wife’s purse, takes excellent high-resolution daytime images, and works great out on the streets at night without a flash. Ideally I’d like it to take great pictures of sunsets and other scenes with harsh light.
Any help or recommendation would be appreciated.
Mack N.
Mack N. –
My, you sure don’t ask for a lot in a compact camera do you? ;o) Just joking. The wish-list you describe could be described as the holy grail for consumer digital compacts. In the past the best camera in this range was the Fuji Finepix F30 or F31d. In my on-line review of the F30/31d I made the prediction that the capabilities of these two cameras would become folklore, legendary, and be big sellers. Many readers went on to buy the F30/31d’s, over 50+ who emailed me and told me they bought this model on my recommendation. Both (identical except for a few minor features) became legendary. Unfortunately Fuji’s marketing department discarded this fine 6mp design in favor of the “megapixel race” to compete with the masses. Professional photographers and keen enthusiasts bought up all they could find until there were no more on the market. Years later a Fuji Finepix F30/31d on EBay goes for 2-3 times its original cost. Years later there is no digital compact made that works as well in low light, without a flash, as the F30/31d.
For years I hesitated to recommend digital compacts because I consider them mostly the same. I’d tell people to buy for the features they needed at the best possible price, because the image quality and core capabilities were just too close to each other to make much difference.
On February 4th 2009 this might have changed with Fuji’s announcement of the Fuji Finepix F200EXR! This is a svelte compact that can easily fit in your pocket, has a 5x zoom lens (28-140mm equiv), 3” LCD, both automatic and MANUAL modes, and offers 12mp’s of resolution in optimum light, and can/will automatically switch to a lower 6mp’s for low light or high dynamic range shots. The science behind their new Super CCD EXR is extraordinary. I WILL purchase one of these for review the moment it becomes available locally.
I rarely make recommendations without a review, the only time I’ve done so is in the case of the Canon 5d Mark II. So far it’s been a runaway success. I suspect the Fuji Finepix F200EXR to redefine the capabilities of a pocket compact digital. It will be a strong success. Now is can compete with the megapixel race manufacturers have created to dupe the public into buying the latest camera, and it will actually be useful in low light and high dynamic range environments. I can’t wait to get my hands on one!
If you can postpone your purchase until the end of the month I’d recommend you check out this new model.
Hope this helps.
Steve
Please submit your questions to QandA@Bkkimages.com All questions will be answered and most will show up in the weekly column.
A Snapshot of Bangkok Images Week in Review
Another slow week as the “high season” dies an early death.
I continue planning a new website and have mapped out several road trips in the near future to some unique locations.
Infocus Blog
Vintage Digital vs. Vintage Film
14 years ago I paid a small fortune for a cool Nikon filmstrip scanner that allowed me to scan years and years worth of film, to digital. Negatives and Positives (transparencies) can last almost forever if properly stored so at the time I wasn’t thinking about scanning as a method of safeguarding my work. Instead, I simply wanted to share with family
11 years ago my home burned down in a freak fire and everything was destroyed including decades worth of film. Furniture and clothes and the such can easily be replaced. Family photo albums, sentimental gifts, and the like cannot. Some of the scans I made back then I’d sent out via email to friends and family and I was able to retrieve some of my memories.

Digital was starting to become a part of my life and I found myself with a new challenge. Safeguarding my digital files. Theoretically digital files can last forever because they’re simply 1’s and 0’s arranged on magnetic or optical media. The funny thing is, for over two decades I never lost a film negative of positive due to a power glitch, crashed hard drive, or in some black hole. Short of a fire or natural disaster film is a lot easier to safeguard than digital files. On the other hand, film has only one copy unless you pay huge sums to duplicate them, while digital allows you to store as many different backup sets in as many different locations as you desire.
Also, keep in mind that while your digital files are limited by your software today, that ten years from now newer software, especially RAW file converters, will continue to improve and make better images out of old files.
I’d have to admit, that today with all the digital storage options available at reasonable cost, safe guarding digital files becomes easier and safer.
But what about quality? It’s true that film scanners have made huge gains in resolution and the software that supports them had improved by leaps and bounds. Still, film isn’t nearly as popular as digital is now and probably never will be again. This means the market won’t be driven for the same level of improvements we’ll continue to see in digital file software, especially RAW converters. So I’d have to give the nod to digital once again.
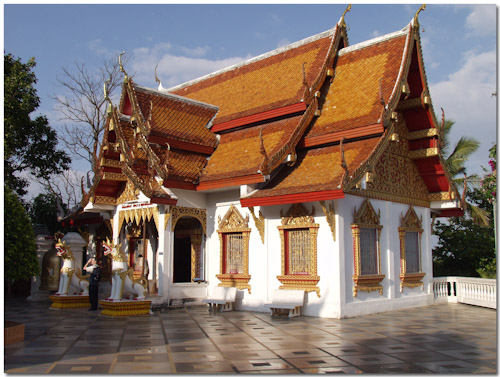
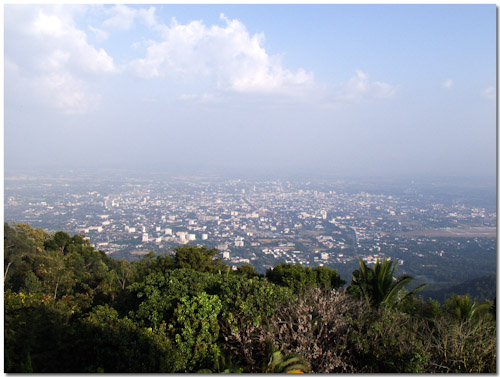
These two shots were taken at Doi Suthep near Chiang Mai over ten years ago. The one of the temple is perfectly exposed, made possible today, by software not available ten years ago. The one of Chiang Mai from Doi Suthep isn’t great, but the software ten years ago didn’t allow me to see through the haze and clouds nearly as well as you can with this image processed on improved software today..
This is really an in-depth subject, much more than a blog entry can cover. Perhaps I’ll cover it more in detail in a future learning column. Today, I just want to get you to start thinking about safeguarding your film and digital images, and to know the future will bring us more and better tools to help make the images better in the future.
Backup you your images, put them on a couple sets of cheap DVDs and mail one to a family member for safe keeping. Put your film negatives and positives in the safest place you can think of, and if possible in a fireproof container. And don’t throw away images you can’t make look decent today, because the future holds a lot of promise..
