Panoramics, Sanctuary of Truth II
![]()
|
• Alara Plaza Motor Inn • Best Western Reef Resort • Country Comfort Mackay Resort • Grand Mercure Suites Hotel Mackay |
Feature Photograph
This image was captured at the Khao Kheow Open Zoo near Pattaya during a workshop where we take what I call the “Pattaya Loop.” The Pattaya loop is a three stop tour of the Khao Kheow Open Zoo, Siracha Tiger Zoo, and the Sanctuary of Truth. I was first introduced to the loop by Rob over on www.1ds.com. It’s a whirlwind 12-16 hour day of a workshop that covers all three attractions with significant computer time boning up on Lightroom once back in Bangkok.

It’s not a very physical workshop as there’s considerable driving time and all three attractions have easy access, but it’s a heck of a lot of fun and lets us work from the car which means we can carry all the photo junk our hearts desire. During this loop we cover techniques for shooting wildlife, landscapes, architecture, and low light interiors as you’ll see below in our outing section. We also learn to use long lenses (provided), Gimbel heads & tripods, and ultra-wide angle lenses.
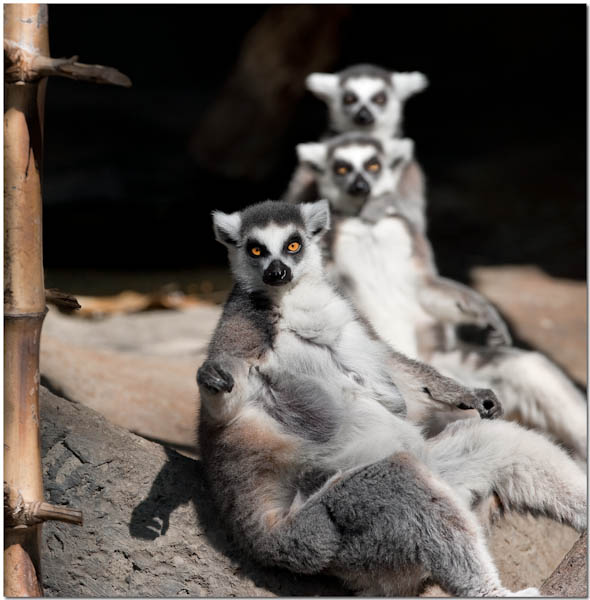
This particular image is significant when you consider the technical challenges in capturing this particular composition. Mastering depth of field (DOF) is an essential skill and here we use it to show the first lemur in sharp focus, the second less in focus, and the third totally out of focus. The way they’re positioned in a line, all looking at the camera, all with their attention on you at the same instant is very difficult to do.. much less capture. Perspective, lighting, and more than a bit of patience is required.
Composition is fun as you try to include all the essential elements. In this image you not only have your main subjects (3 lemurs) in the mid-ground, but a bamboo element in the foreground to lend depth. You find the subjects, notice the perfect light, select your lens and aperture for the best perspective and DOF, try to include a foreground or background element or possibly both, and wait wait wait for the perfect expressions from our human like friends who are normally running and jumping around at light speed.

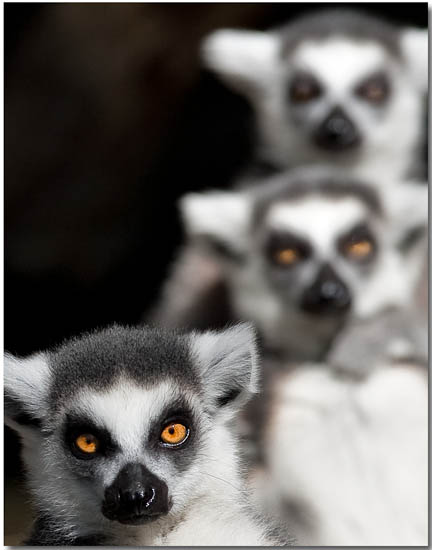
I’ve had a few inquiries about how much cropping is done and if enough ‘image’ is left for large size prints Below is a crop of the first picture which has been reduced over 100% after the crop was made. Plenty of image for a large print!
Primates are great practice and the Khao Kheow Zoo doesn’t disappoint. Primates have many of the same facial expressions, temperaments, and challenges you’ll find when photographing humans, especially children. If you can learn to capture running and playing primates with interesting expressions, proper exposure, and a decent composition.. then you just might be ready to photograph a wedding.. ;o)
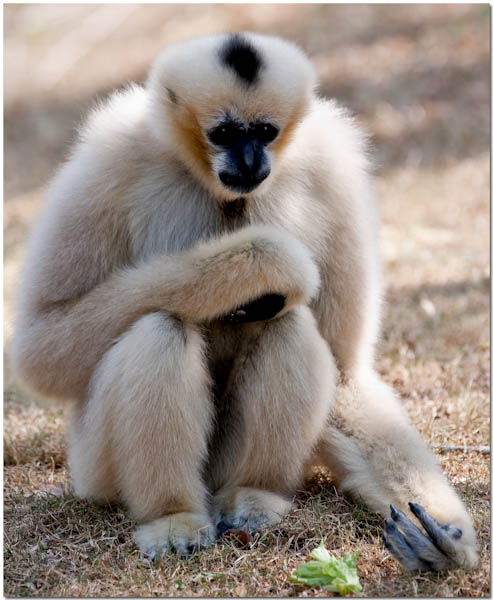
In this composition I loved the left arm and hand extending outwards in the scene. The detail on the hand is extreme and very interesting on a full size print. The face looks somewhat worried, like he’s worrying about the baht devaluing and the red shirts having a turn shutting down the airport.
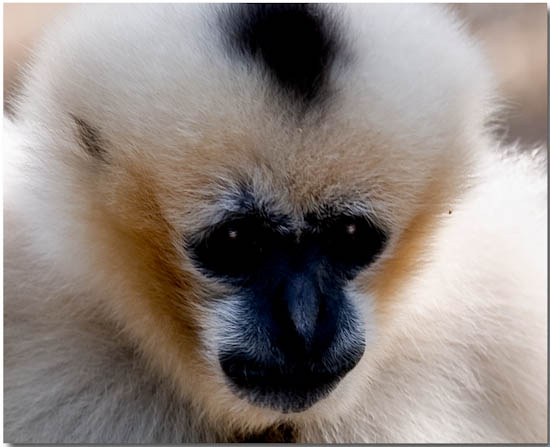
This is a crop from the image above. That is definitely an expression of worry!

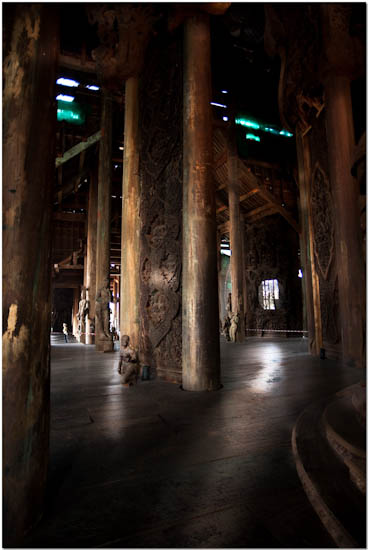
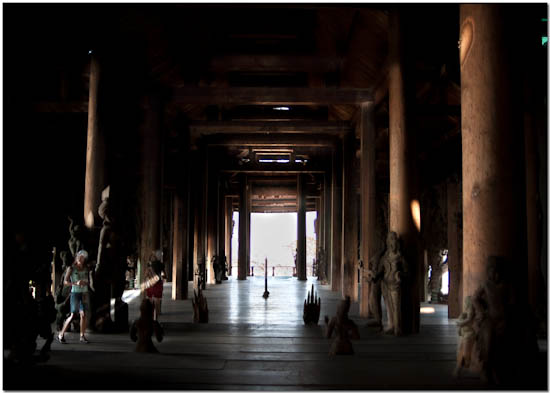
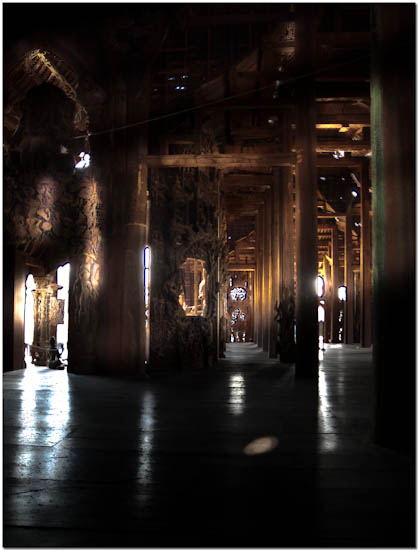
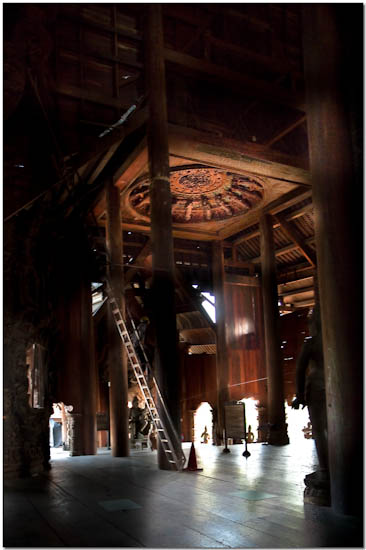
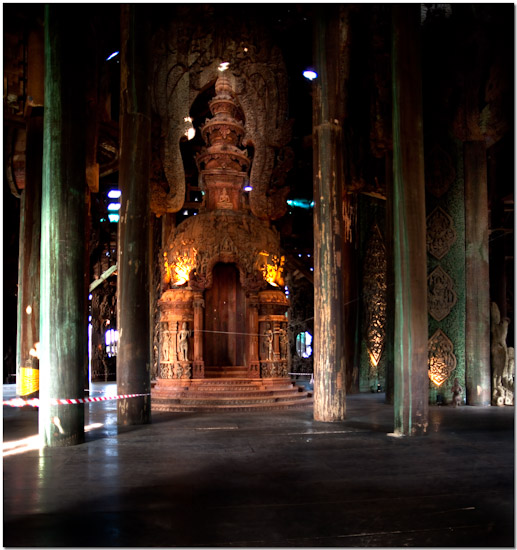
Sanctuary of Truth
This week we’ll be covering the Sanctuary of Truth for the second time in our photo outing section. This is a fantastic place to shoot and is worthy of being covered several more times in the future.
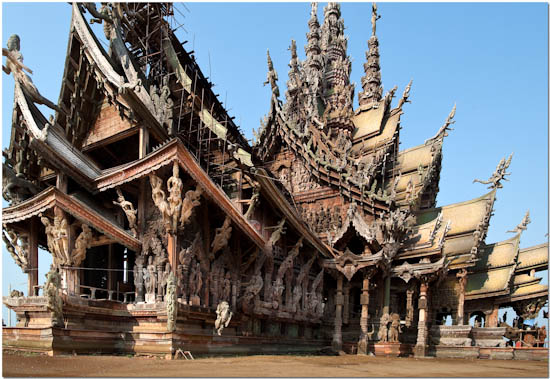
20mm F11, ISO 100, 1/100th
The lens used for all the photos in this section is the Sigma 20mm F1.8 EX DG, and all images were captured handheld. During workshops of this attraction we routinely use a tripod for the best support, especially on the interior, because most people have lenses starting in the F2.8-F4 range. At those apertures the tripod is recommended outdoors and an absolute necessity indoors. With this F1.8 lens I was able to shoot the interiors handheld at ISO 100 at F2, and the exteriors handheld at ISO 100 and F8-11. Talk about freedom!
20mm F8, ISO 100, 1/250th
As you can see the lens is very sharp and contrasty and easily captures the abundance of detail of the different exterior views. Full size crops reveal enough detail to identify termites!
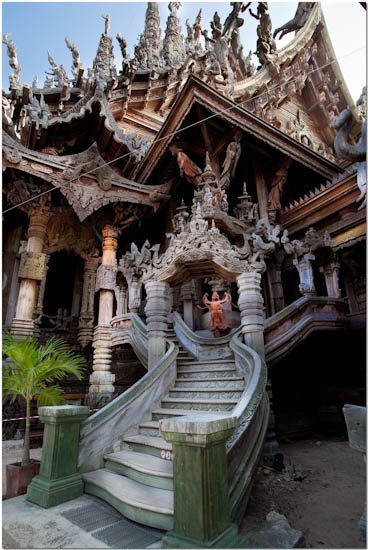
20mm F8, ISO 100, 1/60th
The staircases leading into the temple are extraordinary. The compositional possibilities are nearly limitless. I love the curves of the banisters and the view from this angle. No wood is painted or stained. This makes the ‘reddish’ looking wooden figure at the apex of the staircase even more interesting.
20mm F8, ISO 100, 1/125th
Perhaps the biggest challenge when photographing the interior is achieving enough dynamic range to properly exposure the outside scenes seen through the various apertures of the structure, while still allowing for some detail and dimension on the inside. Search for stray rays of sunlight that might not be obvious at first glance, or even with your eyes at their current exposure (pupil openings).

20mm F2, ISO 100, 1/25th
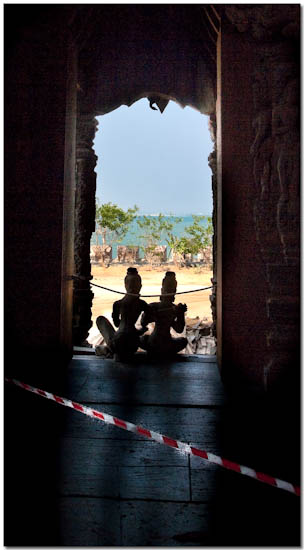
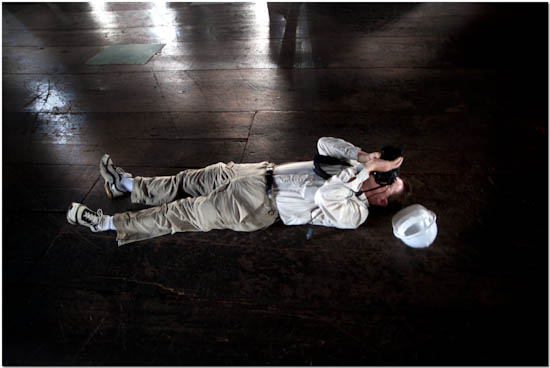
Everyone is required to wear a hardhat because the Sanctuary is always under construction. This makes photography a bit difficult at times. Here, a client is seen in the corner with his tripod mounted DSLR taking a series of exposures to process later as an HDR image. Again, the goal here is to capture a wide enough dynamic range to reveal detail inside the temple while making the light a major component of the composition. With a F2.8-4 lens HDR is almost mandatory for the low ISO range where you’ll get the most quality and detail (ISO 100-400). Using the Sigma 20mm F1.8 I captured this at ISO 100 F2 handheld. So what if the shutter speed was 1/15th.. at 20mm and with careful bracing you can pull it off!
20mm F2, ISO 100, 1/15th
This is the sort of shot I was really after. Many curves, many focal points, tons of detail, and beautiful lighting throughout.
20mm F2, ISO 100, 1/80th
Another fun photo opportunity. The light coming in the windows to the left accent all the support pillars lending a great depth to the image which shows the vastness of the interior. 20mm F1.8 ISO 100.
20mm F2, ISO 100, 1/20th
Another great view. This wouldn’t be a decent image without the rays of light on the floor extending towards the front of the frame. Without them the image would be really dull.
20mm F2.8, ISO 100, 1/25th
I love this image printed on a 20×24” sheet. The light plays from so many angles and the detail on the ceiling is the central point of the image.
20mm F2, ISO 100, 1/13th
Some people think this stuff is easy. It often requires getting dirty as you capture a perspective most photographers wouldn’t think to cover. Actually, I suggested this perspective to a client and when he was done taking the picture he had to turn over and pump out 20 pushups.. ;o)
20mm F2, ISO 100, 1/25th
Directional light, the food of gods.. Such an interesting composition with the red&white striped crowd control rope extending down the scene.
Panorama’s on the Go, Part I
I’m always happy to run outings or learning sections by other accomplished photographers who wish to share their experiences with photography or traveling in the Asian theatre. Tom Tweedel is a good friend with significant experience in China and has self-published several interesting volumes of his travels in China complete with many great images and informative narrative. A few months ago he visited Thailand for the first time and I had a great time showing him around the area. When Tom told me he’d like to share some of his work in this weekly I was both excited and grateful. I hope you enjoy China through his lens as much as I have. For those whose plans include extended travel in China I’d recommend contacting Tom and inquiring into obtaining copies of his books. Tom Tweedel is an Austin, TX based photographer and can be reached at tomsds@austin.rr.com
Panoramas on the Go
Panoramas are very fascinating aspect of photography. It allows you to capture and present the grandeur of scene better than any other photographic technique. With the advent of digital cameras and sophisticated software they have also become more accessible.
With the addition of QuickTime VR and Flash movies panoramas have moved into the digital age with more options. These new tools allow us to use our images in new ways besides just having them printed.
High Resolution Landscapes-
One of the drawbacks of panoramas was that they are fundamentally clumsy to deal with on paper because of their aspect ration (height/width). If you have a very impressive shot that is 120 degrees wide you often had to compromise its display because your paper was only so wide. To fit the whole thing on you had to make the print very narrow. This applied web images as well. If the pano is as wide as your monitor it’s usually not tall enough to see the detail or get the effect. By taking your high resolution image and turning it into a pano movie the user can pan and zoom across your landscape and see it in its full detail. While it’s not the full magic of a large scale print its pretty good.
Below is an example of a panorama of the Bangkok skyline rendered 800 pixels wide, not very impressive.

Here are two flash movies of the same scene. The first is low resolution for slow connections. The second is high resolution for high speed connections.
Use the control buttons to scroll and zoom
BKK Panoramic High-Rez
BKK Panoramic Low-Rez
360VR Pano Movies
The second new use for pano images is creating 360 degree VR Movies. This opens a lot of options for capturing the reality of a place that a single photograph (or even a group of photographs) cannot.
Here is a Flash 360 movie taken in Suphanburi.
Suphanburi
Gearing up for Panos on the Go
Traditionally shooting panoramas involved large tripods, specialized cameras and heads. Not quick, cheap or easy. Digital trimmed that down significantly in terms of cost and weight. Still it required a tripod and a mechanically complex head along with significant setup time. I wanted to take panos in Thailand but knew that it wasn’t feasible to carry a full kit around and spend several minutes setting up each time I wanted to take a shot. There had to be a better way. So I did some research and this is what I found.
The lens – Your choice of “which lens” is naturally the foundation of everything to come. There are a number of options out there. The first choice is if you want to invest in a fisheye or use “regular” wide angle lenses. Both will get the job done (especially if you have something in the 10-24mm range). Fisheyes just let you get the job done faster and easier.
For those of you like myself shooting Nikon DX cameras the Nikon Fisheye 10.5mm f/2.8G ED AF DX is an excellent choice. Its lightweight and not much bigger than a 50mm prime and fast (F2.8 max aperture). Plus when your not doing panos you have a fully functional fisheye to play around with.
If your shooting a full frame Canon they have a Canon EF 15mm f/2.8 Fisheye for about the same price.
For full frame Nikon there is the Nikon AF 16mm f/2.8 D Fisheye for a few bucks more.
Support-
After I had picked out the lens the next question was how do I ditch the tripod? After thinking about it I realized the tripod did three things for me
1 – It made sure all the shots were taken from the same level and the same point of rotation.
2 – It helped to make sure each shot was equally spaced apart.
3 – It provided support for maximum sharpness and allowed the possibility of longer exposures.
When considering all the options I realized that a monopod could do 1 & 2 and some of 3. In my experience with stitching, especially doing VR type images the critical sharpness of the image really doesn’t matter since its getting stretched and distorted every which way in the processing. I would miss the tripod for the longer exposures, but something was better than nothing.
So a monopod it was. There really wasn’t anything special about the monopod. I selected one that had a comfortable folded and extended length and wasn’t too heavy to carry or on my wallet. For me something light enough and small enough to hang from my belt was the main criteria.
Mounting Hardware
After getting the monopod the next challenge was to get the camera mounted on the monopod in a portrait fashion. For that I turned to the guys at Really Right Stuff. I’m a big fan of their L-Brackets, every time I get a new SLR I get a custom bracket for it. It allows me to fit it into my existing tripod head, flash bracket and more. They stock excellent modified Bogen monopod head that is factory attached to one of their clamps. You just screw it on and you’re ready to go with your L-plate in either portrait or landscape.
That provided me with a good platform to work off of. Now the only thing missing was how to make sure each shot was level and equally spaced apart. There are all sorts of heads and contraptions to mount on your support to do this. But it was important to keep it small and light. Once again Really Right Stuff had the answer in the form of the PCL-1 Panning Clamp with the PCL-DVT attachment. It is a small but solid head that can easily clamp into the jaws of that Bogen monopod. You can then put your camera into its clamping jaws. If your looking to save a few bucks and a little weight you can actually dispense with the Bogen head all together and screw the PCL-1 directly onto your monopod. I preferred to use it with the Bogen head however as it gave me additional utility when using just the monopod. The PCL-1 is a wonderful little gadget. It has etched markings in 2.5 degree increments and a built in bubble level. This allows you to check your level and helps assure even spacing between shots. When your done it easily fits in your bag or pocket with no disassembly required.
Shooting the Panorama
Shooting a Panorama on the go can be quick and easy once you’ve got it down. With a bit of practice you can go from deciding to shoot to moving on your way in a few minutes.
Once you have picked out a location extend the monopod to a comfortable height and place your camera on the PCL-1 (preferably in portrait orientation).
When shooting Panoramas it’s very important to set your shooting mode to manual. The range of exposures in other modes will make the blending both ugly and difficult. Since you’re likely to be shooting things from bright sunlight to deep shade you need to make some choices about what to expose for. Usually I choose a key object or view that is going to be the most attractive thing in the picture and expose for that.
Its also a good idea to lock your white balance in one of the closest presets. Using Auto white balance can cause color differences.
If y you want to avoid any possible focus mistakes you should put your camera into manual focus mode and focus at infinity.
Pay attention to the orientation of your monopod. The most common mistake when shooting from a monopod is creep. As you shoot and rotate the camera on the PCL-1 you tend to rotate the monopod as well. This will result in gaps in the final product. I avoid this by starting at the zero degree setting and having that pointed or lined up with something distinctive around me. That way when I’m shooting I can easily check if I’m still lined up. You can also use the screw knob of the monopod clamp as a pointer.
After lining up look at your bubble level. Shift the pod around until your bubble level is in the middle and then take the shot. If you’re using the fisheye you’ve got a little play if your not totally level so don’t sweat it too much.
After you’ve take the first shot hold your monopod steady and then rotate the camera on the PCL-1 head. Line up with your bubble level and take the next shot. Repeat this until you’ve done all 360 degrees (6 shots with a Fisheye). If you’re not using a Fisheye you’ll need to figure out a head of time how many shots it will take you to go 360 degrees. As a rule you should overlap about 1/3 on each side to give plenty of overlap (only the middle third is used on each shot). In a pinch you can get away with less but better too much than not enough.
Once you’ve shot all around you can shoot a top shot if you like. The top shot is a little different. Pull the camera out of the PCL-1 and then lay it down on top of it pointing straight up. Eyeball it to make sure the monopod is level (or put a bubble level in your hot shoe) and take a shot. It’s a good idea to rotate the camera 90 degrees (spinning it around on an axis through the lens so that it’s still pointing straight up) and take another shot. This will make sure that you have enough reference points on the top shots to stitch with the regular shots. In some cases (like a uniform sky with nothing in it a top shot really doesn’t add much to the pano so you might skip it all together.
But what about the Nodal Point?
One of the bane of shooting panos has been getting everything around the nodal point. This is the optical center (not actual center) of a lens. If you don’t use the nodal point it’s possible to have parallax errors and distortions in the final image. In the past I spent much time, pain and effort in trying to get my shots around the nodal point. Then I realized that many times it doesn’t matter. If your shooting in any space bigger than a medium sized room the nodal point doesn’t really come into play when your using a fisheye or wide angle lens. There’s just not enough difference between your rotational point and the nodal point to be a factor. The further away your subject is the less of an issue it becomes.
What about the Bottom?
Getting the bottom shot (so you have full 360×180 view) is tough. Stitching it is even tougher and Parallax errors can come into play. In my opinion its really not worth it since it doesn’t add too much to the pano.
To illustrate this point I shot this panorama on the Island of Ko Samet handheld (no pod or clamp) using an 18-200 lens shuffling my feet around as I rotated.
Ko Samet
After you’ve got all your images captured the next step is to put them all together and turn them into a VR movie which will be the topic for my next article.
Happy shooting!
Photography News of Interest
Adobe has released RC versions of Lightroom 2.3 and ACR 5.3 You can download them here.
A father and daughter have both won first prizes in the national photo contest of Ireland. Great accomplishment! You can read about it here.
Super-zoom point and shoots are all the rage lately. Image quality isn’t better than from any other point and shoot, but the zoom range can certainly make for interesting photography. Of all the current models the Panasonic FZ28 interests me the most. You can read a review on the FZ28 here.
I’ve done workshops to Alaska but have only dreamed about one to Antarctica. The adventure is extreme and the images simply stunning. Read this blog entry on this groups trip to Antarctica here.
Readers' Submissions
There are no readers' submissions this week.
I suspect the readers submissions will be a highly anticipated section of this column and I encourage anyone with photographs and travel accounts they d like to share to please send them to me at: QandA@Bkkimages.com
Readers Questions
BKKSTEVE:
I am working up a budget for my first DSLR system and I’m thinking $3000 USD is the maximum I can afford at this time. I want to get quality gear I can use a long time and grow with that will take great images once I have the skills. The new DSLRs would take almost all of my budget leaving almost nothing for lenses. What would you recommend?
Andy;
Andy –
$3000 USD is really a respectable investment and one I’d consider quite well before making purchases. Your question comes at a time when the manufacturers have recently released some great new bodies worthy of consideration like the Canon 5d Mark II and the Nikon D700, both costing almost your entire budget. Quality lenses can be quite expensive as well.
With that said, lenses are forever, new bodies come and go. If you want really great image quality I’d recommend a full frame digital sensor and top lenses. The only cameras that have full frame sensors are very expensive new, and the only brand that’s had full frame sensors on the market long enough to create a used market would be Canon. If your interests are portraits and landscapes look for a good used Canon 5d. You can find them for about $1200 or so. If you need a faster handing camera perhaps you can find an original Canon 1ds for under $2000.
Lets say you found a good 5d for $1200. That would leave $1800 for lenses. In this column I used the Sigma 20mm F1.8 for the outing section and it’s about $250. Perhaps add a 70-200 F4 zoom and a 17-40 F4 zoom to the mix (brand new, but used are available) and you have the start of a kit that will take very high quality images. The 70-200 can be used for portraits and distant objects and the 17-40 for landscapes and shots inside the home of the kids and/or dog playing. From there, you can go in many different directions but I think you’ll always keep and enjoy these three lenses.
I hope this helps.
Steve
Please submit your questions to QandA@Bkkimages.com All questions will be answered and most will show up in the weekly column.
A Snapshot of Bangkok Images Week in Review
This week has been slow. However, I’ve taken my own advice and loaded up the SUV with photo gear and hit the trails as often as I can. So many photo opportunities, so little time..
Meanwhile.. I continue to think about the design to update my website..
Infocus Blog
Guest Writers and Local Talent
One of my most valued pleasures when writing this column and holding workshops is meeting fellow photographers. I still learn things from the most basic beginners to the most accomplished professionals.
Every now and then I meet someone whose contributions would benefit the readers and I approach them in a humble plea to share their art and experiences through an Outing or Learning section. So far we’ve had the pleasure of seeing work from Rob, Stick, and Tom and soon I hope to show you some great work from Kees in the coming weeks. If I forgot anyone please forgive me.
And of course we have our Readers Submissions and Questions which contribute greatly to reader interest. If you have a question I’m sure many others do as well, and while you might enjoy looking at professional works it’s often the work of our peers which motivates us more.
If you have something to share please feel free to send it in. If you think you could contribute an entire Outing section email me and let’s discuss it. I’m not looking for perfection, but I am looking for anything of interest to your average reader.
The ‘magic season’ of Thailand, the season where its cool enough to get out there and be really active and the light is often soft enough for great pictures, has been upon us now for several months. If we’re lucky it will continue through mid-February so lets get out there and enjoy the weather and light and take some great photographs!
