Night Shots, Samut Songkram Boat Yards
![]()
|
• Alara Plaza Motor Inn • Best Western Reef Resort • Country Comfort Mackay Resort • Grand Mercure Suites Hotel Mackay |
Feature Photograph

This week's feature photograph was captured at the Sanctuary of Truth in Pattaya. This photograph is significant for several reasons. First, construction on the SOT is never ending and on the far right of this photograph you can see the small newest addition. Second, the light and time of day for this capture were just about perfect, allowing the details of the SOT to contrast nicely with the blue sky and warm sand. Third, the lens used for this capture is one of the cheapest ultra-wide angle primes, the Sigma 20mm F1.8 EX DG which can be shopped for around $250.00 USD if you’re patient.

What, a 20mm F1.8 lens for $250!!! How can that be? How good can it be? I love wide angle lenses and I’ve got a bunch of them, from the most expensive to the most obscure. This is my cheapest and truth be told lowest regarded lens of them all, and I haven’t had the chance to give it a really good test until now. During a workshop last week I mounted this lens on my Canon 1ds Mark II and gave it a workout.
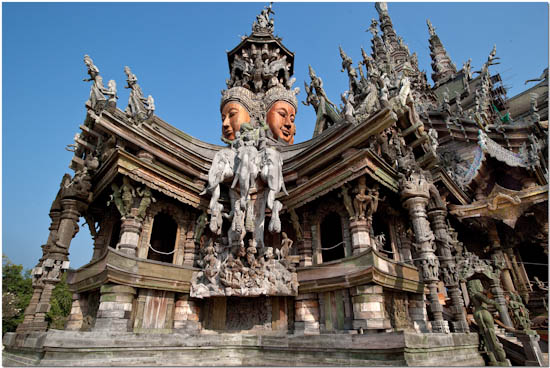
I’m pleased to report that this is perhaps the sharpest most contrasty 20mm focal length I have out of all my wide angle lenses! It’s also the fastest with it’s F1.8 aperture. Looking at the images I took that day I can’t believe the sharpness and contrast present in the images. More, even the interior shots at F1.8 – F2 allowed me to shoot at ISO 100 handheld and returned some really sharp images even wide open! I’m impressed. Its small size and weight will allow this lens to become a regular part of my travel bag, a perfect lens for wide angle shots inside temples where it’s dark and it more than holds its own against the competition stopped down for outdoor photography. Every now and then you come across an unexpected diamond in the rough.
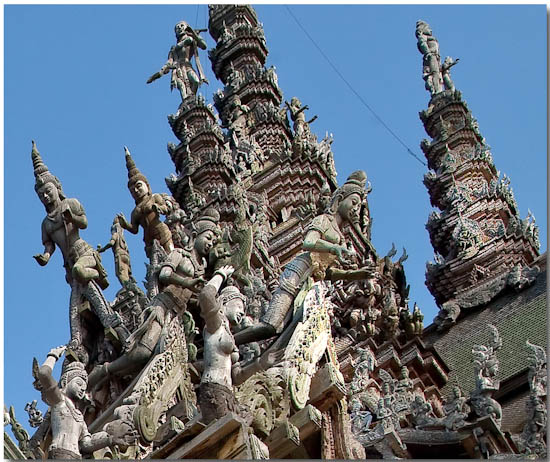
Above you can see a reduced size crop from the second image. It was reduced in size 100% from the original crop but still exhibits great sharpness and contrast.

Look for more images captured with this lens in next week's Outing section. I have some really fun interior shots of the SOT to share.
Weekly Photo Outing
One of my favorite places anywhere, is a boat yard! They’re smelly, greasy, loud and busy. They’re also full of colorful boats and even more colorful marine craftsmen who really know how to swear and have a great time doing it!
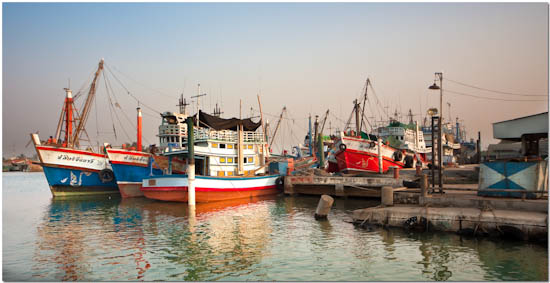
This boat yard is located in Samut Songkram right on Rama II (Highway 35). It services mostly Thai fishing boats. Thai fishing boats are traditionally generous with both curves and color, a perfect combination for great pictures!

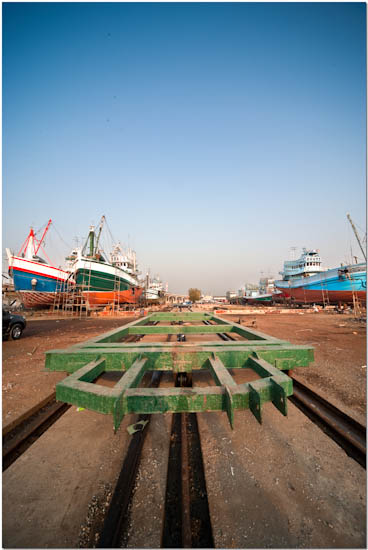
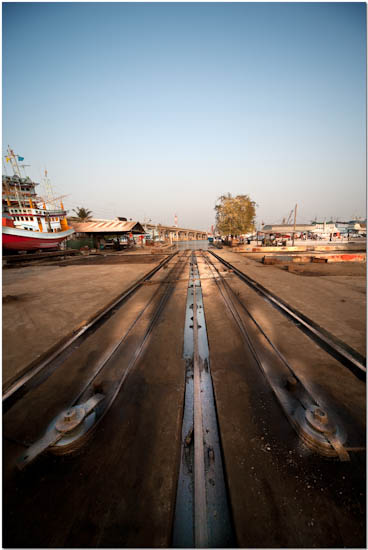
In the above image you can see the dolly on the tracks used to drag the boats from the water. I used a 12mm rectangular ultra-wide angle lens for this shot.
In this image you can see the cable and pulley system which pulls the dolly. What you don’t see is the small diesel motor which provides the pulling power.
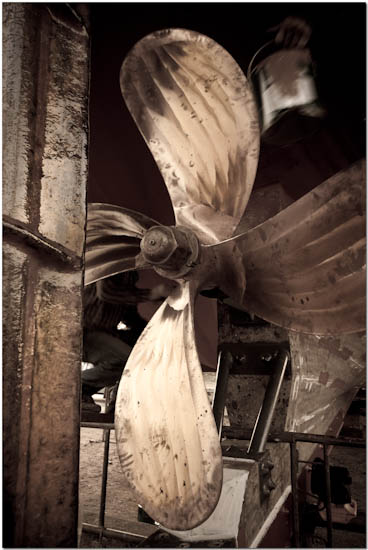
The screws (civilians call them “propellers”) are always made of a high quality brass to resist corrosion. This screw has been stripped of it’s natural patina and inspected for cracks and other damage.
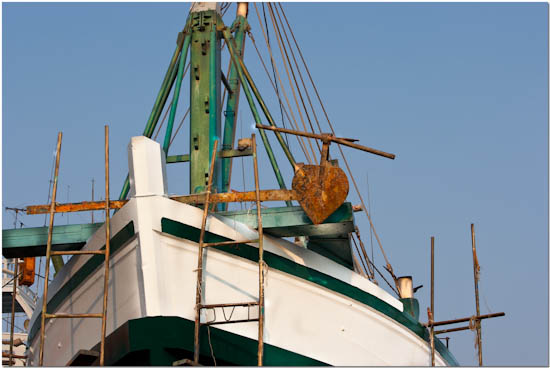
Here you can see a wonderfully colored and textured anchor positioned across the bow (civilians call this “the front”) of the ship.
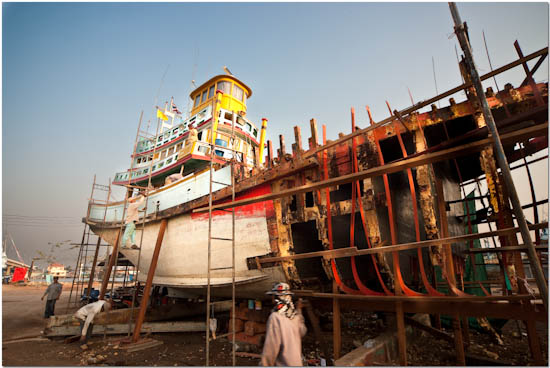
Here is a hull laid wide open. Isn’t it interesting that even ancient Thai fishing boats were built with several watertight compartments to help keep her afloat when damaged? Can you picture the skeleton of a whale and then compare it to the above photograph?
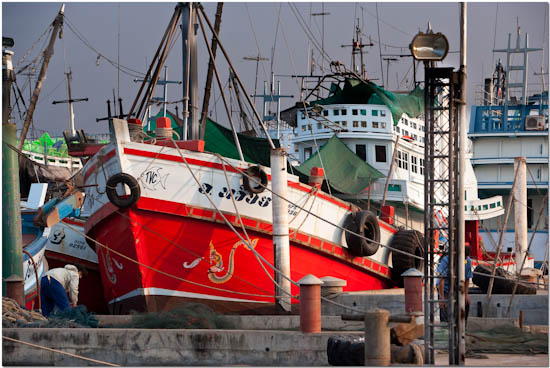
This is an active and seaworthy fishing vessel. It’s fully rigged and ready to get underway with minimal notice.
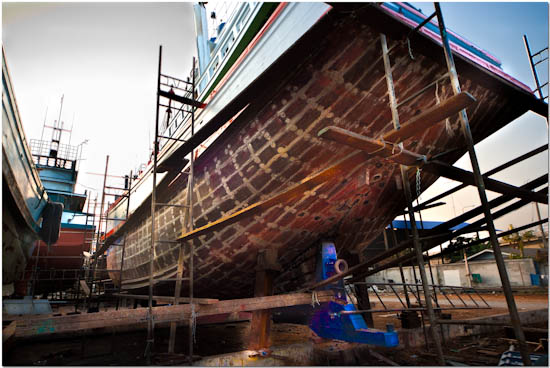
The underside or belly of a vessel is rarely seen outside of a boat yard and this image reveals a few mysteries. Notice the blue steel towards the stern (civilians call this the “rear.”) This is the guide that holds the shaft that turns the screw. Notice the many strips of wood that make up the hull? It’s amazing boats are still built this way.
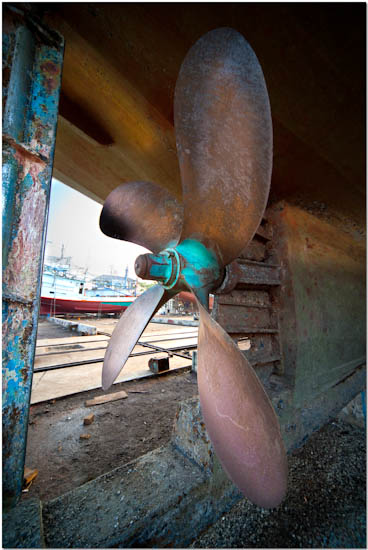
Here is a solid brass screw with it’s natural patina still attached to the shaft. On the far left you can see the rear of the rudder. I used a 12mm ultra-wide angle lens and was approximately 6 inches from the nearest blades which is what makes the nearest blades loom to the front of the frame. You can do things with an ultra-wide you just can’t do with a standard 24mm or greater. The images of this outing were either shot with the long end of a 70-200, or the short end of the 12-24. Properly used you’ll always get a much more interesting perspective from a 12-18mm focal range than if limiting yourself to 24mm and greater.
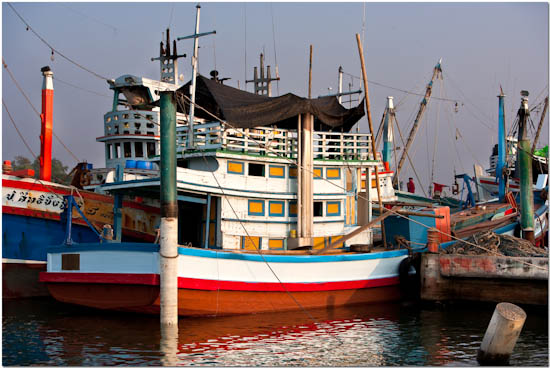
Another ship docked and at rest.
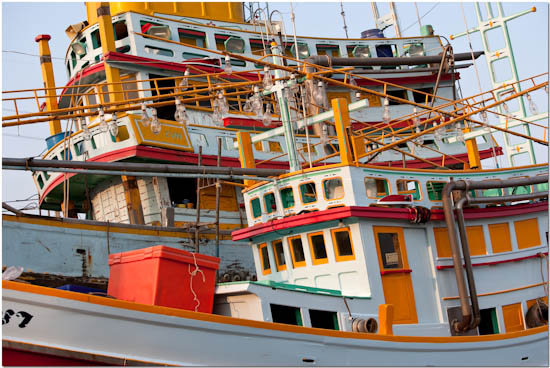
Notice the tall superstructures? I love all the windows, colors, and even color matched rigging. Has anyone noticed that Thai fishing boats have the same basic color scheme and look as Thailand’s big rig trucks? Perhaps I should venture down to the local airstrip and have a look at their planes.. ;o)
You can see the rest of the images from this outing in the Samut Songkram Boat Yard gallery at Bangkok Images by clicking this link.
Night Shots
I’m always happy to run outings or learning sections by other accomplished photographers who wish to share their experiences with photography or traveling in the Asian theatre. Tom Tweedel is a good friend with significant experience in China and has self-published several interesting volumes of his travels in China complete with many great images and informative narrative. A few months ago he visited Thailand for the first time and I had a great time showing him around the area. When Tom told me he’d like to share some of his work in this weekly I was both excited and grateful. I hope you enjoy China through his lens as much as I have. For those whose plans include extend to travel in China I’d recommend contacting Tom and inquiring into obtaining copies of his books. Tom Tweedel is an Austin, TX based photographer and can be reached at tomsds@austin.rr.com.
Intro
Shooting night shots can be one of the most interesting and rewarding ways of shooting the urban landscape. With a little bit of equipment and know how it’s not that difficult.
To do a night shot you're going to want a tripod and a head to hold your camera on the tripod. A good tripod setup should be part of every photographer’s arsenal of gear. Tripods vary tremendously in size, quality and price. If you’re serious about photography you should check out this article on how to select and buy the proper tripod. Better support will give you sharper pictures, but any tripod capable of supporting your gear without wobbling will do the job.
Remote Release
If at all possible you should use some type of remote release when doing long exposures. The smallest amount of vibration from pushing the shutter or even taking your hand off the camera during the exposure can ruin a picture. If a remote release is not available try using the time delay feature on your camera.
Settings
There are a few guidelines about settings that can be useful in night shots.
Shooting Mode
Shoot in manual mode. This will give you the best control over your exposure. Shooting in aperture mode with exposure compensation dialed in can achieve the same result as your exposures become longer it gets harder to control.
Aperture
For the F-stop you should use the sharpest F-stop setting on your lens. For pro grade glass this is usually F5.6-F8. For consumer grade lenses it is F9-11. Those are fairly small apertures so you’ll have to extend your shutter speed to compensate.
ISO
For your ISO you’ll want to use the lowest, cleanest ISOs unless you absolutely need a shorter shutter speed or smaller F-stop.
Shutter Speed
In most cases the shutter speed is going to be the main way you control your exposures with. On a tripod long shutter speeds are not a problem. One time when they might be is if you’ve got moving objects in the scene. If your shutter speed is long moving objects that emit no light of their own (like people walking) won’t show up in the picture at all. Objects that emit light (like cars) will only show up as a streak of light. You may need to alter your shutter speed (and therefore your F-stop or ISO) to get the look you want.
Shorter speeds will give you more detail of those objects while longer speeds will yield less detail and streaks of motion.
Mirror Lock Up
If your camera has a mirror lockup feature use it. The vibrations from the mirror slap can degrade image quality in long exposures.
White Balance
Setting the white balance in a night shot can be a tricky thing. Many times there are multiple light sources in the scene. Sodium vapor street lights, neon signs, florescent office lights, headlights and more. You should probably experiment with different white balance settings to see what color set gives you the best results or just leave it at Auto. Chances are you're going to have to compromise on some sources to get others right.
Setting Your Exposure
One of the choices you have to make when doing night shots is what your exposure is going to be. Thinking about your exposure for night shots you can break the scene down into three types of lighting: Direct, Indirect and Ambient
Direct lighting
The light of the actual lights themselves. You might want expose for direct lighting when shooting neon signs, outdoor Christmas lights and other scenes were the color and pattern of the light is the emphasis.
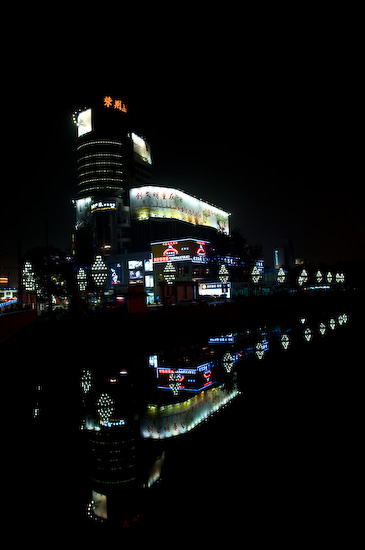
When exposed for direct lighting the lights and strongly illuminated areas are clear and colorful. The reflection is very sharp. There isn’t much detail of the building other than the black space between the lights.
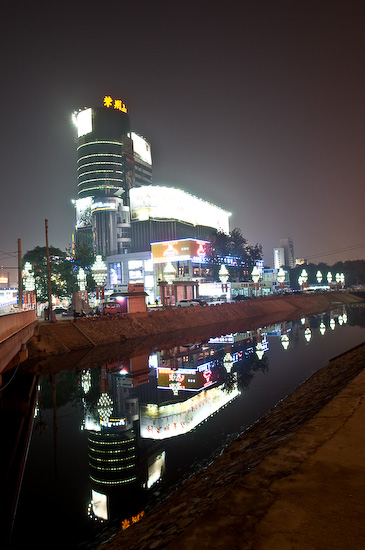
Indirect Lighting
Light directly reflected off buildings and surfaces and is usually significantly dimmer than the direct light. Your scene will be defined by glow of objects illuminated by that light.

When exposed for indirect lighting pulls up some of the detail of the building, gives a hint of the surroundings but at the cost of the color and detail of the strongly lit areas.
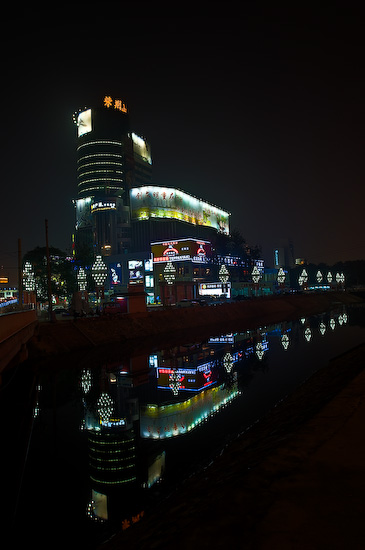
Ambient light is the background light on surfaces that are not directly lit. It is usually dimmer than indirect light. You might use this if you’re trying to show shape or texture of objects that don’t have any lights on them.
When exposed for ambient light you see the details on the building as well as what is along the edge of the canal. It even captures some of the glow created by the dust and smog ever present in most Asian cities. The lights and the signs are completely blown out as a consequence.
Bracketing
When shooting night shots it’s a very good idea to bracket your exposures. You may not know what the best exposure is going to be for a scene at the time. By shooting a 3 or 5 stop bracket you’re almost guaranteed to have whatever it is you’re looking for. You can also use the pictures to create a HDR image if you want.
HDR Image using a 5 shots, 1 stop apart in exposure.
The Best Time for Night Shots
When visiting foreign locations you may not have the luxury of planning when and where you can take your night shots. But if you do here are some things to keep in mind.
The Golden Hour
The best night shots are not actually taken at night. They are taken in the hour around sunset. Thirty minutes before to thirty minutes after is the rule of thumb. During this time period the level of ambient illumination is dropping below that of the city lights but is still enough to be a factor in the picture. It’s also the time when the sky tends to take on a nice pleasing blue glow regardless of the weather. You’ll get more dramatic scenes as a rule.
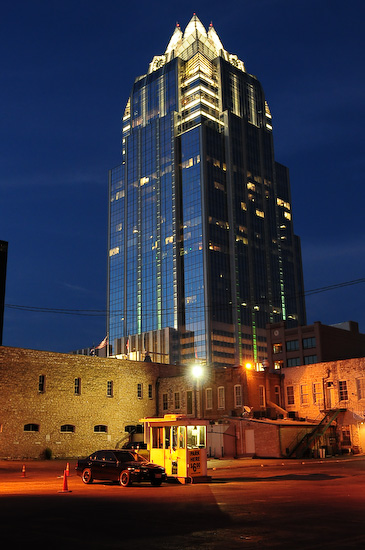
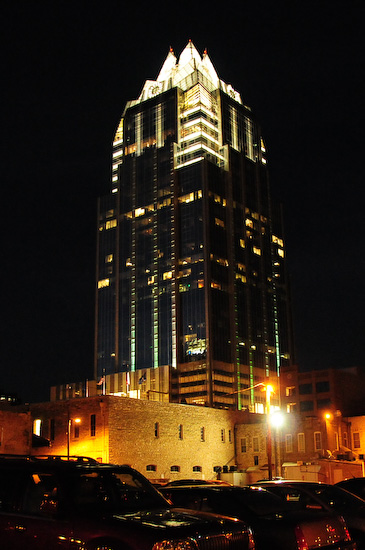
It’s not Asia but it illustrates the point. Two pictures of the same scene, during the golden hour, one after.
After the Rain
If it rained earlier during the day, especially in the late afternoon you’re in luck. A good rain will wash out some of the smog and haze that dominates the skyline in most Asian cities. You’ll get a clearer, crisper shot and if you're lucky some dramatic clouds.
If it just rained (or it’s raining on and off) you can make the most of it by looking for reflections of light on the slick streets and sidewalks.
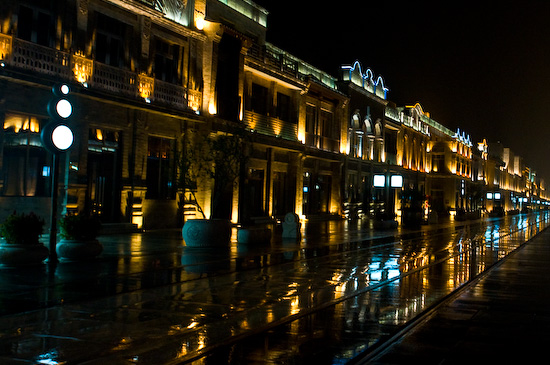
The lights of Quinamen street reflected off the rain slicked walkway.
A Cold, Clear Winter Day
If you’re doing cityscapes, winter is a good time to do them, especially when it’s cold. You’ve got a lot less heat being emitted by the cooling concrete and winter air tends to be dry and cold. As a result you should have less atmospheric distortion, shimmer and smog than at warmer times.
Thank you Tom!
Steve
Photography News of Interest
Occasionally something really unique comes on the market and the Panasonic G1 is really unique, and perhaps unique in a useful way to many of our readers. In the past if we wanted a compact travel camera we had to settle for the low image quality of the standard point and shoot compact, or the heft and bulk of the smallest DSLR’s in the APS-C format. Now, with the Panasonic G1 we have the best of both size/weight and image quality in a reasonable compromise. Read about it here.
The Nikon D3x has been recognized as having the highest image quality and highest resolution of any DSLR available. Dx0 now rates the sensor of the D3x as the best in the industry, significantly exceeding anything even close including the new Canon 5d Mark II, Nikon D700, Nikon D3, and Canon 1ds Mark II. The Digital Outback has started an excellent Review Diary on the D3x and you can read it here.
I love seeing things like this. Retired Army Veteran and photographer Will Vandeneynde wants to pay back something to the country that gave him so much, the United States. A native and citizen of the Netherlands remembers people dying on the streets of his country. After three days in a rowboat he was rescued by the U.S. Army and went on to serve in the U.S. Armed Forces. Now he wants to produce two free high quality prints of loved ones photographs to send to any U.S. personnel stationed overseas. You can read more about this here.
Historical Photos in Web Archives Gain Vivid New Lives. This article talks about Flickr, the photo-sharing site owned by Yahoo that has more than 3 BILLION PHOTOGRAPHS online. Read more about it here.
Readers' Submissions
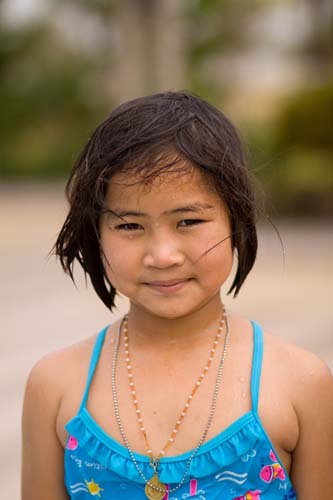
Canon 50d, 85mm F1.8 @ 1.8
The photo I sent is "Noon", the daughter of one of my wife's cousins. We took a truckload of nieces, nephews and their friends on a New Year's swim at a pool in Isaan. The weather was sunny and warm but the kids were "freezing". So it was a short outing. Noon is a great kid who lost her brother to brain cancer two years ago. I am very lucky to have a wonderful Thai family and appreciate when we can get together
Hi Steve;
All is well… just working / traveling too much. I enjoyed your BKKImages site this week and the photos. It's good that you could recover so quickly from your electrical and hardware problems.
The boatyard looks very interesting.
Have purchased two Canon lenses since we met, but not much time to check them out.
EF 85mm f1.8
and
EFS 10-22 f3.5 – 4.5 "wide angle" (but limited with 1.6 cropping).
I really like the 85mm lens.
Would also like to pick up a 50mm 1.4 primary lens. Any thoughts?
Seems like you are very busy with workshops, etc. Congratulations. We will be heading up to Isaan this weekend and I plan to get out and try the lenses. Would like to get together with you again in the near future. I have questions about DOF and the DOF button on the 50D and also fine points about LightRoom.
See you soon;
Take care;
Steve
Hi Steve –
The boatyards were a blast.. so many different perspectives, scenes, colors..
Curious why you got the 85mm F1.8 when you have the F1.2 version? AF speed?
The 10-22 I’ve heard is a very nice lens. The perspectives of an actual 16mm will give you a lot of options.
Have fun in Isaan. Let me know when you want to get together.. DOF is an area you’ll need to master and it's really hard to get it all even in several days of instruction. Nothing else will improve your compositions as much as mastering DOF.
Lightroom.. yes.. much more we can cover there..
Have fun in Isaan.
Steve
Sorry haven't seen you since Stick's first get-together. The photo on the 10th of January prompted me to poke through a couple of pictures taken while experimenting with night photography. I used a Sony H1 for this, but can't remember if I had the additional zoom attachment fitted.
The picture was taken just South of the bridge going over the Ping river at Khanu woralaksaburi.
Regards
Vincent

Hi Vincent –
Yes, it’s been a long time. When will you be in town next?
Great image! Do you mind if I run it in this week's column along with this email? The Readers Submissions area has been a bit light lately and an image like this could inspire others to contribute.
Take care
Steve
I suspect the readers submissions will be a highly anticipated section of this column and I encourage anyone with photographs and travel accounts they d like to share to please send them to me at: QandA@Bkkimages.com
Readers' Questions
Kees Sprengers is based locally in Thailand and is one of the best photographers I’ve seen when working in the rural environment of small villages. His language abilities are quite good and enable him to easily communicate and set people at ease. A while back he attended one of my individual workshops to expand his capabilities with Adobe’s Lightroom and to learn more about color profiling his monitors. We had a great time and his work was quite impressive. You can see more of his work by visiting his website here.
Hi Steve,
Some feedback, all positive.
I bought the 5DMkII, and it is brilliant, a great improvement on the 5D.
Better low light performance, and many other improvements.
Got the 24-70, and took both to a job in Laos two weeks ago, shot 4500 exposures.
It did everything except the 5% lower then 2.8, but no lens change, no dust, great pics.
Good advice.
LR2 is a wonderful tool, and saves a lot of time.
The Nikon leather handgrip you showed was a Godsend with many hours handling a hefty camera/lens combination.
I'll try and put some pix onto my site when I get back from this weeks trip to photo Pimai Jin in Northern Laos.
Hope all is ok for you and 'yours'.
Kees
Hi Kees –
Great to hear from you!
Nice to hear the 5dII is working out well. I hear it's a fantastic tool.
The 24-70.. great lens.. I'm glad you went that way.
LightRoom just keeps getting better. Photomatrix now makes a handy plug-in so you can export your choices into PM directly from LR.. nice.. and even PTlens has the same. I think Lightroom has helped make photography enjoyable and provided the most results for most of my clients who come through my workshop.
Hehe.. that Nikon strap is a jewel. I'm glad you were able to find one.
Still using my 5 year old 1ds2.. and hoping Canon announces the new 1ds4 before I lose patience and go buy the 5d2..
Take care
Steve
Please submit your questions to QandA@Bkkimages.com All questions will be answered and most will show up in the weekly column.
A Snapshot of Bangkok Images Week in Review
So far this has been a slow week so I’ve started thinking about a new design and improvements for my website and I took some much needed time to process some images for three new galleries.
If you’ve visited my website you’ve noticed it’s “Cooliris” enabled. Cooliris is a very cool 3d photo interface that allows you to see all the images on a website at once on a big 3d wall of photos. You can easily cruise through the images, choose one to see in a larger view, or even go to a more traditional view. This is a lot of fun. What many don’t realize is that Cooliris is also a photo search engine and the easiest way I know of to find great photographs on just about any subject. Type in “cat” and watch thousands of cat pictures appear on the 3d wall, type in “F/A-14 Tomcat” and see as many pictures of jets fill the way. This is a lot of fun! You can download the Cooliris plug-in for your browser here. Don’t forget to try it out on my site first!
Three new galleries on Bangkok Images:
Sanctuary of Truth II
Samut Songkram Boat Yards
Chotika River Front Hotel, Samut Songkram
Infocus Blog
An “ideal” imaging workstation
Over the last few weeks I’ve talked about repairing and minor upgrades for my imaging workstation and I mentioned that I would be upgrading my entire workstation later this spring. Since, several people have asked me exactly what makes a adequate imaging workstation and what I’ll be upgrading to myself.
Interesting questions. I’ll be happy to share my current upgrade plans with the caveat that by the time I actually order parts newer or differently priced technology might sway my choices. The hard part is trying to determine what makes the ideal imaging workstation for others when I don’t know your budget or needs.
What I’ll do, is divide this into two different systems. One being a low end system that will perform just fine for someone who doesn’t process tons of images, and a higher end system for someone who does process a ton if images and computing speed is a great factor.
Minimum system:
Keeping current price points in mind I don’t think it would pay to go any lower than these choices. The prices are rough estimates in USD based on what I’ve seen on-line. Also, I’ll only be discussing the motherboard, RAM, CPU and power supply because the rest of the system (case, optical drives, hard drives, keyboard, monitors, etc) are based on user defined requirements. I will share what I’ll be building though. As you’ll see, the main cost of a system is in the parts I’m not covering. The motherboard, CPU, and RAM costs becomes relatively insignificant compared to the total cost of a complete system.
Motherboard: Intel 975xbx Roughly $110. This is a very reliable and stable board that had been on the market long enough to expose any bugs or reliability issues. It has none. There are many choices of great motherboards in this price range.
CPU: Intel Core 2 Duo 2.66ghz E6700 series. Roughly $90. This was state of the art three years ago, but today is the minimum CPU I’d recommend. It has the large caches and is fast/capable enough to crunch images at a moderate pace.
RAM: 4 gigs of DDR2 800mhz. Approximately $85 at current prices. There is no need to buy more for most purposes and it doesn’t make sense to buy less at current prices.
Power Supply: Antec, Thermaltake, or PCpowerandcooling brands. Buy at least a 500 watt model. These are top brands and will cost you from $125-$200. You could buy 500 watt supplies for as low as $25 but I’d recommend against it.
Input and output devices should be as good as you can afford. The best mouse, keyboard and monitor will only allow you to work faster and enjoy the system more.
You don’t need a powerful graphics card for imaging workstations but you should get one powerful enough to run the Vista Aero interface, not for the Aero interface, but because a card that is rated for the Aero interface will tend to be very compatible and have all the power you need for imaging processing. This means almost any card in the Nvidia 7000/8000/9000 series. You can find these for under $75.
Monitors, look for S-IPS panels, the largest size and best quality you can afford. You can find 19” S-IPS LCDs for $150-$200.
Hard drives, top quality pays here for reliability and not losing data, as well as speed and size. I’d recommend nothing smaller than a 1tb (terabyte) drive because they’re now under $100, unless you’re using multiple hard drives and you want to buy a faster higher performance drive like Western Digital’s Raptors series. In this case a 150 gig Raptor makes for an ideal system drive, and at least a single 1tb drive for your storage needs.
My current planned upgrade:
Motherboard: Asus PB6T Deluxe. This is about $250 and allows overclocking and very stable operation.
CPU: Intel i7 at 2.66ghz. This is a quad core chip that allows 8 threads. It runs about $280 and can easily be overclocked to a reliable 3.8gig if you so desire. This makes the 2.98ghz i7 at near $600 not the economical choice, especially when you know they can both be overclocked to the same speeds. I’ll be cooling the CPU with the Thermaltake 120 Extreme tower with a quality 120mm fan mounted to move airflow through the fins. This is one of the best air coolers available with easy installation.
RAM: A minimum of 8 gigs of 2000mhz DDR3 RAM. Current prices are about $380. Slower RAM that would work fine in this system can be found for less than half this price.
Power Supply: I’ll be choosing the PCpowerandcooling Silencer 920watts. This is a superbly built power supply with enough power for my system components and is fairly quiet in operation. I try to choose power supplies that not only provide very clean power under heavy load, but that typically output twice the power I’d normally use. This means that no matter how heavily I use my system the power supply will be supplying ripple free clean DC voltage and staying cool and quiet at the same time. If for instance I installed a 500 watt power supply, it would have enough power to do the job, but it would be working very hard at its limits, which means much more heat and noise and the power would be less clean (as a rule). This power supply retails for under $300.
Case: Lian li makes excellent cases. I’ll be getting something along the lines of what I have now, a V1000b. It’s a high quality aluminum case with great airflow, silent fans, very easy access, space for 12 internal hard drives and 8 external drives. It’s a huge case, but when it comes to cases the bigger the case the less heat build up and usually the most airflow. The Lian li case I have now makes any repairs or maintenance very easy. This quality of case runs about $250.
Graphics Cards: I’m not a gamer, but if you are the graphics cards are major considerations. On the other hand I use multiple monitors and I expect to be processing a lot more HD video in the future so the gamer graphics cards will fit my needs better than anything else. The big question these days is do you go with ATI’s Crossfire system or Nvidia’s SLI system. At the moment Nvidia’s drivers are significantly more stable for x64 bit operating systems and in my experience a lot more user friendly for running a HDTV. Chances are I’ll be going with two dual GPU Nvidia cards such as the new GTX 295’s in Quad-SLI mode. This will give me four LUT’s (look up tables) which means I can run four color profiled monitors. I color profile my HDTV and my image monitors so I need the four LUT’s. This choice of cards is more personal and luxury than necessary, and will run approximately $600.
Monitors. I’m still researching this. Chances are I’ll end up with two 21.5” 1600×1200’s, a 30” 2560×1600, and finally a 50” 1080p HDTV driven at 1920x1080p. I use my system not only for image processing, but also as a sort of TIVO that drives my HDTV. Four monitors might seem like overkill, but if you ever use a system with 3-4 monitors for any length of time you’ll soon learn how productive multiple monitors can be. There have also been many studies showing that using dual monitors over a single monitor can increase productivity something like 40%, and adding a third of fourth monitor even more. People with doubts have watched my workflow and after a few minutes comment they can’t believe how easy everything seems to be with multiple monitors. Soon, they’re on the way to the stores to buy an extra monitor for themselves. I wish I could give you the cost on these, but since I haven’t made my selections I don’t even want to guess. I can tell you my current monitors and HDTV cost in excess of $10,000. I expect prices to be a lot less this time around.
Hard Drives, Storage: This is another area I haven’t decided yet. It’s also another area where new products are announced almost every week so my choices could change. I plan on one SAS (these are very fast compared to SATA) system drive with a capacity of 300gigs or more, and three 1-2tb SATA II drives (this will be changed to SAS drives if they come out with them by then) for my working storage. In addition I’ll be driving eight (8) 1-2tb SATA II (or SAS) drives in a RAID 50 configuration using a Promise Technologies EX8350 RAID Controller. This will give me 6-12tb’s of primary RAID storage in the case in addition to the 3-6tb’s of working storage. This probably sounds like overkill once again, but I keep my systems for years and I suspect in 2-3 years this amount of storage will be common. Currently I have 4tb’s of RAID storage and 3tb’s of working storage, and 3 years ago that was considered overkill.
Other extras like my Wacom graphics tablet(s), Logitech diNovo Edge Keyboard, Logitech MX mouse, and other small items will also be upgraded.
This all sounds rather extreme doesn’t it? Some of you may think I actually enjoy “living” on my workstation? Nothing could be further from the truth, the less time I spend on the computer the more happy I have. Less time in front of the workstation is my goal.
The hard reality of my profession is that a significant amount of time must be spent on a workstation to complete my workload. There’s no getting around this.
The more powerful the workstation, the more productive it is, the easier it is to use, the more reliable the system, this all means the less time I need to spend using it.
How much difference does it make? Several years ago when running my studio in Oregon a computer upgrade saved me over 30 hours PER WEEK in workstation time! 30 hours is a lot of time. Much of this was spent running files through a process, letting the computer crunch the files, and then coming back to further process them when the computer was done. This had me jumping back and forth through 4-5 tasks in the studio while trying to maximize my time. This sort of thing can make you feel hurried and even a bit nervous. A simple computer upgrade allowed me to process the files in real time and greatly simplify my life.
How much time will this next upgrade save me? Probably not 30 hours a week, but perhaps as many as 10-15.. time which could be better spent behind the lens of my camera or traveling to interesting places. This is worth the actual cash it will take to build the system.
I hope all this helps you when considering your own computer upgrade.
