Introduction to RAW, DPRK Part 2
![]()
|
• Flora Hotel Apartments • Flora Park Hotel Apartments • Fortune Hotel Dubai • Grand Moov Hotel |
Feature Photograph
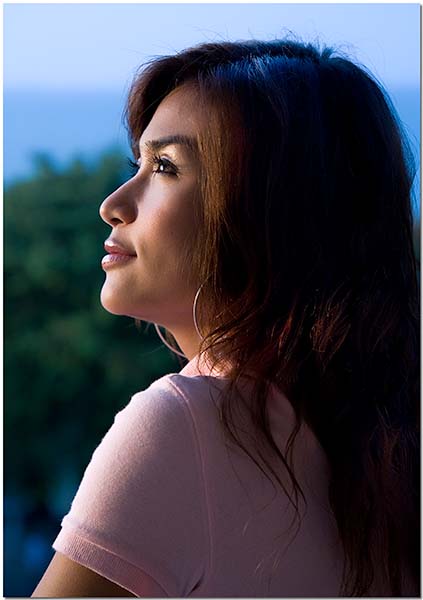
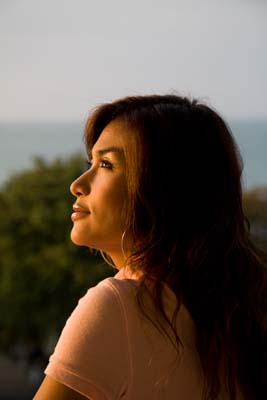
This weeks feature photograph is significant because it’s all about light. I’m going to share with you how I captured this image and under what circumstances, and then in the learning topic below take you step by step through it’s processing. You might already have images on your computer which could benefit from these steps and be turned into really nice images, but until now you’ve not considered them because you didn’t know what was beneath the surface.

Two years ago I found myself with my Canon 5d and 24-105/4 IS lens atop a hill in Pattaya snapping pictures of the bay with a friend. The 5d at the time was my small camera and I’d carry it in my knapsack ready for whatever interesting presented itself. This was the very late afternoon and the sky had already turned black. If you took a “accurate” picture of the bay at this time you’d get a black sky, boats with lights, buildings with lights, etc. .and I took some just like this. Looking over at my friend enjoying the view I noticed the subtle light coming from the sodium filled street lights filtering on her face. You really had to look because these lights are anything but directional and bright.
A future learning topic will cover how even after the sky is black to the naked eye, to the camera sensor its often full of amazing colors just waiting to be captured. Knowing this and watching her enjoy the view I decided to try something unique. I wanted to “overexpose” the black sky for color, while also capturing more of the street light falling on her face through the same longer shutter speed needed through the sky. I also wanted a fairly detailed image, sharp, and something that could be enlarged to at least 11×14”. The 5d was the perfect camera for this particular setting because it performs very well in low light with high ISOs and very high ISOs was exactly what I needed to achieve the settings necessary for my visions.
I stopped the lens down to F5.6, set the ISO to 1600, and the shutter speed to 1/10th which is possible with image stabilization if you’re very careful and brace properly. Without the capabilities of ISO 1600 I would never have been able to use the F5.6 and 1/10th necessary for the image detail/sharpness and perfect exposure. The street light imitated a studio strobe with an attached softbox, and provided an almost perfect directional light that highlighted her face, eyes, and at the same time back lighted the contour of her face. A technique I often use in the studio for high-end portraits. But this time I was outdoors, performing ad-hoc, and only had a simple camera and lens.

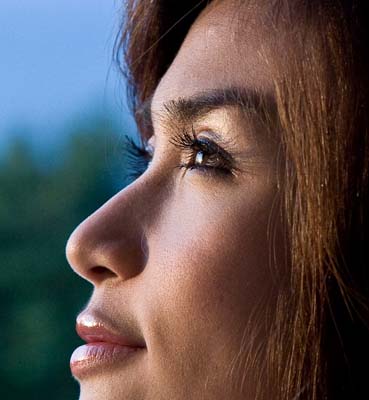
I’m sure you’re asking yourself “well, at ISO 1600 the image must be very noisy (heavy grain) and show little detail when zoomed in” and most often you would be right. But by nailing the correct exposure (in this case by less than 1/3rd of a stop) you drastically reduce the noise and proper technique ensures you get all the sharpness possible from your equipment. Look at a crop of the face below.
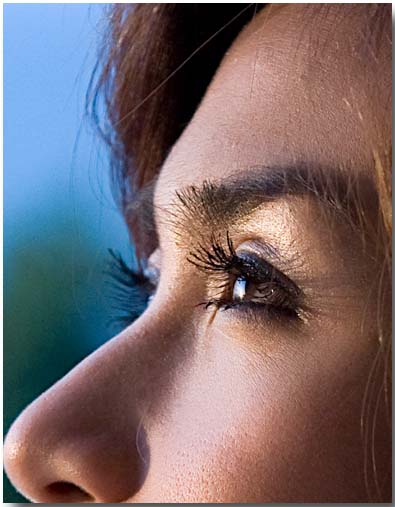
The finished image shows very little noise and a fair amount of detail. You can even see the pores in her skin, individual eyelashes, and stray hairs. Not quite the quality you’d get in the studio under perfect conditions and shooting at ISO 100, but still very good.
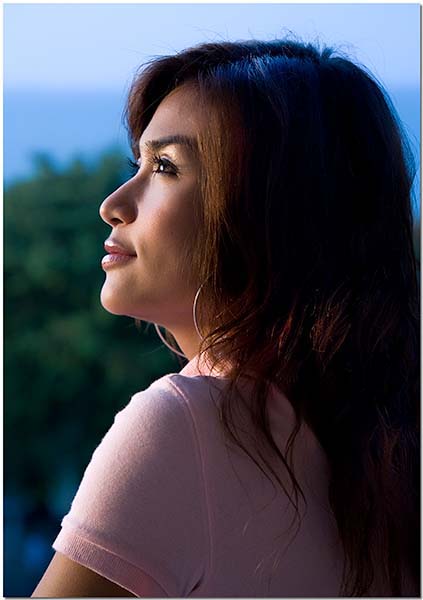
Next time you’re out there taking pictures, even in the dark, don’t be afraid to run the variables through your head and think outside the box. You just might “see” an image most wouldn’t. This type of image will often be the ones that please you the most. Read the learning topic below to see how this image was processed.
Weekly Photo Outing

This week we have the second and last part of Akulka’s excellent series from the Democratic Peoples Republic of Korea (DPRK). I’ve really enjoyed the photos and narrative and I hope you have too. In the coming weeks look for more detailed submissions in the Stickman Bangkok Readers Submissions area from Akulka on his trip to the DRPK. Thank you Akulka! You can contact Akulka at argonaut942@gmail.com.
Travelling to North Korea last month, this strictly totalitarian and secretive nation that usually no one would idly choose to visit, has confirmed some rumors and debunked other myths. One of them in many people’s minds is that the North Koreans are nothing more than socialist automatons, hard-line communist in their outlook, and aboulic citizens of a warmongering pariah state remote-controlled by their dangerously ludicrous screwball leader Kim Jong Il.
While it is true that by and large the North Koreans are very conservative and strict in their political philosophy, the people I’ve met confirmed what I had personally hoped for and expected all along, which is that they are basically nice people that have radically different ideas about the world. And unsurprisingly so really, considering that they are citizens of nation exhibiting a political construct built to fulfil a grand ideological vision, and where militarism pervades everyday life.
The objective fact is that the Democratic People’s Republic of Korea is a country unusually homogeneous in its culture and populace. Basically leading their lives almost completely cut off from the outside world, the overwhelming majority of its people have never had a chance to get in touch with foreigners in their entire lives. Visitors to North Korea are preciously sparse, and there are virtually no foreigners living permanently in the nation.
At the same time the popular image of foreigners as a bunch of big-nosed devils that want to kill them remains stuck in many Koreans’ minds, spurred by unvarnished government propaganda that ceaselessly conjures up images of foreign aggressors who bombed them in the 50ies’ and who still plot against them today from dark lairs around the world.
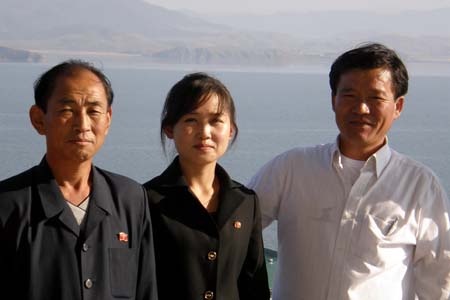
The vice president of Nampo City’s shipyard posing with my tourguides Ms. Kim and Mr. Lee.
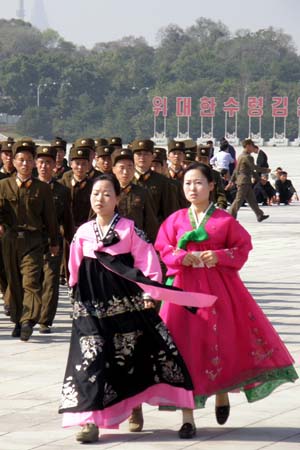
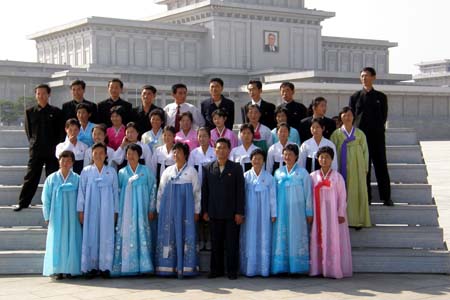
A party of visitors dressed in their best garments gathered for a photo shoot in front of to the sacred-held mausoleum holding “Great Leader” Kim Il Sung’s embalmed remains.

Hustle and bustle on the oceanic plaza in front of Kim Il Sung’s mausoleum.

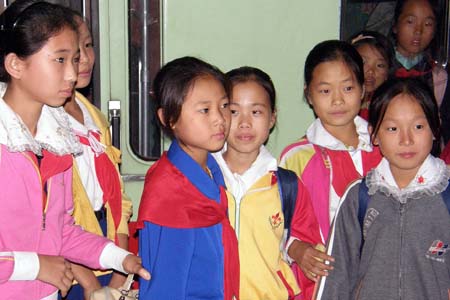
School kids in the metro on their way to a picnic.

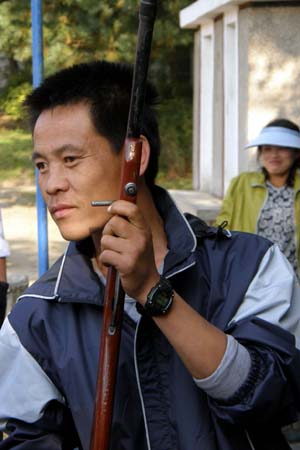
Man in charge of one of many shooting ranges at Pyongyang’s central funfair.
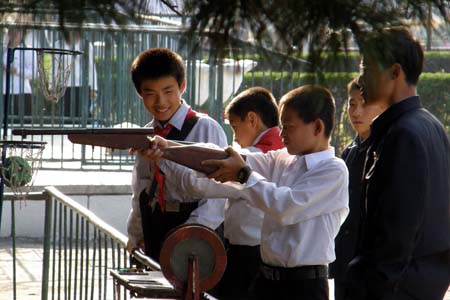
Aiming at targets representing the imperialistic enemies of the nation.
An officer guiding tourists at the De-Militarized Zone.
A young boy greeting me with the socialist salute.
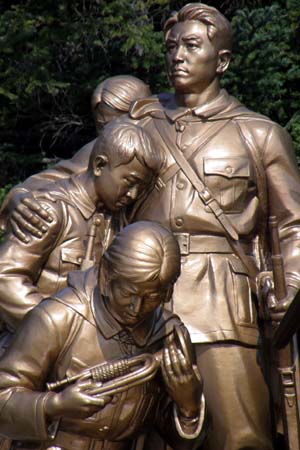
Statue at the Martyr’s Monument in Pyongyang.
Weeping for the brave heroes of the Korean War that never returned from battle.
Introduction to RAW
Every digital camera captures raw data from the sensor and processes it through the analog to digital converters making it available to the cameras CPU. Almost 100% of consumer compact cameras take this data and using the cameras CPU and a program in the cameras firmware, convert this raw data to the jpeg files you’re used to seeing from compact cameras. The firmware program applies a set of parameters common to what the ‘camera thinks’ you need, and you get a jpeg file as a result. This file might be perfect, but most often it could stand some corrections/changes.
The problem with jpeg files it that every time you open and save a jpeg file, it induces image degradation. More, you are very limited to what you can do with a jpeg image. DSLRs (digital single lens reflex) and a small handful of compacts (Canon G9, G10, Panasonic Luminx 3, Nikon P6000) make the raw data available to the photographer. Some parameters (such as white balance) can be adjusted with very little image degradation, while others can be adjusted much more than a jpeg but still suffers a quality loss. To process RAW files you’ll need your manufacturers included raw converter software, or a good aftermarket software package like Adobe’s Lightroom or Phase One’s Capture Pro. Let me introduce you to the processing of a very difficult raw file and show you the magic within.
Above is an image right out of the camera. This would look the same whether or not I outputted it as a jpeg or a raw file. The difference is what I can do with it and still maintain image quality. Notice how the colors are way off? The skin tones are wildly inaccurate and most people would either delete this image in camera or just discard it later. Lets see what we can do with it. First we’ll adjust the white balance.

WOW! Can you see the dramatic effect of just being able to adjust the white balance? (I also cropped to taste) No other adjustment was made. White balance ‘usually’ results in zero image degradation. It can degrade the image in more extreme circumstances and I’ll get into how this happens in a future topic.

Now you can see I’ve brought the exposure up exactly 1/3rd of a stop and we now have the correct exposure. Most people would be happy with the correct exposure and the correct white balance but lets go further. Take a look at the image below.

It’s a face of life that 99.9% of humans have blemishes of some sort, usually temporary and brought on by stress or cycles. In this case we can see several small blemishes, one on the nose, under the eye, and on the forehead. You’d probably not notice these in person, or on a 5×7” print, but you would on a 11×14” print where the size of the head almost doubles its life size. Using our healing brush the blemishes are removed in seconds.
With the blemishes removed we want to eeekk out the maximum detail from this image without creating sharpening artifacts or halos, sharpening errors common even with experienced amateurs. They go too far with a good thing.

With this particular image, especially considering it’s high ISO, I chose to not use your standard Lightroom or Photoshop unsharp mask or sharpening features. Instead I used a program called Focus Magic which in the mode I used it actually realigns the pixels for maximum sharpness without inducing artifacts. Check it out here.
After achieving the most detail can you believe the final action I want to do is remove detail? Its not hard to use Photoshop to soften skin and give an overall softer look, but it’s much better to selectively soften that which you want softened (skin and background noise (grain), while leaving the areas where detail helps make the picture (eyes, hair). For this purpose I used Kodak’s excellent Airbrush Pro. You can check it out here. Now we have a presentable image ready for print that looks much better than most would expect from ISO 1600 and totally looks different than the darkness it was taken in.
Photography News of Interest
Before Adobe’s Lightroom dominated the raw converter market Phase One’s Capture One Pro was my converter of choice. It offers a conversion unmatched when it comes to fine color tones and contrast, but the interface was clunky and didn’t lend itself well to high volume sessions. Recently Phase One has released an much upgraded version of their Capture One Pro, version 4.5.1.
This is a major upgrade and I’m still test driving it to evaluate it against Lightroom. I very much doubt it will unseat Lightroom as the most used raw converter, but it will probably be the converter of choice for studio professionals desiring
tethered operation. Check it out here.
Every good thing, or maybe in this case a bad thing, must come to an end and such is the case with the company who brought us the disposable camera. You can read about it here.
This teenager is getting her images published in a significant magazine. At 17 she’s achieved what many don’t, probably not because of her photography skills, but because she still has the youthful confidence born from optimism and looking outside the box. It’s not that hard to get published, something to consider if you have the desire. Read her story here.
Readers' Submissions
There were not readers submissions this week. If you have anything you want to share now is a great time to put a few together and email them off to me. I think you’d be surprised how many readers enjoy everyday travel pictures and even a bit of narrative.
I suspect the readers submissions will be a highly anticipated section of this column and I encourage anyone with photographs and travel accounts they d like to share to please send them to me at: QandA@Bkkimages.com
Readers' Questions
Steve;
How do you clean your lenses? I have a tough time with sprays and lens tissues and never seem to get them as clean as they should be.
Great Weekly!
Raymond:
Raymond –
You’ve come to the right guy as I have a ton of lenses I keep clean. I try very hard to stay away from the liquids when cleaning the lenses and when I do use any “lens cleaner” liquid I’m very careful to ensure I’m using a liquid that doesn’t damage the lens coatings. Lens coatings change over the years, so chances are if you have several lenses you will also have several different types of coatings. One liquid cleaner could be fine on one lens, and damage the coating on another.
Some of the old pros used to use very soft t-shirts and their hot breath to clean their lenses and filters. Believe it or not this works great. The problem is not everyone has the same definition of “soft t-shirt” and often if you’re not very careful the t-shirt will pick up abrasives such as small pieces of sand or dirt and will end up scratching the hell out of your lens in your attempt to clean it. Lens “tissues” are practically worthless, so what is a photographer to do?
I buy boxes of 24 each microfiber clothes expressly made for lens cleaning and they come sealed in reusable ziplock bags. They are neatly folded in the bags so I know they’ve never been unsealed. I remove one from the bag, breath hot air on the lens/filter, and using the microfiber cloth gently clean the lens/filter until perfect.
When I’m done with the cloth I don’t fold it, instead I roll it up and put it back in the Ziploc and them back in the bottom of my camera bag. The next time I need one I’ll use a fresh one thereby ensuring no abrasive particles scratch my lenses.
Never fear, we can reuse the used microfiber clothes. I run a cycle through my washing machine empty to be sure there are no particles in the machine, and then using the delicate cycle and NO SOAP I wash the microfiber clothes. I usually wait until I have 20-30 of them. Once clean I use an anti-stat dryer sheet such as Bounce to make sure any particles are detached, and then in a very clean area I carefully inspect and neatly fold each cloth before placing them back in their Ziplocks and back into use. This has worked great for me.
Good shooting!
Steve
Please submit your questions to QandA@Bkkimages.com All questions will be answered and most will show up in the weekly column.
A Snapshot of Bangkok Images Week in Review
This was a fun week. We held a two day individual workshop on street photography, and then spent a great night out on the klongs for the Loy Krathong festivities.
Infocus Blog
This week I find myself thinking about the newest technology and how it affects high ISO performance. My personal needs and style benefits greatly from being able to shoot at higher ISOs so this is a major feature/improvement I look for when deciding if I want to upgrade to the newest and latest model.
Once you reach the professional level and shell out $8000.00 USD for the best camera body you really want to get some good use from it. Over four years ago I purchased my last professional camera body and even through it costs half as much as a new car I’ve more than recovered my costs, maybe 200x over. Still, just because I’ve made good money with this body, it doesn’t mean I’m ready to set it on a shelf to collect dust and shell out another $8000.00 for the latest model just to have the latest model. No, the latest model must not only have new and useful features, but it must also exhibit a higher image quality in the way of high ISO performance, color tones, and resolution with the emphasis for my needs being high ISO performance.
The replacement model came out last year and I patiently waited for the reviews and was even able to try the replacement a friend had purchased. Because they upped the resolution from 16.7mp to 21mp, the high ISO performance was minimal. It’s very difficult for manufactures to increase both resolution and high ISO performance, and any improvements are more likely to be incremental than significant. IMO this was the case between my older model and it’s replacement.
However, technology marches on and image quality continues to improve even as resolution increases. I think we’ll see this evident when Canon releases the new 21mp 5d Mark II. Unfortunately this is not a professional body in the sense that I need a professional body. So I wait. For what? I’m hoping the new technology demonstrated in the new 5d Mark II, and perhaps some more improvement, will be in the next professional replacement body. By this time about 5-6 years will have passed, 5-6 years of new technology will be included, and the differences will then be worth another $8000.00 USD’s from my pocket.
